
Appetizers
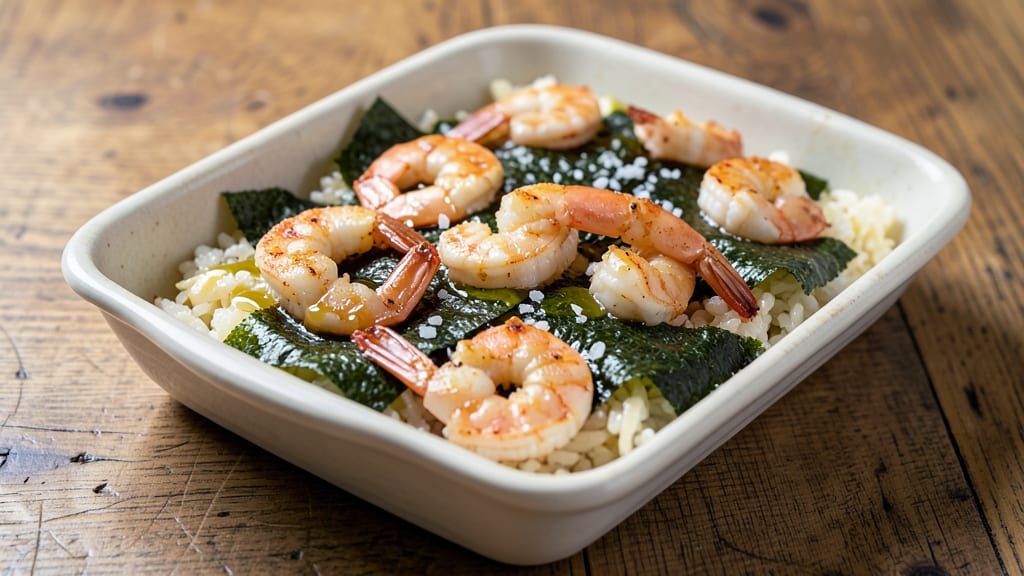
This shrimp sushi bake recipe transforms traditional sushi flavors into a crispy, cheesy casserole that’s perfect for sharing. The combination of perfectly cooked shrimp, tender sushi rice, and a golden, melty cheese topping creates a dish that’s both satisfying and restaurant-worthy.
I’ve refined this recipe over years of testing—balancing textures and flavors to ensure every bite delivers that perfect mix of savory, umami, and cheesy indulgence.
The secret to success lies in the preparation: searing the shrimp just enough to lock in flavor before baking, using short-grain rice for ideal texture, and layering ingredients in a way that guarantees a crispy, bubbly top while keeping the shrimp juicy.
This isn’t your typical sushi roll—it’s a hearty, one-dish meal that brings the essence of Japanese cuisine to your table with modern convenience. The result? A dish that’s crispy on top, creamy in the middle, and packed with flavor in every bite.
What makes this recipe stand out is how it adapts traditional techniques—like properly seasoning the rice and cooking the shrimp—to a baking method that’s foolproof and delivers professional results.
Whether you’re hosting a gathering or simply craving a comforting meal, this bake brings together the best of sushi and comfort food in one satisfying package. Ready to bake? Here’s how to make it perfect every time.
This dish pairs beautifully with a side of seaweed salad or steamed vegetables, but it’s equally delicious on its own. The crispy cheese topping adds a satisfying crunch, while the shrimp remains tender and flavorful.
Best of all, it’s a recipe that’s easy to scale—doubling the ingredients for a crowd or halving for a lighter portion. Let’s get baking!
Ingredients for shrimp sushi bake
Shrimp, rice, and cheesy goodness—this bake brings sushi flavors to your table with zero fuss.
| Ingredient | Amount | Notes |
|---|---|---|
| Large Shrimp (Peeled and Deveined) 🦐 | 1 ½ lb | Frozen works if thawed properly |
| Short-Grain Sushi Rice 🍚 | 2 cups | Uncooked, Koshihikari preferred |
| Rice Vinegar 🍶 | ⅓ cup | Seasoned preferred for flavor |
| Sugar 🍚 | 2 tbsp | Granulated, for rice seasoning |
| Salt 🧂 | ½ tsp | Kosher or sea salt |
| Extra-Virgin Olive Oil 🫒 | 2 tbsp | For searing shrimp |
| Garlic Cloves 🧄 | 3 cloves | Minced for shrimp seasoning |
| Ginger (Fresh) 🌿 | 1 tbsp | Grated, for shrimp marinade |
| Soy Sauce 🍶 | 2 tbsp | Low-sodium preferred |
| Sesame Oil 🫒 | 1 tsp | Toasted, for aroma |
| Shredded Mozzarella Cheese 🧀 | 2 cups | Low-moisture for crispy top |
| Shredded Cheddar Cheese 🧀 | 1 cup | Sharp preferred for flavor |
| Panko Breadcrumbs 🍞 | ½ cup | For extra crunch |
| Green Onions 🧅 | 3 whole | Sliced thin for garnish |
| Sesame Seeds 🌾 | 1 tbsp | Toasted for garnish |
The shrimp is everything here. Wild-caught or sustainably farmed makes all the difference—look for plump, uniform tails at Whole Foods or your local fishmonger. If using frozen, thaw in cold water (no warm bath!) and pat very dry before searing. The rice? Koshihikari or Calrose is non-negotiable for that perfect sticky texture. I grab mine in bulk from Asian markets—way cheaper than the tiny packages at regular stores. And don't skip the seasoned rice vinegar—the sweetness balances the umami perfectly.
No sesame oil? Toasted peanut oil works in a pinch (same flavor profile, just nuttier). Short on ginger? Substitute 1 tsp ground ginger, but fresh is worth the squeeze. The cheeses can be swapped—Parmesan instead of cheddar adds a salty kick. For extra crunch, mix crushed potato chips into the panko. Pro tip: Toast the panko in a dry pan for 2 minutes before adding—it gets way crunchier that way. And if your shrimp is already cooked (like those pre-cooked frozen ones), skip the searing step entirely.
This bake reheats like a dream—just pop it under the broiler for 3-4 minutes to get that crispy top back. Store leftovers in an airtight container for 3-4 days, but honestly? It disappears faster than that. The rice dries out if reheated too long, so I portion mine into individual containers before baking—microwave-safe ones work great for single servings. Freezes beautifully too—up to 2 months—just bake straight from frozen with an extra 10 minutes. Garnish right before serving (that crispy panko loses its magic if added too early).
Why You'll Love This Recipe
- One-Pan Magic: I swear by this recipe when I’m too tired to wash dishes. The shrimp and rice bake together—no chopping, no fuss—just a sheet pan and 20 minutes later, dinner’s ready. Honestly, the only cleanup is my kids’ sticky fingers.
- Sweet-Salty Balance: That simple mix of rice vinegar, sugar, and salt transforms plain rice into something ridiculously good. The shrimp stay juicy while the edges get a light crisp, and the vinegar’s tang cuts through the richness—like a mini sushi flavor explosion without the rolling.
- Lunchbox Hero: Between us, this is my secret weapon for meal prep. I bake a big tray on Sunday, slice it up, and pack it for lunches all week. The rice stays fluffy, the shrimp holds together, and my coworkers actually finish their portions. (Yes, even on a Tuesday night.)
- Budget-Friendly Luxury: Fresh shrimp can feel fancy, but this recipe stretches it perfectly. A pound of shrimp and a bag of rice feed four people, and the vinegar-sugar mix costs pennies. It’s the kind of dish that makes takeout feel like a splurge—without the guilt.
Step-by-step instructions for shrimp sushi bake recipe
This foolproof method delivers perfectly cooked shrimp, crispy cheese topping, and fluffy sushi rice every time.
👨🍳 Step 1: Prepare the Shrimp Marinade and Seasoning
In a small bowl, combine the 2 tablespoons soy sauce, 1 teaspoon sesame oil, 3 minced garlic cloves, and 1 tablespoon grated fresh ginger. Mix well until fully incorporated. Add the 1.5 lb large shrimp (peeled and deveined) to the marinade and toss gently to coat evenly. Let the shrimp marinate for 15-20 minutes at room temperature while you prepare the rice.
This marinade infuses the shrimp with bold flavors while keeping them tender. If using frozen shrimp, thaw them completely first—partially thawed shrimp won't cook evenly. I like to pat the shrimp dry with paper towels before marinating to ensure maximum crispiness when seared.
🍳 Step 2: Cook the Sushi Rice and Assemble the Base
Rinse the 2 cups short-grain sushi rice under cold water until the water runs clear, then drain well. In a saucepan, combine the rice with 2 cups water, 2 tablespoons sugar, and ½ teaspoon salt. Bring to a boil, then reduce heat to low, cover, and simmer for 15 minutes. Turn off the heat and let it steam for another 10 minutes without lifting the lid.
While the rice cooks, preheat your oven to 375°F. Lightly grease a 9x13-inch baking dish with 2 tablespoons extra-virgin olive oil. Once the rice is cooked, fluff it gently with a fork and transfer it to the prepared baking dish, spreading it evenly. Mix the 0.33 cup rice vinegar into the rice using a spatula until fully incorporated.
🥘 Step 3: Sear the Shrimp and Layer the Cheese Mixture
Heat 1 tablespoon extra-virgin olive oil in a large skillet over medium-high heat. Add the marinated shrimp in a single layer and cook for 2-3 minutes per side until they turn opaque and slightly pink—they'll finish cooking in the oven. Remove the shrimp from the skillet and set them aside.
In a small bowl, mix the 2 cups shredded mozzarella cheese and 1 cup shredded cheddar cheese until well combined. Sprinkle half of this cheese mixture evenly over the rice in the baking dish. Arrange the cooked shrimp in a single layer on top of the cheese, slightly overlapping if needed. Sprinkle the remaining cheese mixture over the shrimp, then cover the entire dish with the ½ cup panko breadcrumbs for that perfect crispy topping.
🔥 Step 4: Bake Until Golden and Bubbly
Place the baking dish on the middle rack of your preheated 375°F oven and bake for 15-18 minutes until the cheese is bubbly and golden brown on top. The panko breadcrumbs should be crispy, and the shrimp should turn pink and opaque all the way through.
Real talk: Don't open the oven door during baking—this causes the cheese to sink and lose its crispy texture. If you're unsure about doneness, check the shrimp's internal temperature with an instant-read thermometer—it should reach 145°F. Let the bake rest for 5 minutes before serving to allow the cheese to set slightly.
🍽️ Step 5: Garnish and Serve Immediately
Remove the dish from the oven and let it cool for 2-3 minutes. Thinly slice the 3 whole green onions and sprinkle them evenly over the top. Toast the 1 tablespoon sesame seeds in a dry skillet over medium heat for 1-2 minutes until fragrant, then sprinkle them over the dish as well.
Serve the shrimp sushi bake immediately while the cheese is still melty and the panko is crispy. The contrast of fluffy rice, tender shrimp, and gooey cheese with that crunchy topping makes this dish absolutely incredible. Pair it with a simple cucumber salad or steamed edamame for a complete meal!
Pro Tips For Making Shrimp Sushi Bake
- Pat Shrimp Dry: DESCRIPTION:
- Cook Rice Vinegar First: DESCRIPTION:
- Don’t Overmix the Rice: DESCRIPTION:
- Bake Until Shrimp Curves: DESCRIPTION:
Perfect pairings for these flavors
Crispy Top Secrets
For that perfect golden crust, I recommend mixing ½ cup panko breadcrumbs with 1 tablespoon melted butter before sprinkling over the cheese. The butter adds richness and helps the panko adhere better.
Toast the panko in a dry pan for 2 minutes before adding it to the dish—this boosts its crunch significantly. 🔥
Sauce Pairings
A drizzle of spicy mayo (mix ¼ cup mayo with 1 teaspoon sriracha) adds a tangy kick that cuts through the richness. For something lighter, try yuzu kosho sauce—just 1 teaspoon yuzu kosho paste mixed with 1 tablespoon soy sauce.
Both elevate the dish without overpowering the shrimp flavors.
Side Dish Harmony
Serve with miso soup for an authentic touch—the umami broth complements the cheesy bake beautifully. A simple cucumber salad with rice vinegar and sesame seeds adds freshness. For extra protein, include steamed edamame with sea salt. These sides balance the richness while keeping the meal light and refreshing.
Beverage Balance
A crisp dry sake or green tea cleanses the palate between bites. For beer lovers, try a light Japanese lager like Asahi—its subtle hop bitterness pairs perfectly. Avoid heavy beers or sweet wines that would clash with the dish's savory notes. 🍶
Garnish Upgrades
Add thinly sliced avocado sprinkled with lime zest right before serving for a creamy contrast. For heat lovers, top with chili crisp (about 1 teaspoon). The avocado adds freshness, while the chili crisp brings excitement to every bite.
Make-Ahead Garnishes
Prep garnishes ahead to save time: Toast sesame seeds in a dry skillet for 1-2 minutes and store in an airtight container. Slice green onions and keep them refrigerated in a sealed bag.
This way, you can assemble the dish quickly and garnish just before serving for maximum freshness and crunch. ✨
Nutrition facts
Frequently asked questions
Can I use pre-cooked shrimp for this recipe?
Yes, you can! If using pre-cooked shrimp, skip the searing step entirely and simply arrange them on top of the cheese layer. Just ensure they're fully thawed and patted dry to prevent excess moisture from making the cheese topping soggy. Pre-cooked shrimp works especially well if you're short on time or want to prep ahead.
How do I prevent the rice from getting dry or mushy?
Use short-grain sushi rice exclusively—it's the only rice that holds up well in baked dishes. Cook it according to package instructions (usually a 1:1 rice-to-water ratio) and let it steam covered for the full 10 minutes after turning off the heat. When assembling, spread the rice evenly in the baking dish and don't overfill it—this helps maintain texture. The key is patience: don't peek at the rice while it cooks!
Can I make this dish ahead of time?
Assemble the entire dish (without the panko topping) and refrigerate for up to 24 hours. When ready to bake, sprinkle with fresh panko and bake at 375°F for 18-20 minutes to restore crispiness. For freezing, assemble completely (including panko) and bake straight from frozen at 375°F for 25-30 minutes, covering loosely with foil if the top browns too quickly. The flavors actually improve after resting!
What's the best way to reheat leftovers?
Reheat in 10-second bursts in the microwave at 50% power, stirring between each interval. For best results, cover with a damp paper towel to retain moisture. Alternatively, pop slices under the broiler for 2-3 minutes to restore that crispy cheese texture. Never microwave uncovered—it dries out the rice and makes the cheese rubbery.
Can I substitute the cheeses?
Certainly! For a lighter option, use feta and goat cheese (mix with a splash of lemon juice). For extra richness, swap in Gruyère or fontina. Avoid high-moisture cheeses like Colby—they create steam that can make the panko soggy. If your cheese is pre-shredded, drain it thoroughly to prevent a watery topping. The mozzarella-cheddar combo works best for that classic melty texture.