
Snacks
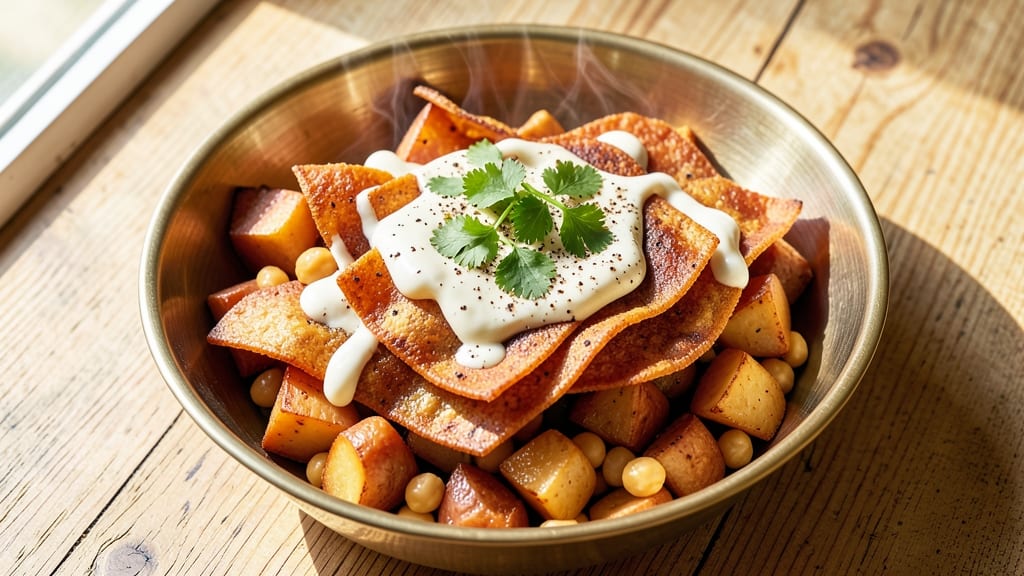
This papdi chaat veg recipe delivers the perfect balance of crispy, spiced layers that make every bite irresistible. The secret lies in the thin, crispy papdi shells that hold tender potatoes, chickpeas, and a tangy yogurt dressing—all topped with a sprinkle of chaat masala.
I developed this recipe after years of perfecting the texture and flavor profile, ensuring every component comes together just right.
The foundation of great papdi chaat is the papdi itself—thin, crispy, and slightly spiced, made from a simple flour and water batter. Once you master the frying technique, the rest falls into place: spiced potatoes and chickpeas add substance, while a creamy yogurt dressing ties everything together.
This dish is foolproof for beginners but impressive enough for gatherings, with layers of crunch and flavor that keep everyone reaching for more.
What you’ll end up with is a dish that’s crispy on the outside, tender inside, and packed with the bright, tangy flavors of traditional Indian chaat. The potatoes and chickpeas soak up the spices perfectly, while the yogurt dressing adds a cooling contrast.
It’s the kind of snack that feels indulgent but stays light—ideal for parties, picnics, or a satisfying midday treat.
Serve with a side of tamarind chutney or mint-coriander sauce to elevate the flavors even further. Let’s bring this classic snack to life with a professional touch that’s easy to follow. Here’s how to make it step by step.
Ingredients for papdi veg
Sixteen ingredients crafting crispy, spiced layers perfect for gatherings or a satisfying snack.
| Ingredient | Amount | Notes |
|---|---|---|
| All-Purpose Flour 🌾 | 2 cups | Sifted for smooth batter consistency |
| Water 💧 | 1 ½ cups | Room temperature preferred |
| Vegetable Oil 🫒 | 3 cups | For deep frying papdi shells |
| Russet Potatoes 🥔 | 3 medium | Peeled and cubed evenly |
| Chickpeas 🍲 | 1 ½ cups | Cooked, drained, and cooled |
| Plain Yogurt 🥛 | 1 cup | Full-fat for creaminess |
| Lemon Juice 🍋 | 2 tbsp | Freshly squeezed |
| Chaat Masala 🌶️ | 2 tsp | Traditional Indian blend |
| Cumin Seeds 🌿 | 1 tsp | Toasted for aroma |
| Red Chili Powder 🌶️ | 1 tsp | Adjust for spice preference |
| Turmeric Powder 🌿 | ½ tsp | For vibrant color |
| Garam Masala 🌶️ | 1 tsp | For depth of flavor |
| Salt 🧂 | 1 ½ tsp | Diamond Crystal preferred |
| Fresh Coriander Leaves 🌿 | ¼ cup | Chopped for garnish |
| Mint Leaves 🌿 | ¼ cup | Chopped for freshness |
The foundation begins with all-purpose flour—King Arthur brand ensures smooth batter consistency. For the papdi shells, vegetable oil must be used at 350°F to achieve that signature crispiness. Russet potatoes should be peeled and cubed evenly—Yukon Golds work too, but Russets hold their shape better during frying. Chickpeas must be cooled completely before mixing with spices to prevent excess moisture. The plain yogurt should be full-fat for optimal creaminess in the dressing, and Whole Foods 365 brand is a reliable choice for consistency. Chaat masala is non-negotiable—MTR brand delivers the authentic tangy-spicy profile this dish requires.
No chaat masala? Mix 1 tsp amchur (dry mango powder), 0.5 tsp black salt, 0.5 tsp cumin powder, and 0.25 tsp black pepper for a close substitute. Fresh coriander and mint can be swapped for dried versions at one-third the amount, though fresh is ideal. Vegetable oil can be replaced with ghee for a richer flavor, though it burns more quickly. Russet potatoes can be swapped for red potatoes if preferred, though they'll be slightly less starchy. Chickpeas can be replaced with cauliflower florets for a lighter option, though texture will differ. Lemon juice must be freshly squeezed—bottled versions lack the necessary acidity.
Store the papdi shells in an airtight container for up to 3 days to maintain crispiness, though they're best enjoyed fresh. The spiced potato-chickpea mixture keeps well in the refrigerator for 4 days and freezes beautifully for 3 months—portion into single servings before freezing. Yogurt dressing should be made fresh before serving, though the spices and herbs can be prepped ahead. Chaat masala and garam masala retain potency for 6 months when stored in a cool, dark place. For optimal freshness, assemble the dish just before serving to preserve the crispy texture of the papdi shells.
Why You'll Love This Recipe
- No-Fuss Crispy Shells: I swear by this recipe because it’s the kind of thing you can make while watching TV—just mix flour, water, and a splash of oil, roll it thin, and bake. No fancy equipment, no stress.
- Taste Like a Treat: That golden, flaky crust with tender potatoes and chickpeas inside? It’s the kind of flavor that makes you forget it’s just a veggie dish. The oil gives it a satisfying crunch that’s hard to resist.
- Lunchbox Hero: Between us, this is my go-to for school lunches or office meals. It reheats like a dream, stays fresh for days, and even my picky-eating kid asks for it. Pack a few, and you’ve got a hit for any day.
- Pantry Magic: Honestly, you can’t beat the budget here—flour, potatoes, chickpeas, and oil are all staples. Stretch one batch into two meals, or freeze extras for when you’re too tired to cook. It’s the ultimate lazy-day savior.
Step-by-step instructions for papdi chaat veg recipe
A perfect balance of crispy papdi shells, spiced potato-chickpea filling, and tangy yogurt dressing awaits.
Prepare the Spiced Potato-Chickpea Filling
In a large mixing bowl, combine the 3 medium russet potatoes and 1.5 cups chickpeas. Peel the potatoes first and cut them into even ½-inch cubes for consistent cooking. The potatoes should be completely cold before mixing to prevent premature softening.
In a small saucepan, toast the 1 tsp cumin seeds over medium heat for 1 minute until fragrant and lightly golden. Immediately transfer them to the bowl with the potatoes and chickpeas. Add the 1 tsp red chili powder, 0.5 tsp turmeric powder, 1 tsp garam masala, and 1.5 tsp salt, mixing thoroughly to coat all ingredients evenly. The spices should create a vibrant orange-red powder that clings to the potato and chickpea surfaces.
Heat 2 tablespoons of vegetable oil in a large skillet over medium heat. Add the spiced potato-chickpea mixture and cook for 10-12 minutes, stirring occasionally, until the potatoes are tender but not mushy. You'll know they're ready when a knife slides in easily and the mixture releases from the pan without sticking. Remove from heat and let cool completely before assembling.
Create the Crispy Papdi Shells
In a large mixing bowl, combine the 2 cups all-purpose flour and 1.5 tsp salt. Whisk to break up any lumps, then gradually add the 1.5 cups water while mixing with a fork. The batter should be smooth and slightly thicker than pancake batter but still pourable. If it's too thick, add 1 tablespoon of water at a time until it reaches the right consistency.
Heat 1 cup of vegetable oil in a deep frying pan over medium-high heat until it reaches 350°F. The oil should shimmer gently when a drop of batter is added. Dip a spoon into the batter and carefully drop small, thin circles of batter into the hot oil, spacing them about 2 inches apart. Fry for 1-2 minutes per side until golden brown and crispy. Remove with a slotted spoon and drain on paper towels. Repeat with the remaining batter and oil, maintaining the same oil temperature for even cooking.
Once all papdi shells are fried, stack them between paper towels to remove excess oil. Keep them warm in a 200°F oven while you prepare the remaining components. The shells should remain crispy but not brittle when handled properly.
Assemble the Papdi Chaat Layers
In a medium bowl, whisk together the 1 cup plain yogurt, 2 tbsp lemon juice, and 2 tsp chaat masala until smooth. The mixture should be slightly tangy with a bright yellow color from the chaat masala. Set aside at room temperature while you assemble the chaat.
To assemble each serving, start with a crispy papdi shell as the base. Spread a thin layer of the spiced potato-chickpea filling over the shell, leaving a ½-inch border around the edges. Drizzle a generous amount of the yogurt mixture over the filling, then sprinkle with half of the 0.25 cup fresh coriander leaves and half of the 0.25 cup mint leaves. Repeat the layers for each serving, creating a total of 6 individual portions.
For an extra crunch, lightly toast the remaining papdi shells in a dry skillet over medium heat for 30 seconds per side before placing them on top of each assembled serving. This final step ensures every bite delivers that signature crispy texture that defines papdi chaat.
Serve Immediately for Maximum Crunch
Garnish each serving with the remaining coriander and mint leaves, then serve immediately while all components are at their peak texture. The contrast between the crispy papdi shells, warm spiced filling, and cool yogurt dressing creates the perfect balance of temperatures and textures in every bite.
For best results, serve this papdi chaat within 15 minutes of assembly. The crispiness of the papdi shells diminishes quickly once removed from the oven, so timing is crucial. Pair with a side of fresh mango slices or a simple cucumber raita for a complete meal experience.
Pro Tips For Making Papdi Veg
- Boil Potatoes Until Fork-Tender: Russets split like overconfident politicians if you overcook them—stop when a knife slides in easily, not when it falls apart. Cold water speeds this up, but don’t rush: undercooked chunks turn papdi into sad, chewy paper.
- Toast Chickpeas Before Mashing: Dry them on medium heat for 3–4 minutes first—they’ll crisp slightly and add texture you didn’t know you needed. Skip this, and your filling turns into glue. (Yes, even canned chickpeas—drain and rinse them first.)
- Roll the Papdi Thin but Even: Use a rolling pin with consistent pressure—thicker edges burn before the center cooks. A damp cloth between layers prevents sticking, but don’t over-wet the dough or it’ll rip. Think "lasagna sheets," not "tortilla chips."
- Fry in Small Batches: Two papdis at a time in hot oil (350°F/175°C) keeps them crisp without soggy centers. Crowd the pan, and the temperature drops faster than your motivation on a Monday. A slotted spoon helps flip them cleanly.
Serving suggestions for this dish
Garnish Like a Pro
Fresh herbs elevate this dish instantly. I always chop ¼ cup coriander and ¼ cup mint finely and sprinkle them over each serving right before eating. For extra flair, add ½ tsp black sesame seeds or crushed papdi pieces around the edges to create visual contrast.
The herbs should be bright green and freshly chopped—never dried, as they lose their vibrant color and aroma. 🌿
Chutney Pairings
No papdi chaat is complete without a tangy chutney. I recommend serving with tamarind chutney for its sweet-sour balance or mint-coriander chutney for a fresher profile.
For a quick version, blend ½ cup mint leaves, ¼ cup cilantro, 1 tbsp tamarind paste, 1 tsp cumin powder, and 2 tbsp water. Adjust sweetness with 1 tsp sugar if needed. 🌶️
Temperature Contrast
The magic of papdi chaat lies in its temperature play. Serve the crispy papdi shells and spiced filling at room temperature, while the yogurt dressing stays cool.
For an extra touch, chill the yogurt mixture for 30 minutes before assembling to enhance its cooling effect. This contrast makes every bite feel fresh and satisfying. ❄️
Presentation Tips
Arrange the papdi chaat in a circular pattern on a large platter for a visually appealing spread. Use edible flowers or lemon wedges as garnishes to add color. For individual servings, place each portion on a small plate with a side of chutney in a tiny bowl.
The presentation should feel inviting and festive—just like a street-side chaat stall in Delhi. 🌺
Drink Pairings
Cool, refreshing drinks balance the richness of this dish. I love serving it with masala chai for a traditional pairing or nimbu pani (Indian lemonade) for a lighter option.
For a non-caffeinated choice, try rose water-infused limeade. The acidity cuts through the spices beautifully, cleansing the palate between bites. 🍹
Make-Ahead Serving
While papdi chaat is best enjoyed fresh, you can prep components ahead. Store the spiced potato-chickpea filling in the fridge for up to 4 days and the yogurt dressing for 2 days.
Fry the papdi shells just before serving to maintain crispiness. Assemble the dish only when ready to eat—this ensures the shells stay crunchy and the yogurt dressing remains creamy. 🕒
Nutrition facts
Frequently asked questions
Can I make papdi shells ahead of time?
Yes, but with a trick! Fry the papdi shells and let them cool completely, then store them in an airtight container between layers of paper towels. They'll stay crispy for up to 3 days at room temperature. For longer storage, freeze them for 1 month—just reheat in a dry skillet for 10 seconds before assembling.
What if my papdi shells turn out soggy?
Soggy shells usually mean the oil wasn't hot enough (350°F is key) or the shells weren't drained properly. Next time, fry in batches with consistent oil temperature and drain on a wire rack (not paper towels) to remove excess oil while keeping them crisp. If they lose crispness after frying, reheat in a 375°F oven for 2-3 minutes before assembling.
Can I substitute chickpeas in this recipe?
For a lighter version, use cauliflower florets (tossed in spices and roasted) or pan-seared paneer cubes for extra protein. If you prefer legumes, try black-eyed peas or lentils—just adjust cooking time to ensure they're tender. The texture should complement the crispy papdi rather than compete with it.
How do I make this dish gluten-free?
Replace the all-purpose flour with a 1:1 gluten-free flour blend (like Bob's Red Mill) for the papdi shells. For the filling, ensure your spices are certified gluten-free and use tamari instead of soy sauce if adding any. The texture may be slightly different, but the flavor remains rich and satisfying. Test the batter consistency—gluten-free batters often need 1 extra tablespoon of water per cup of flour.
What’s the best way to reheat leftover papdi chaat?
Reheat the filling separately in a skillet for 3-4 minutes until warm, then reassemble with fresh papdi shells (toasted in a dry pan for 10 seconds). The yogurt dressing should be added fresh—never reheated—to maintain its creaminess. For extra crunch, sprinkle with a little chaat masala after reheating to revive the flavors.