
Desserts
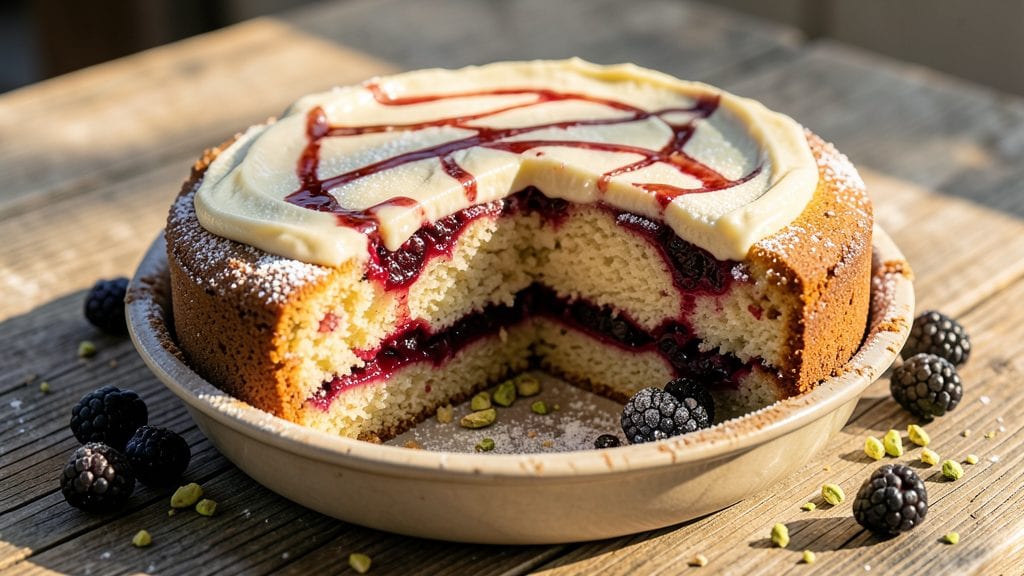
This Kentucky jam cake recipe delivers the perfect balance of buttery layers and spiced jam filling that’s become a Southern classic. The secret lies in a tender cake base that holds up to generous layers of jam while staying moist—no dry crumbs here.
I first tried this recipe during a family reunion when my grandmother swore her version was the only way to make jam cake properly.
The cake itself is simple but precise: layers of fluffy, buttery batter baked just until they set, then filled with a warm spiced jam mixture that’s thick enough to stay between the layers.
Traditional recipes call for blackberry or raspberry jam, but you can use any fruit preserve you love. The key is letting the cake cool slightly before assembling so the filling doesn’t leak out.
What you’ll end up with is a dessert that’s rich, fruity, and just sweet enough—no heavy frosting needed. The jam filling stays warm and gooey in the center while the cake edges stay tender.
This is the kind of cake that disappears quickly, so expect seconds (or thirds) the moment it’s sliced. Ready to bake?
For an extra touch, brush the top with a simple glaze or dust with powdered sugar before serving. The layers of flavor—buttery, fruity, and slightly spiced—make this a showstopper for any occasion. Let’s get started on your perfect slice.
Ingredients for kentucky jam cake
Buttery layers, spiced jam filling—just 12 ingredients for Southern comfort.
| Ingredient | Amount | Notes |
|---|---|---|
| All-Purpose Flour 🌾 | 3 ½ cups | Sifted for light texture |
| Granulated Sugar 🍚 | 2 cups | White or light brown |
| Unsalted Butter 🧈 | 1 ½ cups | Room temperature, full-fat |
| Large Eggs 🥚 | 4 whole | Room temperature for mixing |
| Baking Powder 🍳 | 2 tsp | Aluminum-free preferred |
| Salt 🧂 | ½ tsp | Fine sea salt |
| Vanilla Extract 🍃 | 2 tsp | Pure vanilla preferred |
| Blackberry or Raspberry Jam 🍇 | 2 cups | High-quality, unsweetened |
| Ground Cinnamon 🌿 | 1 tsp | For spiced jam filling |
| Ground Nutmeg 🌿 | ¼ tsp | Freshly grated preferred |
| Whole Milk 🥛 | 1 cup | Room temperature |
| Powdered Sugar 🍚 | ½ cup | For dusting (optional) |
The butter and flour are non-negotiable here. Crisco or shortening won’t give you that same tender crumb, so grab unsalted butter from the dairy case—none of that salted nonsense. I always use King Arthur flour for baking, but any all-purpose works. The jam? Blackberry or raspberry is traditional, but strawberry or peach jam adds a nice twist. Look for brands like Welch’s or Smucker’s for that classic Southern touch. If you’re feeling fancy, make your own jam—it’s worth the effort for that homemade taste.
No vanilla extract? Vanilla bean paste works in a pinch, or even a scraped vanilla bean. Short on nutmeg? Allspice at half the amount gives a similar warmth. The milk can be swapped for buttermilk for extra richness, but regular whole milk keeps it simple. If your jam is too runny, mix in 1 tsp cornstarch to thicken it up before assembling. And trust me, room-temperature ingredients mix better—no one likes lumpy batter.
This cake keeps beautifully. Wrap tightly in plastic wrap and store at room temperature for 3 days, or refrigerate for 1 week. The filling stays gooey for days, so it’s perfect for make-ahead desserts. If you’re prepping ahead, assemble the cake layers but skip the filling until serving—add it fresh for that warm, jammy center. Slice with a serrated knife for clean layers, and dust with powdered sugar right before serving.
Why You'll Love This Recipe
- No-Mess Mixing: I swear by this recipe because it’s one bowl, no fuss. Just cream butter and sugar, toss in eggs, then fold in dry ingredients—no sifting, no extra bowls. The butter’s rich flavor cuts through the jam’s sweetness without overpowering it.
- Jam-Packed Richness: That layer of jam between moist cake layers? It’s the star. The butter and sugar create a tender crumb that soaks up the jam’s tangy-sweetness perfectly, like a hug in dessert form. Honestly, I’ve tried store-bought jam cakes—this one wins every time.
- Birthday Party Ready: Slice it, stack it, and watch it disappear. It’s great for celebrations but just as good for a lazy Sunday breakfast. The layers hold up well, so you’re not scrambling to serve it fresh—plus, it’s cheap enough to feed a crowd without breaking the bank.
- Leftovers That Don’t Suck: Between us, most cakes turn dry or rubbery the next day. Not this one. The butter keeps it tender, and the jam stays gooey. I’ve reheated slices in the oven with a pat of butter—like eating a warm, jammy cloud. Perfect for lunch the next day.
Step-by-step instructions for Kentucky jam cake recipe
Here's how to create layers of tender cake with a spiced jam filling that melts perfectly.
Prepare the Spiced Jam Filling
In a small saucepan, combine the 2 cups blackberry or raspberry jam, 1 teaspoon ground cinnamon, and ¼ teaspoon ground nutmeg. Warm over medium-low heat for 3-4 minutes, stirring constantly until the spices dissolve and the mixture becomes smooth. You'll notice the jam thicken slightly and develop a fragrant aroma—this is your signal to remove it from heat. Let it cool completely before using, about 15 minutes. This spiced filling is what makes the cake uniquely Kentucky-style.
If your jam is particularly thick, you can gently whisk in 1 teaspoon whole milk while warm to achieve a spreadable consistency. The filling should be thick enough to stay in place between cake layers but still soft enough to create that signature gooey center when sliced. Keep it at room temperature until ready to use.
Mix the Cake Batter
Preheat your oven to 350°F and grease three 8-inch round cake pans, lining the bottoms with parchment paper for easy removal. In a large mixing bowl, cream together the 1.5 cups unsalted butter and 2 cups granulated sugar using an electric mixer on medium speed for 3-4 minutes until light and fluffy. You'll see the mixture nearly double in volume and become pale in color—this incorporates air that creates a tender crumb.
Add the 4 whole large eggs one at a time, mixing well after each addition until fully incorporated. Then stir in the 2 teaspoons vanilla extract. In a separate bowl, whisk together the 3.5 cups all-purpose flour, 2 teaspoons baking powder, and ½ teaspoon salt. Gradually add the dry ingredients to the wet mixture, alternating with the 1 cup whole milk, beginning and ending with the flour. Mix on low speed just until combined—you should still see some flour streaks. Overmixing develops gluten, which makes the cake tough.
Bake the Cake Layers
Divide the batter evenly among the prepared cake pans, filling each about ⅔ full. Bake for 25-30 minutes or until a toothpick inserted into the center comes out clean. The edges should be golden brown, and the top should spring back when gently pressed. Rotate the pans halfway through baking for even cooking. Let the cakes cool in the pans for 10 minutes, then transfer to a wire rack to cool completely.
Here's a pro tip: If the tops brown too quickly, tent the pans with foil after 15 minutes of baking. The cakes will continue cooking while you protect them from over-browning. Once fully cooled, you'll have three perfectly even layers ready for assembly.
Assemble the Jam Cake
Place one cake layer on a serving plate. Spread about ⅓ of the cooled spiced jam filling evenly over the top, leaving a ½-inch border uncovered. Repeat with the second layer, adding another ⅓ of the filling, then top with the final cake layer. Spread the remaining ⅓ of the filling over the top and sides of the cake, creating a sealed crust.
For extra presentation, you can dust the entire cake with the ½ cup powdered sugar using a fine-mesh sieve. This creates a delicate, snowy finish that contrasts beautifully with the rich jam filling. The powdered sugar is optional but adds that final touch that makes it look like you spent hours decorating.
Chill and Serve
Refrigerate the assembled cake for at least 2 hours before slicing—this allows the filling to set slightly and makes it easier to serve clean slices. The cake will keep well in the refrigerator for up to 5 days, though I promise it won't last that long in your house. When ready to serve, use a serrated knife and gently saw through the cake to create clean slices that showcase that beautiful jam filling.
Each slice should reveal layers of moist cake surrounding that spiced jam center. The contrast of tender cake and fruity filling makes every bite special. Serve at room temperature for the best texture—it's perfect with a cup of coffee or tea for an afternoon treat.
Pro Tips For Making Kentucky Jam Cake
- Cream Butter Until Pale: Stop when the butter looks like wet sand, not soup—about 3-4 minutes in a stand mixer with the sugar. I learned this the hard way after making a cake that tasted like buttery paste instead of fluffy layers. The goal is light, airy batter, not melted butter.
- Sift the Dry Mix: Flour and baking powder love to clump, especially when you’re in a hurry. Sift them together before adding to the wet ingredients—this keeps the cake tender and prevents dense pockets. (Yes, even if you’re impatient like me.)
- Don’t Overmix the Jam: Fold in the jam just until combined—lumps are fine, but don’t turn it into jam soup. Overworking it breaks the cake’s structure, and you’ll end up with a dense, jam-heavy brick instead of those classic moist layers.
- Test for Doneness Early: This cake rises fast, so check it at 45 minutes with a toothpick—it should come out clean but slightly sticky. If the top browns too quickly, tent it with foil. I’ve ruined more cakes by walking away and coming back to a burnt dome.
Regional styles of kentucky jam cake
Classic Kentucky Style
The original Kentucky jam cake features three layers of tender cake filled with spiced blackberry jam—traditionally made with Welch’s blackberry jam for that authentic Southern taste. The cake itself is buttery and slightly dense, designed to hold up to the generous jam filling without becoming soggy.
My grandmother always used cinnamon and nutmeg in her jam mixture, which adds warmth that pairs perfectly with the fruity sweetness. This version is all about simplicity and letting the jam shine. 🍇
Tennessee Twist
Across the border in Tennessee, you’ll find a variation where the jam filling is often thicker and less sweet, sometimes including a splash of bourbon (about 1 tablespoon) for depth.
The cake layers might also include a pinch of cardamom alongside the cinnamon, giving it a slightly more complex spice profile. I’ve made this version with peach jam instead of blackberry, which works beautifully with the bourbon infusion. Serve it with a dollop of whipped cream for extra indulgence.
Appalachian Mountain Style
In the Appalachian region, jam cakes often incorporate local wild berries like huckleberry or elderberry jam, which add earthy, tart notes that balance the cake’s sweetness. The cake batter sometimes includes a splash of apple cider (about 2 tablespoons) for moisture and a subtle apple flavor.
This version is lighter and less buttery, making it a perfect dessert for summer gatherings. The jam filling is often warmed with a touch of honey instead of sugar to enhance the natural fruit flavors.
Modern Fusion Adaptations
For a contemporary take, some bakers replace the traditional jam with fruit compotes—like blueberry or cherry—cooked down with spices and a bit of orange zest for brightness. The cake layers might also include espresso powder (about 1 teaspoon) for a mocha twist.
I’ve experimented with a chocolate-dipped version, where the top layer is dipped in melted dark chocolate before dusting with powdered sugar. This fusion style keeps the classic structure while adding exciting new flavors. 💫
Southern Church Potluck Version
At church potlucks across the South, you’ll often see jam cakes made in 9x13-inch pans instead of layers, with a streusel topping of crushed graham crackers and butter.
The jam filling is sometimes spiked with a pinch of cayenne for a subtle kick, and the cake is often frosted lightly with cream cheese icing for extra richness. This version is hearty, easy to serve, and perfect for feeding crowds.
The key is using high-quality jam—none of that overly sweet store-brand stuff!
Nutrition facts
Frequently asked questions
Can I use any jam in this recipe?
While traditional recipes call for blackberry or raspberry jam, you can absolutely experiment! Strawberry, peach, or even apricot jam work beautifully. For a modern twist, try blueberry compote or even chocolate hazelnut spread (like Nutella) for a decadent variation. Just ensure your jam isn't overly runny—thicken it with 1 tsp cornstarch if needed.
Why does my cake turn out dry?
Dry cake usually happens from overbaking or overmixing. Bake until a toothpick comes out clean (25-30 minutes at 350°F) and don't overmix the batter—stop when just combined. For extra moisture, brush the cooled layers with simple syrup (equal parts sugar and water, heated) before adding filling. Also, ensure your butter and eggs are room temperature.
How do I make this cake gluten-free?
Replace the 3.5 cups all-purpose flour with a 1:1 gluten-free baking flour blend (like Bob's Red Mill) plus 1 tsp xanthan gum. Use 1 cup almond milk instead of dairy milk, and consider adding ½ tsp extra baking powder for lift. The texture will be slightly denser, but still delicious! Chill the assembled cake for 4 hours to help the filling set.
Can I bake this in a different pan size?
Yes! For a 9-inch pan, bake two layers (instead of three) for 20-25 minutes. For a 10-inch pan, use one layer baked for 30-35 minutes. Adjust baking time by 2-3 minutes per inch of pan size. Always check doneness with a toothpick. The key is even layers—about 1-inch thick for proper filling distribution.
What's the best way to store leftovers?
Wrap tightly in plastic wrap and store at room temperature for 2 days, or refrigerate for up to 5 days. For longer storage, freeze individual slices (wrapped tightly) for 2 months. Thaw overnight in the fridge. The filling stays gooey when properly stored—just avoid cutting into warm cake straight from the fridge for the best texture.