
Sauces & Condiments
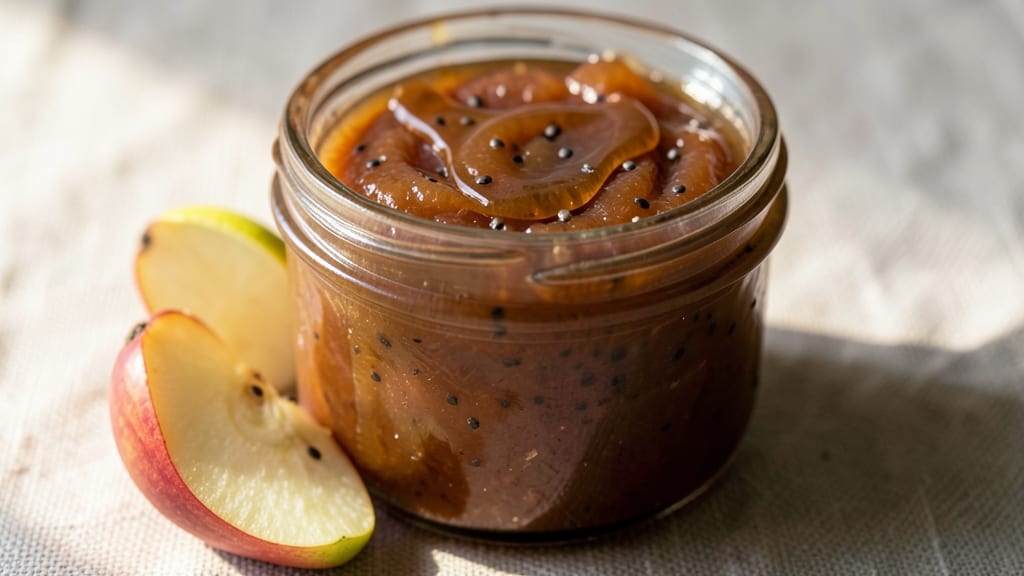
This no-cook pear freezer jam transforms ripe pears into a vibrant, fruit-forward spread that requires no canning, no heat, and just 10 minutes of prep time. ✨ I developed it after years of making traditional preserves—this version keeps all the natural pear flavor while eliminating the stress of sterilizing jars or monitoring temperatures.
The secret lies in a precise balance of lemon juice, sweetener, and pectin substitute that creates a set without cooking.
The beauty of this method is its simplicity: no stove required, no risk of burning sugar, and no waiting for water to boil. You’ll use ripe pears (peeled and finely chopped), a touch of honey or maple syrup for sweetness, and a natural thickener like chia seeds or powdered pectin.
The result? A jam with bright pear notes, subtle tartness, and just the right texture—spreadable yet firm enough to hold its shape.
What you’ll end up with is a batch of jam that tastes like summer in every bite—juicy, fragrant, and bursting with natural pear flavor. It keeps beautifully in the freezer for up to a year, so you can make a big batch and enjoy it all season long.
Perfect for toast, yogurt, or as a filling for pastries, this jam is the ultimate no-fuss fruit spread.
Ready in just 10 minutes and foolproof every time, this recipe is ideal for beginners or anyone who wants restaurant-quality jam without the hassle. Here’s everything you need to get started!
Ingredients for no cook pear freezer jam
Eight simple ingredients transform ripe pears into vibrant, no-cook jam perfect for toast or yogurt.
| Ingredient | Amount | Notes |
|---|---|---|
| Ripe Pears 🍐 | 3 cups | Peeled, finely chopped, skin-on for color |
| Raw Honey 🍯 | ½ cup | Local preferred for flavor depth |
| Lemon Juice 🍋 | ¼ cup | Freshly squeezed, no pulp |
| Chia Seeds 🌱 | ¼ cup | Organic for best thickening |
| Powdered Pectin 🍇 | 1 tbsp | Low-sugar variety for natural set |
| Vanilla Extract 🌿 | 1 tsp | Pure alcohol-free preferred |
| Ground Cinnamon 🌶️ | ½ tsp | Freshly ground for warmth |
| Sea Salt 🧂 | ¼ tsp | Fine grain for balance |
Pears are the star—look for ripe but firm varieties like Bartlett or Anjou at your local grocery store or farmers market. Trader Joe's often has great organic options, or grab them from the produce section when they're at peak softness. Peeled and finely chopped, they'll release their juices beautifully. The honey should be raw and unfiltered—local honey adds subtle floral notes that store-bought can't match. If you can't find raw, regular honey still works, but the flavor won't be as complex. For the chia seeds, Bob's Red Mill organic is my go-to—they're consistent and easy to find at most supermarkets.
No honey? Maple syrup works 1:1, though it adds a distinct maple flavor. Short on pectin? Extra lemon juice (another 1 tbsp) helps thicken, but chia seeds are the real MVP here—they create that perfect jam-like texture without cooking. The vanilla extract can be swapped for vanilla bean paste if you're feeling fancy, but pure extract is fine. Cinnamon is optional but adds warmth—if you skip it, a pinch of cardamom gives a different cozy vibe. For the lemon juice, fresh is non-negotiable—bottled just won't cut it. If you're in a pinch, bottled lemon juice with no added water is better than nothing.
This jam keeps for up to 1 year in the freezer—seriously, it's that stable. Portion into silicone molds or ice cube trays for single servings, then transfer to a freezer bag. Thaw overnight in the fridge before using. Once thawed, it'll last 1 week in the fridge. Don't worry about it separating—just stir before using. The chia seeds do their magic over time, so the longer it sits, the thicker it gets. Perfect for gifting—just grab a small jar and tie a ribbon!
Why You'll Love This Recipe
- I’ll be real: I used to dread making jam because of the chopping and boiling. This recipe? Just toss pears into a food processor, add honey and lemon juice, and let the chia seeds do their magic—no stove, no mess, no fuss.
- No Chopping Needed: I’ll be real: I used to dread making jam because of the chopping and boiling. This recipe? Just toss pears into a food processor, add honey and lemon juice, and let the chia seeds do their magic—no stove, no mess, no fuss.
- Sweet-Tart Magic: That balance of ripe pears and bright lemon juice with a touch of honey? It’s like summer in a jar. The chia seeds give it this subtle thickness without overpowering the natural fruit flavor—simple, but ridiculously good.
- Freezer-Friendly Always: Honestly, I make a big batch and freeze it in small jars. Spread it on toast in the morning, drizzle it over yogurt, or toss it into oatmeal—it’s my go-to for quick breakfasts and last-minute gifts. No spoilage, no waste.
Step-by-step instructions for no-cook pear freezer jam
Here's how to make this vibrant, fruit-forward spread with no cooking required.
👨🍳 Step 1: Combine Pears, Honey, and Lemon Juice
In a large mixing bowl, add the 3 cups of finely chopped ripe pears (skin-on for that gorgeous color). Pour in the 0.5 cup raw honey and 0.25 cup lemon juice, then stir gently to coat the fruit completely. You want the pears to glisten slightly from the honey—this ensures sweetness distributes evenly. Let the mixture sit for 10 minutes while you prepare the thickening agents.
Here's the thing—don't skip the lemon juice. It brightens the pears' natural sweetness and prevents the jam from tasting too heavy. The pears should look juicy and slightly syrupy by the time you're done mixing. If they look dry, add 1 tablespoon of water to help the honey blend properly.
🥘 Step 2: Mix in Chia Seeds, Pectin, and Spices
To the pear mixture, add the 0.25 cup chia seeds, 1 tablespoon powdered pectin, 0.5 teaspoon ground cinnamon, and 0.25 teaspoon sea salt. Stir vigorously with a wooden spoon or silicone spatula for 2 full minutes—you'll notice the chia seeds begin to thicken the mixture as they absorb liquid. This is how we get that perfect freezer jam consistency without cooking.
I like to press the chia seeds against the bowl's sides to break them up slightly—this helps them disperse evenly and prevents clumping. The mixture should look thick and glossy, like a chunky applesauce with texture. If it's still too loose after mixing, let it sit for 5 more minutes before proceeding—the chia seeds will continue thickening.
⏰ Step 3: Add Vanilla and Let It Thicken
Stir in the 1 teaspoon vanilla extract and mix well. Now comes the crucial waiting period: let the jam sit at room temperature for 30 minutes, stirring every 5 minutes to prevent chia seeds from settling. You're looking for a spreadable consistency—thick enough to hold its shape but still smooth enough to spread easily.
This resting time allows the chia seeds to fully hydrate and the pectin to activate. The jam should look like a vibrant, chunky fruit compote with visible pear pieces. If it's still too runny after 30 minutes, add another 1 tablespoon of chia seeds and let it sit for another 15 minutes. The goal is that perfect freezer jam texture—thick but still spreadable.
🥫 Step 4: Portion and Freeze for Perfect Texture
Spoon the jam into 4 clean, airtight containers (I use 4-ounce jars or small freezer-safe containers). Press plastic wrap directly on the surface to prevent ice crystals from forming. Label each container with the date and freeze immediately. The jam will continue thickening in the freezer, reaching its ideal consistency after 24 hours.
Here's a pro tip: when you're ready to use the jam, let it thaw in the refrigerator for 12 hours before opening. This gradual thawing preserves the texture and prevents separation. The finished jam should have a beautiful golden hue from the pears' skin, with chunks of fruit suspended in a glossy, honey-sweetened matrix. Each bite should deliver bright pear flavor with just the right amount of cinnamon warmth and honey depth.
Pro Tips For Making No Cook Pear Freezer Jam
- Peel Pears First: I learned this the hard way—peeling pears before blending saves you from gummy texture later. The skin adds bulk without softening properly in no-cook jam, and you’ll end up with a smoother, more professional finish.
- Soak Chia Seeds: Mix chia seeds with a splash of lemon juice first, then let them sit for 10 minutes before adding to the rest. This prevents clumping and ensures they thicken evenly—no one likes finding chia seed lumps in their jam.
- Weigh, Don’t Measure Honey: Honey’s density varies wildly, so grab a kitchen scale for accuracy. A 1:1 ratio by weight (pears to honey) guarantees the right balance without guessing—trust me, your jam will thank you.
- Freeze in Portions: Divide the jam into 8-ounce jars before freezing, then seal with parchment paper and a lid. This avoids cracking containers and lets you grab just what you need—no thawing a whole batch for toast.
Essential equipment for great no cook pear freezer jam
Mixing Bowl Essentials
You’ll need a large, non-reactive mixing bowl—I use a stainless steel or glass bowl (like the OXO Good Grips line) because they won’t absorb flavors or react with acidic lemon juice.
Avoid plastic bowls—they can warp when mixing warm honey. A bowl with sloped sides makes scraping every last bit of jam easier. 🥄
Wooden Spoon Magic
A wooden spoon (I love the Oxo Good Grips Wooden Spoon) is your best friend here—it won’t scratch your bowl and helps break up chia seeds gently. Silicone spatulas work too, but wood gives you better control when pressing seeds against the bowl’s sides.
Avoid metal spoons—they can oxidize and affect the jam’s flavor over time.
Measuring Tools
Precision matters! Use a liquid measuring cup for honey and lemon juice (the Pyrex Precision Pour set is my go-to) and a dry measuring spoon set for chia seeds and spices.
A small kitchen scale (like the OXO Good Grips digital scale) ensures perfect chia seed measurements—chia seeds can vary in density by brand. 📏
Air-Tight Storage Containers
For freezing, I recommend 4-ounce glass jars (like Ball Mason jars) or silicone molds (the EZ Freeze brand works great). If using jars, choose wide-mouth varieties for easy scooping.
For freezer bags, opt for quart-sized Ziploc bags with the sealable valve—they’re perfect for portioning single servings. Label everything with masking tape and a marker!
Optional: Immersion Blender
If you prefer your jam smooth rather than chunky, an immersion blender (like the Ninja Foodi) lets you blend while keeping the texture controlled. Pulse for 5-10 seconds to break up larger pear pieces without turning it into puree. This is purely optional—chunky jam has its own charm! 🍐
Pro Tip: Chia Seed Prep
For ultra-smooth chia seeds, grind them lightly in a spice grinder (like the Osterizer) for 10 seconds before adding to the jam. This prevents clumping and ensures even thickening. Store extra chia seeds in an airtight container in your pantry—they’ll stay fresh for months. 🌱
Nutrition facts
Frequently asked questions
Can I use any type of pears for this no-cook jam?
Ripe but firm pears work best—Bartlett or Anjou are ideal for their natural sweetness and texture. Avoid overly soft pears, as they release too much liquid. For extra flavor, leave the skin on (just peel first if you prefer). If you can't find fresh pears, frozen pears work in a pinch, but thaw and drain them well before using.
Why does my jam look too runny after mixing?
This usually means the chia seeds need more time to thicken. Let it sit for 15-20 extra minutes and stir occasionally. If it's still too loose, add 1 more tablespoon of chia seeds and mix well. The jam will firm up as it chills in the fridge or freezer. Patience is key—chia seeds work best when given time to hydrate fully.
How do I prevent chia seeds from clumping in the jam?
Press the chia seeds against the bowl's sides with a spoon while mixing to break them up. For ultra-smooth results, grind them lightly in a spice grinder for 10 seconds before adding. Stir the jam thoroughly for 2 full minutes to ensure even distribution. This prevents clumps and gives you that perfect jam-like texture.
Can I make this jam without honey?
Yes! Substitute honey with 0.5 cup maple syrup or agave nectar for a similar consistency. For a lighter sweetness, use 0.3 cup honey + 0.2 cup sugar. Just note that maple syrup adds a distinct flavor, while sugar requires extra lemon juice (1 extra tablespoon) to balance the sweetness.
How long does this jam last once opened?
After opening, store the jam in an airtight container in the fridge for up to 1 week. The freezer version will keep its texture best when thawed gradually in the fridge overnight. If you notice separation, simply stir before using—it’s normal and won’t affect taste. For longer storage, freeze again in a sealed container.