
Snacks
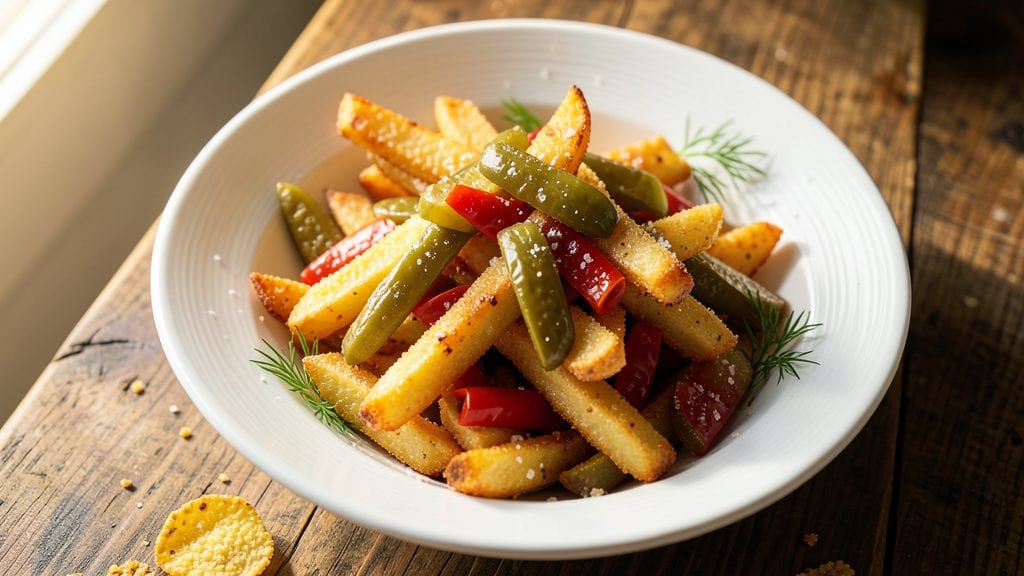
This fried pickle fries recipe transforms a classic snack into a tangy, crunchy masterpiece that’s impossible to resist. The secret lies in double-frying the pickles for maximum crispiness while keeping the insides juicy, then pairing them with golden, salty fries for a bite-sized flavor explosion.
I developed this recipe after craving something bold and unexpected—something that delivers both the satisfying crunch of fries and the bright, briny punch of pickles in every bite.
The magic happens in two stages: first, frying the pickles in a light batter for a crispy exterior, then tossing them in a seasoned coating that clings perfectly. Meanwhile, the fries get their signature golden crust from a 350°F oil bath, ensuring they’re crispy outside and fluffy inside.
This isn’t just a snack—it’s a foolproof method for turning simple ingredients into a dish that’s equal parts nostalgic and innovative. The result? A plate that’s as fun to eat as it is to make, with flavors that balance sweet, salty, and tangy in every mouthful.
By the time you’re done, you’ll have a platter of crispy, bite-sized fries topped with golden, tangy pickle bites that stay crunchy even after dipping. The contrast in textures—creamy fries, crunchy pickles—makes every bite exciting, while the seasoning ensures no flavor falls flat.
Serve with a side of ranch or spicy mayo for dipping, and watch this dish disappear faster than you can say “second helping.” Ready to elevate your snack game? Let’s get started.
This recipe works perfectly as an appetizer for game day, a bold side dish for burgers, or even a standalone snack when you’re craving something unexpectedly addictive. The best part?
It’s easy to scale up for parties or down for a single serving—no compromise on flavor, just pure, satisfying crunch. Whether you’re a seasoned home cook or a beginner in the kitchen, this method delivers restaurant-quality results with minimal effort. Here’s how to make it happen.
Ingredients for fried pickle fries
Classic fries meet tangy pickles—just 14 ingredients for a bold, crunchy snack sensation.
| Ingredient | Amount | Notes |
|---|---|---|
| Russet Potatoes 🥔 | 2 lb | Cut into 1-inch sticks |
| Dill Pickle Spears 🥒 | 16 whole | Brine-packed, 3-inch size |
| All-Purpose Flour 🌾 | 1 cup | For light batter |
| Cornstarch 🌾 | ½ cup | For extra crispiness |
| Large Eggs 🥚 | 2 whole | Beaten for batter |
| Vegetable Oil 🫒 | 3 cups | For frying, peanut oil works too |
| Panko Breadcrumbs 🍞 | 1 cup | For crunchy coating |
| Granulated Garlic Powder 🧄 | 1 tbsp | For seasoning |
| Onion Powder 🧅 | 1 tbsp | For seasoning |
| Paprika 🌶️ | ½ tbsp | Smoked for depth |
| Salt 🧂 | 1 tsp | Kosher salt preferred |
| Black Pepper 🌶️ | ½ tsp | Freshly ground |
| Ranch Dressing Mix 🥛 | 2 tbsp | For serving, optional |
| Spicy Mayo 🍯 | ½ cup | For dipping, optional |
The pickles make or break this dish, so grab firm, briny dill spears—none of that mushy stuff. Heinz or Vlasic from the grocery store work fine, but if you can find local pickles at a farmers market, they’ll have way more flavor. For the potatoes, Russets are non-negotiable—their starchiness is what makes them crispy. Soak the cut fries in cold water for 20 minutes before frying to remove excess starch, or they’ll turn gummy. The oil? Vegetable or peanut oil is best—both have high smoke points and stay neutral. If you’re frying a crowd, Costco sells bulk vegetable oil that’s perfect for this.
No panko? Regular breadcrumbs work, but they won’t be as crispy. Short on dill pickles? Substitute bread-and-butter pickles—they’re sweeter, so cut back on the salt in the seasoning. The cornstarch is key for that extra crunch on both the fries and pickles. Skip it if you’re in a pinch, but your coating won’t be as golden. For the dipping sauces, ranch is a must, but if you’re feeling spicy, mix mayo with sriracha or hot sauce. The pickles can be fried fresh or made ahead—just reheat in the oven at 375°F for 5 minutes to revive the crunch. Pro tip: Double the batter recipe if you’re feeding a crowd—it’s worth it.
Leftover fries? Crisp them up in the oven at 400°F for 10 minutes—they’ll lose some crunch but still taste amazing. The fried pickles stay crispy for up to 2 days if you store them in a single layer on a wire rack. No wire rack? A baking sheet works. For longer storage, freeze them for up to 1 month—just thaw at room temp before serving. The seasoned breadcrumbs keep well in an airtight container for 1 week, so make extra for future snacks. This dish reheats beautifully—oven or air fryer only, though. Microwaving turns everything soggy.
Why You'll Love This Recipe
- Pickle Spear Shortcut: I swear by the jarred spears—no chopping, no peeling, just toss them straight into the fryer. The potatoes take the real work, but even that’s just slicing and soaking, not some fancy spiralizer routine.
- Crunchy-Tangy Magic: That first bite? Crispy potatoes meet briny, tangy pickles in a way that’s weirdly addictive. The cornstarch coating keeps the fries shatteringly crisp, while the pickle’s acid cuts through the richness—like a perfect salty-sweet balance.
- Game for Any Gathering: Between us, these disappear at parties. They’re fancy enough for a tailgate but easy enough to toss together when your in-laws drop by. (Yes, even on a Tuesday night.) Serve with ranch or just eat them straight—no judgment here.
- Budget-Friendly Crunch: Russets are cheap, pickles are cheap, and one egg + flour mix stretches for multiple batches. I’ve made these for $2 a serving, and honestly? Nobody can resist seconds. Leftovers? Reheat in the air fryer—same crisp, no sog.
Step-by-step instructions for fried pickle fries
Here's how to make these addictive, double-fried pickle fries with perfect crunch and tangy flavor.
Cut and Soak the Potatoes
Start by cutting the 2 lb russet potatoes into 1-inch sticks using a mandoline or sharp knife. For even cooking, I like to soak them in cold water for 30 minutes to remove excess starch. This prevents the fries from sticking together and helps create that classic crispy exterior.
Drain the potatoes thoroughly before proceeding—wet potatoes will steam instead of fry properly. Pat them completely dry with paper towels. The drier they are, the crispier your fries will turn out. I like to work in batches if I'm prepping ahead, but keep them covered with a damp towel to prevent drying out too much before frying.
Prepare the Breading Station
In a large bowl, whisk together the 1 cup all-purpose flour, 0.5 cup cornstarch, 1 tbsp granulated garlic powder, 1 tbsp onion powder, 0.5 tbsp paprika, 1 tsp salt, and 0.5 tsp black pepper. This dry mix is what gives the fries their signature seasoning and extra crunch.
In another bowl, beat the 2 whole large eggs until fully combined. The eggs create a light, crispy coating that helps hold the breading in place. For the final coating, use the 1 cup panko breadcrumbs—these add that satisfying crunch you can't get with regular breadcrumbs.
First Fry for Cooking Through
Heat 3 cups vegetable oil in a deep fryer or heavy pot to 325°F. This lower temperature ensures the potatoes cook through without burning on the outside. Carefully add the potatoes in batches, working in small groups so they don't overcrowd the oil.
Fry for 4-5 minutes until the potatoes are soft inside but still slightly underdone—they'll finish cooking in the second fry. You'll know they're ready when they float to the surface and a knife slides in easily. Remove with a slotted spoon and drain on a wire rack or paper towels. Don't skip this draining step—excess oil will make the second coating soggy.
Bread and Second Fry for Crispiness
Working quickly, dip each potato stick into the beaten eggs, letting any excess drip off. Roll them in the flour mixture first, pressing gently to adhere, then coat with the panko breadcrumbs. I like to double-dip for extra crunch—dip in egg, coat with flour, then egg again before the final panko layer.
Heat the oil back up to 375°F for the second fry. This higher temperature creates that perfect crispy exterior. Fry the breaded potatoes for 2-3 minutes until they're deep golden brown and puffed slightly. The breading should be crispy to the touch and hold its shape when you lift them out.
Assemble and Serve
Transfer the hot fries to a paper towel-lined plate to drain any excess oil. Here's where it gets fun—arrange them on a platter with the 16 whole dill pickle spears fanned out around them. The pickles add that classic tangy contrast that makes these fries irresistible.
For serving, I like to offer both 2 tbsp ranch dressing mix (mixed with mayo if desired) and 0.5 cup spicy mayo for dipping. The spicy mayo adds a kick that pairs perfectly with the crispy, savory fries. Serve immediately while they're hot and crispy—these won't wait!
Pro Tips For Making Fried Pickle Fries
- FRIZZ THE PICKLES: DESCRIPTION:
- DOUBLE-DREDGE POTATOES: DESCRIPTION:
- SKIP THE CROWDED PAN: DESCRIPTION:
- REST THE PICKLE BATTER: DESCRIPTION:
Essential equipment for perfect results
Deep Fryer Essentials
For perfect fried pickle fries, a deep fryer is my go-to tool—it maintains consistent oil temperature better than a pot. I recommend the Ninja Foodi Deep Fryer for its precise temperature control and safety features.
If you prefer a budget-friendly option, the Presto 02700 4-Quart Oil Fryer works great for smaller batches. For home cooks who fry frequently, a deep fryer thermometer (like the Thermoworks Smoke) is a must to monitor oil temps accurately between 325°F and 375°F. 🌡️
Oil Selection Guide
Use vegetable oil or peanut oil—both have high smoke points and stay neutral in flavor. For bulk frying, Costco’s 5-gallon vegetable oil is a game-changer, especially for parties. Avoid olive oil (it burns too easily) and canola oil (it can turn bitter at high temps).
I keep a large stainless steel pot (like the All-Clad Stainless Steel Fry Pot) for stovetop frying—it distributes heat evenly and handles deep-frying batches well.
Breading Tools
For crispy coatings, I use a wire whisk to blend the flour and spices, ensuring no lumps remain. A large mixing bowl (preferably glass or stainless steel) keeps ingredients from sticking.
For breading, I recommend two shallow bowls—one for the egg wash and one for the panko—so you can dip and coat efficiently. A slotted spoon (like the OXO Good Grips) is essential for draining fried foods without losing oil.
Draining and Resting
After frying, transfer foods to a wire cooling rack (I love the Amazon Basics Wire Rack) to allow air circulation—this keeps them crispy. If you don’t have a rack, a paper towel-lined baking sheet works in a pinch.
For the pickles, I use a small mesh strainer to drain excess oil before seasoning. Pro tip: Keep fried foods warm in a 200°F oven while finishing the batch to maintain crispiness.
Safety Gear
Always wear heat-resistant gloves (like the Oven Mitts by ChefMade) when handling hot oil or fryers. A splatter screen (such as the Presto Splatter Guard) protects your face from oil splashes.
I also keep a fire extinguisher (rated for kitchen fires) nearby—just in case. Never leave oil unattended, and keep a lid or baking sheet nearby to smother flames if needed. Safety first! 🔥
Nutrition facts
Frequently asked questions
Why do the pickles need to be fried twice?
The double-fry method is key for maximum crunch. The first fry at 325°F cooks the pickles through while the second fry at 375°F creates that irresistible crispy exterior. This two-stage process ensures the insides stay juicy while the outside gets perfectly golden and crunchy.
Can I use frozen fries instead of fresh-cut potatoes?
Yes, but with adjustments! Use thick-cut frozen fries (like shoestring) and skip the first fry—just bread them and fry at 375°F for 2-3 minutes until crispy. For best results, thaw them first and pat completely dry to prevent soggy breading.
What’s the best way to keep the fries crispy when serving?
Keep fried foods warm in a 200°F oven on a wire rack (not a plate) to maintain crispiness. For serving, arrange fries in a single layer on a platter and place the platter directly on the oven rack. This prevents steam buildup that makes them soggy.
Can I make this recipe ahead of time?
Fry the pickles and potatoes separately, then store them in single layers on wire racks to cool. Reheat in a 400°F oven for 5-7 minutes until crispy again. The pickles stay crunchy for 2 days this way, while fries are best reheated fresh.
What if my pickles are too mushy after frying?
Mushy pickles usually mean they weren’t cooked long enough or had too much moisture. Next time, ensure your pickles are completely dry before frying and cook them at 325°F for 4-5 minutes in the first fry. Also, use firm dill pickles—avoid soft or overly brined ones.