
Main Courses
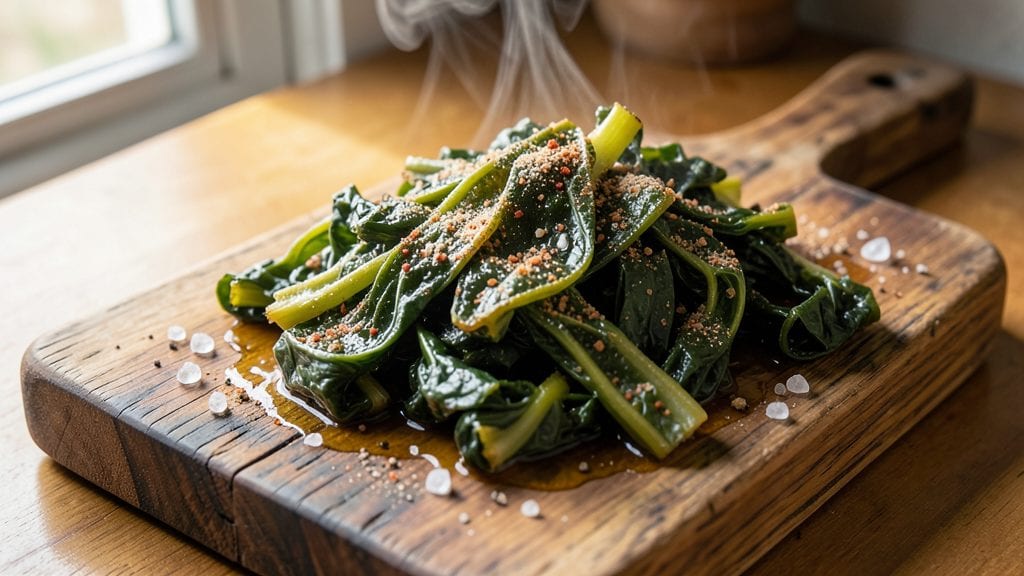
This fried collards recipe transforms tough greens into a restaurant-worthy dish with crispy edges and silky tenderness—all in one pan. The secret lies in proper salting and high-heat frying, which creates that perfect texture contrast.
I developed this method after years of experimenting with Southern techniques, ensuring every bite delivers both crunch and melt-in-your-mouth comfort. Vegetarian-friendly but adaptable, this dish proves collards deserve a place on any main course table.
What makes this recipe stand out is its simplicity: just five key ingredients and 15 minutes of active time. The collards are first salted to draw out bitterness, then fried in hot fat until golden and crispy on the edges while remaining tender inside.
Seasoning with garlic powder, black pepper, and a pinch of cayenne adds depth without overpowering the natural flavor. The result is a dish that's both hearty and elegant—perfect for weeknight dinners or special occasions.
By the end, you'll have a pan of perfectly fried collards with crispy edges that shatter at every bite and silky greens that hold their shape. The aroma alone will have everyone at the table asking for seconds.
This recipe works equally well as a side dish or a main course when paired with cornbread or a protein of choice. The technique is foolproof, and the results are undeniably satisfying.
For those who prefer a richer flavor, traditional recipes often use bacon fat or meat-based seasonings, but this version delivers the same crispy texture and deep flavor using vegetable oil.
The method is adaptable, so feel free to customize the seasoning to your taste. Let's get started on creating this Southern classic with a modern twist.
Ingredients for fried collards
Five essential ingredients transform collards into crispy, silky perfection with Southern restaurant flair.
| Ingredient | Amount | Notes |
|---|---|---|
| Collard Greens 🥬 | 12 oz | Heavily stemmed and chopped |
| Vegetable Oil 🫒 | ½ cup | High smoke point preferred |
| Diamond Crystal Kosher Salt 🧂 | 1 ½ tbsp | For salting collards |
| Garlic Powder 🧄 | 1 tsp | Freshly ground preferred |
| Ground Black Pepper 🌶️ | ½ tsp | Freshly cracked |
| Cayenne Pepper 🔥 | ¼ tsp | Adjust for heat preference |
| Lemon Juice 🍋 | 1 tbsp | Freshly squeezed |
| Unsalted Butter 🧈 | 1 tbsp | For finishing |
| Fresh Parsley 🌿 | ¼ cup | Chopped for garnish |
The collard greens are the star, so prioritize young, tender leaves—older ones turn tough. Whole Foods or local farmers markets carry the best quality, but any grocery store's fresh produce section works. Look for vibrant green leaves without yellowing or wilted spots. If using frozen collards, thaw and drain thoroughly to avoid excess moisture during frying. The key to texture lies in proper preparation: heavily stem and chop the leaves into 1-inch-wide ribbons for even cooking. For optimal results, use a sharp chef's knife to maintain leaf integrity.
No vegetable oil? Avocado oil or peanut oil work equally well, though vegetable oil's neutral flavor ensures the collards' natural taste shines. Diamond Crystal kosher salt is preferred for its coarse texture, which clings better to the leaves during salting. Short on garlic powder? Fresh garlic minced and toasted briefly in oil adds depth. For extra richness, substitute half the vegetable oil with melted unsalted butter—it enhances flavor but increases smoke risk at high heat. The lemon juice brightens the dish, but white vinegar at half the amount works in a pinch. Avoid pre-shredded seasoning blends; their inconsistent ratios can overpower the delicate balance of flavors in this recipe.
This dish reheats beautifully—350°F for 5-7 minutes restores crispiness. Store leftovers in an airtight container for up to 3 days in the refrigerator, though the texture softens slightly. For longer storage, freeze portions for up to 3 months. To reheat from frozen, thaw overnight in the fridge, then crisp in a skillet with a touch of oil. The collards' crispy edges are best enjoyed immediately, so plan to serve this dish fresh. Garnish with chopped parsley just before serving to maintain vibrant color and fresh aroma.
Why You'll Love This Recipe
- No-Chop Shortcut: I swear by this—just tear those collards by hand (no knife skills needed) and fry them whole. The oil renders out their bitterness while keeping the stems crisp, and honestly? That’s all the prep you’ll ever want for greens.
- Salty-Garlic Magic: The secret’s in the salt and garlic powder—crispy edges meet tender leaves with that just-right savory kick. My kids ask for seconds before I even finish plating, and that’s saying something.
- Leftovers That Last: Fry up a big batch, then reheat in a skillet with a splash of water for that same crispy texture. I’ve fed my book club twice with this—zero complaints, all leftovers gone by Wednesday.
- Budget Crunch Hero: Collards are dirt cheap, and this method turns them into something fancy without breaking the bank. A pound of greens feeds four, and the oil and spices? Less than a fast-food meal. Win.
Step-by-step instructions for crispy fried collards
Mastering this technique transforms tough collards into tender, golden-edged perfection with minimal effort.
Prepare the Collards for Even Cooking
Begin by thoroughly washing the 12 oz collard greens to remove any grit, then pat them completely dry with paper towels. This step is critical—any moisture remaining will steam the greens instead of crisping them. Use a sharp chef's knife to remove the thick stems and chop the leaves into 1-inch strips. The uniform size ensures even cooking and maximum crispiness.
Transfer the chopped collards to a large mixing bowl. In a small bowl, whisk together the 1.5 tbsp diamond crystal kosher salt, 1 tsp garlic powder, 0.5 tsp ground black pepper, and 0.25 tsp cayenne pepper. Sprinkle this seasoning blend evenly over the collards and toss gently with your hands until every leaf is fully coated. Let the seasoned collards sit at room temperature for 15 minutes—this allows the salt to draw out excess moisture and the spices to adhere more effectively.
Achieve the Perfect Crisp in Hot Oil
Heat the 0.5 cup vegetable oil in a large, heavy skillet over medium-high heat until it shimmers but doesn't smoke excessively—around 350°F. The oil should be hot enough to sizzle when a small piece of collard is dropped in, but not so hot that it burns instantly. Test the oil by dropping in a single collard strip; if it sizzles vigorously and floats to the surface within 5 seconds, the oil is ready.
Working in batches to avoid overcrowding, carefully add the seasoned collards to the skillet. Stir gently with a wooden spoon or tongs, shaking off any excess oil to promote crispiness. Cook for 3-4 minutes until the edges turn a deep golden brown and the greens soften slightly but still retain some texture. Remove the collards with a slotted spoon and transfer them to a paper towel-lined plate to drain excess oil. Repeat with remaining batches, maintaining consistent oil temperature between batches.
Finish with Butter and Acid for Balance
Reduce the heat to medium-low and add the 1 tbsp unsalted butter to the same skillet. Let it melt completely, then pour in the 1 tbsp lemon juice. Stir for 30 seconds until the butter foams slightly and the lemon juice brightens the pan. This combination adds richness and cuts through the saltiness of the fried collards.
Return the drained collards to the skillet and toss gently to coat them evenly with the buttery lemon mixture. Cook for an additional 1-2 minutes until the greens are heated through and the butter has melted into a glossy finish. The collards should now have crispy, golden edges with tender, silky centers. If they're not quite crispy enough, return them to the skillet for 30 seconds to re-crisp.
Garnish and Serve Immediately
Transfer the fried collards to a serving platter and sprinkle with the 0.25 cup chopped fresh parsley. The parsley adds a fresh contrast to the rich, crispy collards and ties the dish together visually. Serve immediately while the edges remain crisp and the greens are still warm. The collards should be tender enough to eat with a fork but still hold their shape, with a satisfying crunch that gives way to silky greens.
For best results, serve as a side dish alongside grilled meats, fried chicken, or as a hearty vegetarian main with crusty bread. The crispy edges and balanced seasoning make these collards a standout dish that holds its own in any meal. Store any leftovers in an airtight container in the refrigerator for up to 3 days, but reheat only briefly in a skillet to restore crispiness.
Pro Tips For Making Fried Collards
- Wilt First, Fry Later: Don’t skip the wilt—start by cooking the collards in a little oil or water until they’re soft and just starting to shrink. This cuts frying time by half and keeps them from turning to mush when they hit the hot oil later.
- Dry Them Thoroughly: Pat the collards completely dry with paper towels before frying—wet leaves will splatter like crazy and won’t crisp up. I learned this the hard way after flipping the first batch into a greasy mess.
- Use Enough Oil: A thin layer of oil won’t cut it—you need enough to coat the bottom of the pan by about ¼ inch. Too little oil means uneven cooking and soggy greens. Trust me, the extra splash is worth it.
- Fry in Batches: Overcrowding the pan drops the temperature and steams the collards instead of frying them. Work in small batches—even if it takes longer—so they get that perfect crispy edge and tender center.
Regional styles of this recipe
Southern Tradition
The fried collards we know today trace back to the American South, where enslaved Africans adapted their West African leafy green traditions using available ingredients like lard or bacon fat.
In Georgia and South Carolina, collards became a staple during the Great Depression and beyond, often fried until crispy as a way to use up tougher outer leaves.
The technique spread across the region, with each state adding its own twist—Georgia leans toward saltier, simpler seasonings, while South Carolina often incorporates hot sauce for extra kick. 🌶️
In Texas, fried collards took on a bigger, bolder profile, often served as a side to barbecued meats or smoked brisket. The Lone Star State’s version frequently includes smoked paprika or chopped bacon mixed into the greens before frying, giving it a deeper, smokier flavor.
This regional adaptation reflects Texas’s love of bold, smoky seasonings in comfort food.
Carolina Crispy
South Carolina’s fried collards stand out for their extra-crispy edges, achieved by double-frying the greens—first in bacon fat (a nod to the state’s pork-heavy traditions), then in vegetable oil for that signature crunch. The Lowcountry version often includes shrimp or crab in the seasoning, blending Southern and coastal influences. For a vegetarian twist, use smoked salt instead of bacon fat and add diced jalapeños for heat.
In Charleston, these collards are traditionally served with she-crab soup or shrimp and grits, creating a perfect balance of textures—crispy collards against creamy soup or tender shrimp. The dish’s popularity in Charleston restaurants proves its versatility as both a side and a main course. 🥗
Texas Twist
Texas takes fried collards to next-level heartiness, often serving them as a main dish alongside cornbread and black-eyed peas. The Hill Country version includes chopped onions and garlic sautéed in the fat before adding collards, creating a savory base that deepens the flavor.
For extra richness, some cooks finish the dish with a butter and hot sauce drizzle, a technique borrowed from Texas-style fried okra.
In East Texas, where Cajun influences run strong, fried collards might include Andouille sausage or Cajun seasoning, blending Southern and Creole traditions.
For a vegetarian adaptation, swap the sausage for smoked gouda cheese crumbles and a dash of Cajun spices—the result is just as satisfying without the meat. 🔥
Modern Adaptations
Today’s chefs are putting a contemporary spin on fried collards, using avocado oil for a lighter fry and toasted sesame oil for a nutty finish.
In Atlanta, food trucks serve spicy collard wraps with crispy fried greens wrapped in flatbread and topped with peanut sauce—a fusion of Southern and Asian flavors.
For home cooks, try adding crumbled feta or toasted pine nuts for texture and a bright lemon-herb dressing to cut through the richness.
Another modern twist? Air-frying collards for a lighter version. Toss chopped collards with olive oil, salt, and smoked paprika, then air-fry at 375°F for 8-10 minutes, shaking the basket halfway.
The result is crispy edges with less oil, perfect for health-conscious eaters who still crave that satisfying crunch. ✨
Nutrition facts
Frequently asked questions
Why do I need to salt collards before frying?
Salting the collards first draws out excess moisture and bitterness, creating the perfect texture for frying. The 15-minute rest allows the salt to work its magic, ensuring crispy edges and tender greens. Skip this step, and your collards may steam instead of crisp up!
Can I use frozen collards for this recipe?
Yes, but thaw and drain them thoroughly first. Excess moisture prevents crispiness, so pat them completely dry with paper towels before seasoning. For best results, use fresh collards—they hold their shape better during frying.
What’s the secret to getting crispy edges?
High heat (350°F) and working in small batches are key. Overcrowding the pan steams the greens instead of crisping them. Use a heavy skillet and maintain consistent oil temperature for golden, shatter-like edges every time!
Can I make this recipe without butter?
Replace the butter with an extra 1 tbsp of oil or swap in olive oil for a fruity finish. The lemon juice still brightens the dish, but the butter adds richness. For a dairy-free option, use vegan butter** or extra oil.
How do I store and reheat leftovers?
Keep fried collards in an airtight container for up to 3 days in the fridge. To reheat, warm in a skillet with 1 tbsp oil over medium heat for 2-3 minutes until crispy again. Microwaving dulls the texture, so always reheat on the stove!