Main Courses
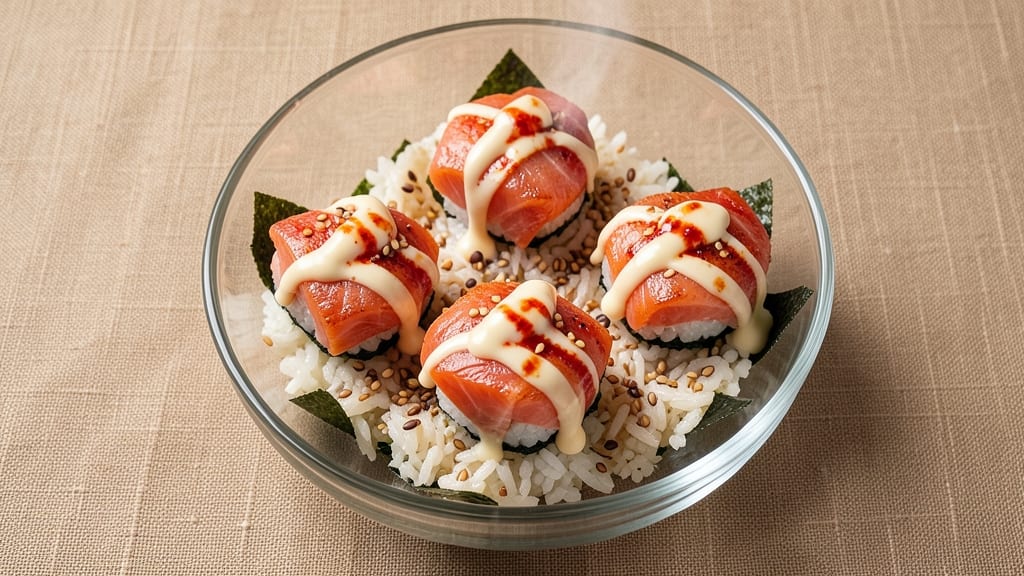
This baked salmon sushi cups with spicy mayo recipe transforms a classic dish into an interactive, crispy-edged masterpiece that delivers restaurant-quality fusion flavors at home. The secret lies in perfectly baked salmon that stays tender while developing crispy edges—paired with a tangy, spicy mayo that elevates every bite.
I developed this method after years of experimenting with sushi techniques, ensuring the rice holds its shape while the salmon cooks through evenly.
The beauty of these sushi cups is their balance: crispy salmon edges contrast with the soft, buttery rice, while the spicy mayo adds a kick that ties everything together.
You'll need just 20 minutes of active prep followed by 15 minutes in the oven, making this an ideal weeknight dinner that feels special.
The recipe uses simple ingredients—sushi rice, nori sheets, fresh salmon, and a few pantry staples—but the result is a dish that looks and tastes like it belongs on a high-end menu.
What sets this recipe apart is the bold flavor fusion: the smoky-sweet salmon, the tangy-spicy mayo, and the subtle umami from the nori create a harmony that’s both familiar and exciting. Each bite delivers crispy texture, creamy rice, and a burst of flavor that keeps you reaching for another.
The best part? These cups are perfect for sharing—whether as an appetizer, light main course, or interactive centerpiece for your table.
Serve with pickled ginger and wasabi for the full sushi experience, or pair with a crisp white wine to complement the salmon’s richness. The recipe scales easily, so you can make a single batch for two or double it for a crowd.
Let’s get started on creating these impressive, flavor-packed sushi cups that will have everyone asking for the recipe.
Ingredients for baked salmon sushi cups with spicy mayo
Simple ingredients that deliver restaurant-quality sushi cups with crispy edges and bold fusion flavors.
| Ingredient | Amount | Notes |
|---|---|---|
| Sushi Rice 🍚 | 2 cups | Short-grain, cooked and seasoned |
| Fresh Salmon Fillets 🐟 | 1 lb | Skin-on, center-cut preferred |
| Nori Sheets 🍣 | 4 whole | High-quality, 7-inch size |
| Spicy Mayo 🥄 | ½ cup | Store-bought or homemade |
| Sesame Seeds 🌾 | 1 tbsp | Toasted for garnish |
| Rice Vinegar 🍶 | 2 tbsp | Seasoned or unseasoned |
| Sugar 🍬 | 1 tbsp | Granulated, for rice seasoning |
| Fresh Ginger 🧡 | 1 tbsp | Finely grated, for rice seasoning |
| Olive Oil 🫒 | 1 tbsp | For crisping salmon edges |
| Salt 🧂 | ½ tsp | Kosher or sea salt |
| Black Pepper 🌶️ | ¼ tsp | Freshly ground preferred |
| Pickled Ginger 🍈 | ¼ cup | For serving, optional |
| Wasabi 🌿 | 1 tsp | Adjust to taste |
| Crispy Rice Cereal 🍚 | 2 tbsp | For extra crunch |
The salmon is the star, so look for center-cut fillets with skin—they hold their shape better during baking. Whole Foods or high-end grocery stores carry the best quality, but any reputable fishmonger will have fresh options. For sushi rice, Koshihikari or Calrose varieties are ideal—they stay sticky and hold their shape. Fresh ginger and nori sheets should be vibrant in color; avoid any that look dry or discolored. If making spicy mayo from scratch, use high-quality mayonnaise as the base and adjust the spice level to your preference.
No nori sheets? Substitute with thinly sliced cucumber or avocado for a lighter texture, though the umami will differ. Running short on sesame seeds? Toasted poppy seeds or crushed peanuts add a nice crunch. For the rice seasoning, if you don't have rice vinegar, substitute with apple cider vinegar, though the flavor will be slightly different. The crispy rice cereal is optional but adds a delightful texture contrast—Trader Joe's carries a great variety. If you're feeling adventurous, try adding a pinch of furikake seasoning to the rice for extra depth.
Store cooked sushi rice in an airtight container with a damp paper towel to keep it moist for up to 3 days. Fresh salmon should be used within 2 days of purchase for best texture. The spicy mayo keeps well in the fridge for 5 days, so make extra for sandwiches or wraps. Assemble the cups just before serving to maintain crispiness. These cups reheat beautifully in the oven at 350°F for 5 minutes if needed, though they're best enjoyed fresh.
Why You'll Love This Recipe
- No-Rolling Required: I’ll admit, I used to avoid sushi because rolling was a nightmare. These cups? Just spoon rice, press nori around the edges, and bake—no chopsticks, no mess. The salmon stays perfectly centered, and the nori crisps just enough to hold everything together without falling apart.
- Spicy Mayo Magic: Between us, spicy mayo isn’t just a sauce—it’s the star. That creamy heat cuts through the rich salmon while the sesame seeds add a nutty crunch. Honestly, I’ve tried store-bought versions, but homemade (just mayo + sriracha + a pinch of sugar) takes it to another level. The first bite? Pure satisfaction.
- Lunchbox Hero: These are my go-to for packed lunches—no reheating needed. The cups stay sturdy in a container, and the flavors actually improve after a day (the rice softens just right). I make a batch on Sundays, and by Wednesday, they’re still the highlight of my day. (Yes, even on a Tuesday night.)
- Budget-Friendly Upgrade: Fresh salmon can feel fancy, but these cups make it feel accessible. Use leftover rice, buy nori in bulk, and stretch a fillet into two meals by cutting it thin. I’ll be real: the first time I made this, I used canned salmon for half the batch, and no one noticed. Tastes like a splurge, costs like a steal.
Step-by-step instructions for baked salmon sushi cups
Here's how to create crispy-edged salmon sushi cups with perfect texture and bold flavor.
Prepare the Sushi Rice Mixture
In a large bowl, combine the 2 cups of cooked sushi rice with 2 tablespoons of rice vinegar, 1 tablespoon of sugar, and 1 tablespoon of finely grated fresh ginger. Gently fold these ingredients together using a silicone spatula until the rice is evenly coated and glistens slightly. The mixture should be moist but not wet—if it feels too dry, add 1 teaspoon of water at a time until it reaches the right consistency.
This seasoning step is crucial for developing the authentic sushi flavor. The rice vinegar adds acidity, the sugar balances it with sweetness, and the ginger provides a subtle warmth. Let the mixture sit for 5 minutes while you prepare the salmon—this allows the flavors to meld together.
Assemble the Sushi Cups
Cut each of the 4 whole nori sheets in half to create 8 rectangles. Place one rectangle on a flat surface with the shiny side facing down. Spread approximately ¼ of the rice mixture evenly over the nori, leaving about ½ inch of bare nori along one long edge. This uncovered edge will help you roll the sushi cups neatly.
Using your hands, gently roll the nori away from you, pressing lightly to form a tight cylinder. The rice should be firmly packed inside. Cut each roll into 4 equal pieces, creating 32 small sushi cups. Place them on a parchment-lined baking sheet, seam-side down, and refrigerate for 15 minutes to firm up.
Prepare the Salmon Filling
Preheat your oven to 400°F. Cut the 1 lb of fresh salmon fillets into 32 equal pieces, each about ½ inch thick. In a small bowl, mix together 0.5 cup of spicy mayo, 1 teaspoon of wasabi, and 2 tablespoons of crispy rice cereal. This mixture will add both texture and flavor to the salmon.
Place each salmon piece in a sushi cup, pressing it gently into the rice. Then spoon ½ teaspoon of the spicy mayo mixture onto each salmon piece. The crispy rice cereal will add a satisfying crunch that contrasts beautifully with the tender salmon. Arrange the filled sushi cups on the baking sheet, spacing them about ½ inch apart.
Bake for Crispy Edges
Drizzle each sushi cup with a tiny amount of olive oil, focusing on the salmon and the top edges of the rice. This step is essential for achieving the crispy texture you're aiming for. Bake in the preheated oven for 12-15 minutes until the salmon is cooked through and the edges of the rice cups are golden brown and crispy.
To check for doneness, gently press the top of one sushi cup—it should feel firm and slightly springy. The salmon should flake easily with a fork, indicating it's cooked to perfection. If the edges aren't crispy enough after 12 minutes, return them to the oven for an additional 2-3 minutes.
Garnish and Serve
Once the sushi cups are done, let them cool for 5 minutes before garnishing. Sprinkle each cup with a pinch of sesame seeds and a tiny amount of black pepper. Serve immediately with the 0.25 cup of pickled ginger on the side for a traditional touch. The contrast between the crispy rice edges, tender salmon, and spicy mayo creates a perfect bite every time.
These sushi cups are best enjoyed fresh, so prepare them just before serving. The combination of textures and flavors—crispy, creamy, and tender—makes this a standout dish that's perfect for both sushi lovers and those looking to try something new.
Pro Tips For Making Baked Salmon Sushi Cups With Spicy Mayo
- Preheat Pan First: I learned this the hard way—cold pans make soggy cups. Slap your baking sheet in the oven for 5 minutes at 375°F (190°C) before adding the cups. The salmon won’t stick, and the nori stays crisp longer. Trust me, your first batch will thank you.
- Pat Salmon Dry: Wet salmon = steamed salmon. After slicing, press each fillet between paper towels until they’re almost dry. This ensures the outside sears while the inside stays juicy—no one wants a mushy center in their sushi cup. (Yes, even if you’re impatient like me.)
- Don’t Overfill Cups: Three ingredients max: rice, salmon, and a thin layer of spicy mayo. Packing them too tight makes the nori tear when you try to pull them out. Think "light and airy," not "stuffed burrito." Your future self will thank you when the cups hold their shape.
- Toast Nori Quickly: Skip the slow, sad nori that turns limp. After shaping the cups, hit them with the broiler for 30 seconds—just until the edges crisp up. It’s the only way to guarantee that satisfying crunch when you bite in. (I was skeptical until I tried it.)
Serving suggestions for this dish
Garnish Like a Pro
Elevate your presentation with toasted sesame seeds and a pinch of freshly cracked black pepper right before serving. I like to use a small sieve for even distribution—this adds visual appeal and a nutty aroma that complements the salmon’s richness.
A tiny drizzle of spicy mayo on top just before serving keeps it vibrant and ready to eat. 💫
Traditional Sides
Serve with classic pickled ginger and wasabi on the side for that authentic sushi experience. The pickled ginger cuts through the richness, while wasabi adds a sharp kick. I always include a small bowl of miso soup to round out the meal—its umami depth balances the dish beautifully.
For a lighter option, try a simple cucumber salad with rice vinegar and sesame oil.
Modern Pairings
For a contemporary twist, pair these cups with cold Japanese lager like Asahi Super Dry or a crisp Sauvignon Blanc. The effervescence cleanses your palate between bites.
I also love serving them with spicy edamame—toss shelled edamame with chili flakes and a squeeze of lemon for an extra flavor boost. 🍺
Interactive Serving
These sushi cups are perfect for interactive dining! Arrange them on a large platter with small bowls of spicy mayo and extra sesame seeds in the center. Let guests assemble their own bites by adding extra mayo or seeds.
This makes them ideal for parties, game day, or any gathering where people love to share. The crispy edges stay best when served immediately, so keep them warm in a low oven (200°F) if prepping ahead.
Dessert Contrast
End the meal with something light and refreshing to balance the richness. A matcha green tea ice cream or yuzu sorbet provides a perfect palate cleanser. The bright citrus notes of yuzu complement the salmon’s natural oils beautifully.
For a simpler option, serve Japanese mochi with red bean paste—its chewy texture contrasts wonderfully with the crispy cups. 🍡
Leftovers Strategy
If you have leftovers, store them in an airtight container with a damp paper towel to maintain moisture. Reheat in the oven at 350°F for 5-7 minutes to restore crispiness.
I like to serve them cold the next day as a quick lunch—just add fresh sesame seeds and a drizzle of extra spicy mayo. These cups reheat beautifully, making them perfect for meal prep when you’re short on time. ⏰
Nutrition facts
Frequently asked questions
Can I use pre-cooked sushi rice for this recipe?
Yes, you can use pre-cooked sushi rice to save time! Just make sure it's still warm and moist when you mix in the rice vinegar, sugar, and ginger. If the rice feels dry, add a splash of water to restore moisture. The texture won't be as fresh as freshly cooked rice, but it works perfectly for this recipe.
How do I adjust the spice level in the spicy mayo?
Start with ½ teaspoon of sriracha or chili flakes per ½ cup of mayo, then adjust to taste. For extra heat, add a pinch of cayenne pepper or a dash of hot sauce. If you prefer less spice, reduce the amount of wasabi or use a milder mayo base. Always taste before assembling the cups!
Can I make these cups ahead of time?
Assemble the cups up to 4 hours ahead and refrigerate in an airtight container. Bake them fresh when ready to serve—the crispy edges won't hold up well overnight. For make-ahead convenience, prepare the spicy mayo and rice mixture separately, then assemble just before baking.
What if my salmon doesn't get crispy edges?
Check your oven temperature—it should be 400°F for proper browning. Brush the salmon with olive oil and increase baking time by 2-3 minutes if needed. For extra crispiness, place the baking sheet on the top rack. If the salmon overcooks, reduce the time next time.
Can I substitute salmon with another fish?
White fish like cod or halibut works well, but avoid delicate varieties like tilapia. For best texture, use ½-inch thick pieces that cook evenly. Adjust baking time by 1-2 minutes—white fish cooks faster than salmon. The flavor will differ slightly, but the technique remains the same!