Snacks
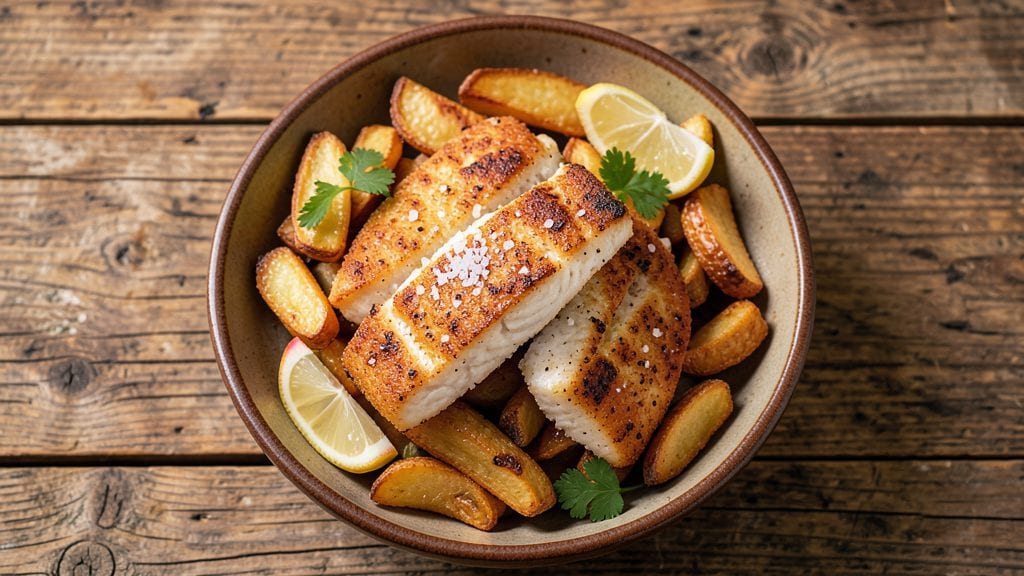
This baked fish and chips recipe delivers the quintessential British pub experience with crispy golden crusts and perfectly flaky fish every time. After years of perfecting oven techniques—including the secret to ultra-crispy chips without deep-frying—I’ve created a method that’s foolproof yet feels like a restaurant-quality treat.
The key lies in precise seasoning, high-heat baking, and a strategic double-dip for the chips that transforms them from soggy to shatteringly crisp.
The beauty of this recipe is its balance between tradition and convenience. You’ll start with simple white fish like cod or haddock, coated in a light flour mixture that creates a delicate crust while keeping the flesh tender inside.
Meanwhile, the chips—whether classic fries or rustic wedges—get their signature crunch through a two-step baking process that ensures maximum crispiness without oil splatter. This method works equally well for weeknight dinners or weekend gatherings, scaling effortlessly to feed a crowd.
What you’ll end up with is a plate that looks and tastes like it came straight from a seaside chippy: golden, crispy chips piled high alongside fish so tender it flakes at the touch of a fork.
The aroma alone—warm, salty, and slightly smoky—will have everyone gathered around your table. Serve with classic tartar sauce, a squeeze of lemon, or a drizzle of malt vinegar for that authentic British touch. The best part?
No deep-fryer required, just your oven and a little patience for results that rival takeout.
This recipe also adapts beautifully to modern preferences: swap the flour coating for almond flour for a gluten-free version, or marinate the fish in herbs and lemon for extra brightness.
The chips can even be made ahead and reheated for crispiness. Let’s get cooking—your first bite will be worth every minute of prep.
Ingredients for baked fish and chips
Simple ingredients, big pub-style flavor—no deep-fryer needed for crispy perfection.
| Ingredient | Amount | Notes |
|---|---|---|
| Fresh White Fish Fillets 🐟 | 2 lb | Cod or haddock, skin-on preferred |
| Russet Potatoes 🥔 | 3 lb | Large, unpeeled, cut into wedges |
| All-Purpose Flour 🌾 | 1 ½ cups | For fish coating and chips |
| Cornstarch 🌾 | ½ cup | For extra crispiness in chips |
| Large Eggs 🥚 | 2 whole | Beaten for fish dredge |
| Diamond Crystal Kosher Salt 🧂 | 2 tbsp | For seasoning chips and fish |
| Ground Black Pepper 🌶️ | 1 tsp | Freshly ground for fish |
| Extra-Virgin Olive Oil 🫒 | ¼ cup | For tossing potato wedges |
| Fresh Lemon 🍋 | 1 whole | Juiced for brightness |
| Malt Vinegar 🍶 | ¼ cup | For serving (optional) |
| Mayonnaise 🥛 | ½ cup | For tartar sauce |
| Capers 🍈 | 2 tbsp | Chopped for tartar sauce |
| Dill Pickle 🥒 | 1 whole | Finely chopped for tartar sauce |
| Fresh Dill 🌿 | ¼ cup | Chopped for tartar sauce |
The potatoes are the star here. Russets are non-negotiable—their starch makes the crispiest chips. Grab 3 lbs from Trader Joe's or your local market for the best texture. Cut them into even wedges (no need to peel) and toss them in olive oil and salt before baking. The secret? Two baking sessions—first at high heat to crisp, then a quick finish to lock in the crunch. For the fish, cod or haddock is ideal, but any firm white fish works. Look for fillets with skin still attached—they help keep the fish together during baking.
No malt vinegar? Substitute lemon juice or white wine vinegar—it won’t be exactly the same, but close enough. Short on dill for the tartar sauce? Chives or parsley work in a pinch, though the flavor won’t be identical. The flour mixture for the fish should be light—too much makes it tough. Almond flour works for gluten-free, but add an extra egg to help bind. For extra crispiness, cornstarch on the chips before baking is a game-changer. And if your oven runs hot, reduce the time by 2-3 minutes—watch those chips like a hawk!
Chips reheat best straight from the oven—5 minutes at 425°F brings back the crunch. Store leftovers in the fridge for 3 days, but they’ll lose crispiness. The fish stays fresh for 2 days if wrapped tightly in foil. Tartar sauce keeps for 5 days in the fridge, but the fresh herbs wilt after 2. For a crowd, double the chips and fish—they’re easy to scale. Leftovers? Fish and chips hash the next day—just chop everything up and fry in a pan with a little oil.
Why You'll Love This Recipe
- One-Pan Wonder: I swear by this for lazy nights—just toss the potatoes and fish on a sheet, drizzle with oil, and let the oven do the work. No fussing with multiple pans or deep-frying messes.
- Crispy Magic: That cornstarch coating turns the fish into golden, shatteringly crisp edges while keeping the inside tender. The potatoes? Fluffy on the inside, crackling on the outside—exactly how they should be.
- Weeknight to Picnic: Between us, this feeds a crowd without breaking the bank. Pack leftovers for lunch or take them straight to a park—still tastes fresh hours later.
- Budget-Friendly Crunch: Russets are cheap, white fish is affordable, and you’re not drowning in specialty ingredients. Honestly, I make this twice a month and never get tired of it.
Step-by-step instructions for baked fish and chips
Here's how to nail that classic British combo with a crispy, golden crust and tender, flaky fish.
Prep the Potatoes for Maximum Crisp
Start by cutting the 3 lb russet potatoes into 1-inch wedges, leaving the skin on for texture. Place them in a large bowl and toss with the 0.25 cup extra-virgin olive oil until evenly coated. Sprinkle with 1 tablespoon of the 2 tbsp diamond crystal kosher salt and toss again. Spread the wedges on two baking sheets in a single layer, ensuring they don't overlap.
Here's the thing—don't skip the single layer. Overlapping potatoes will steam instead of crisp, and you'll end up with soggy chips. Let them sit uncovered at room temperature for 30 minutes. This drying step is what gives you that perfect crunch. Flip the wedges halfway through so both sides get equal exposure to the air.
Create the Perfect Fish Coating
In a shallow dish, beat the 2 whole large eggs until just combined. In another dish, mix the 1.5 cups all-purpose flour with the 0.5 cup cornstarch and the remaining 1 tablespoon diamond crystal kosher salt. Season the fish fillets with the 1 tsp freshly ground black pepper on both sides—this ensures the seasoning penetrates the flesh.
Dredge each fillet first in the flour mixture, pressing gently to adhere, then dip into the beaten eggs, letting any excess drip off. Return to the flour and press again for an even, crispy crust. I like to work in batches to avoid overcrowding the pan later. Let the coated fillets rest on a wire rack for 10 minutes—the flour needs time to firm up for that perfect crunch.
Bake the Potatoes to Golden Perfection
Preheat your oven to 450°F. Bake the potato wedges for 25 minutes, then flip each piece and bake another 15-20 minutes until they're deep golden brown and crispy all over. You'll know they're done when they sound hollow when tapped together and the edges are crisp enough to stand up on their own.
Don't be tempted to peek too early. Every time you open the oven, you lose heat and moisture, which can lead to uneven cooking. If your oven runs hot, start checking at the 20-minute mark. The wedges should be tender when pierced with a fork but still hold their shape—overcooking turns them into mushy fries.
Bake the Fish Until Crisp and Flaky
While the potatoes bake, place the coated fish fillets on a separate baking sheet lined with parchment paper. Bake at 425°F for 12-15 minutes until the crust is deep golden brown and the fish flakes easily when tested with a fork. The edges should be crisp enough to hold their shape when lifted.
Here's where timing matters: the fish is done when it reaches an internal temperature of 145°F. If you pull it out too early, the center will be undercooked and rubbery. If you leave it too long, the crust will burn before the inside finishes. The cornstarch in the coating is what gives you that extra crunch without making the fish tough.
Assemble and Serve with Tartar Sauce
Transfer the baked fish to a serving platter and keep the potatoes warm on their baking sheets. For the tartar sauce, finely chop the 1 whole dill pickle and 2 tbsp capers, then mix with the 0.5 cup mayonnaise, 0.25 cup finely chopped fresh dill, and 1 tablespoon of the 0.25 cup malt vinegar. Add a squeeze of the fresh lemon juice for brightness.
Serve the fish immediately with the crispy potato wedges and a generous dollop of tartar sauce. The contrast of the flaky, buttery fish with the crispy, salty chips is what makes this dish legendary. For extra authenticity, squeeze a little fresh lemon over the top right before serving—it cuts through the richness and adds that final pop of flavor.
Pro Tips For Making Baked Fish And Chips
- PRE-CUT POTATOES? NO.: Peel and slice potatoes thick—about ½-inch—and soak them in cold water for 30 minutes before baking. I learned this the hard way: thin slices burn faster, and skipping the soak leaves them gummy. Use a mandoline if you’re brave, but a sharp knife works fine.
- FISH CRUST NEEDS AIR: Pat the fish bone-dry with paper towels, then dredge it in flour mixed with 2 tablespoons cornstarch (not just flour). The cornstarch is non-negotiable—it’s what makes the crust crispy, not soggy. Tap off excess before dipping in egg; a thick, uneven coating means a weak crust.
- BAKE POTATOES SEPARATELY: Don’t crowd the tray—space potatoes 1 inch apart and bake them alone at 425°F (220°C) for 25 minutes before adding the fish. Crowding steams them instead of crisping, and I’ve ruined more batches by ignoring this. Yes, it’s two oven trips, but it’s worth it.
- REST FISH AFTER BAKING: Pull the fish out of the oven and let it sit for 3–5 minutes under foil—even if it looks done. I used to cut into it immediately, and the juices would pool, making the crust soggy. This guarantees crispy edges and flaky fish every time.
Common mistakes when making perfect results
Overcrowding the Pan
Placing too many potato wedges or fish fillets on a single baking sheet is a rookie move that kills crispiness. When food overlaps, it steams instead of crisps, resulting in soggy chips or a gummy fish crust.
I’ve seen this happen when people try to fit all their chips on one tray—always use two baking sheets for the potatoes and space the fish fillets at least 1 inch apart. This ensures proper air circulation and even browning. 🌡️
Skipping the Resting Time
The 10-minute rest for coated fish fillets is non-negotiable. If you skip it, the flour coating won’t adhere properly, leading to a crumbly crust that falls off in flakes. I’ve learned this the hard way—rushing this step means your fish ends up tasting like cardboard.
Let the coating firm up on a wire rack before baking. For the potatoes, the 30-minute drying time is equally critical. Skipping it means excess moisture in the wedges, which turns crispy chips into sad, limp fries.
Peeking Too Early
Every time you open the oven door, you’re letting out heat and moisture, which disrupts the cooking process. For the chips, this can cause uneven browning or even steaming. I recommend setting a timer and resisting the urge to peek until at least 20 minutes have passed.
The same goes for the fish—once it’s in the oven, leave it alone until the 12-15 minute mark. Patience here is key to that perfect golden crust. 🔥
Using the Wrong Potatoes
Not all potatoes are created equal, and using the wrong variety will leave you with mushy chips. Russet potatoes are the gold standard because of their high starch content, which is essential for crispiness. Substituting with red or Yukon Gold potatoes will result in a denser, less crispy texture.
If you’re set on using another type, soak them in cold water for 30 minutes first to draw out excess starch, but even then, the results won’t be the same. Stick with Russets for that authentic chippy texture.
Overcooking the Fish
Fish cooks in a flash, and once it hits 145°F internal temperature, it’s done. Leaving it in the oven even a minute longer will dry it out or burn the crust. I’ve ruined more than a few batches by not checking the temperature.
Invest in a good meat thermometer—it’s the only way to guarantee perfect doneness every time. If you don’t have one, use the fork test: the fish should flake easily but still hold its shape. Overcooked fish turns rubbery and loses all its tenderness.
Neglecting the Double-Bake
The secret to restaurant-quality chips is the two-step baking process. Many home cooks skip the second bake, which is what locks in that final crisp. After the first bake at 450°F, flip the wedges and return them to the oven for another 15-20 minutes.
This second bake ensures the chips are crispy all the way through, not just on the outside. If you’re short on time, you can finish them in the air fryer for 3-5 minutes at 400°F, but the oven method gives the best results. ⚡
Nutrition facts
Frequently asked questions
Can I use frozen fish for this recipe?
Yes, but thaw it properly first! Place frozen fillets in the fridge overnight or use the cold water method (sealed in a bag for 30 minutes). Never thaw at room temperature—this can lead to uneven cooking. Pat dry thoroughly before dredging to ensure a crispy crust.
How do I keep the chips crispy after baking?
Transfer baked chips immediately to a single layer on a wire rack (not a plate) to cool. This prevents steam buildup that makes them soggy. For serving, place them in a 200°F oven for up to 10 minutes if needed. Store leftovers in the fridge for 1 day max—reheat in the oven for 5 minutes at 425°F to restore crispiness.
What's the best fish to use besides cod or haddock?
Any firm white fish works well! Try halibut, pollock, or tilapia for similar texture. For extra flavor, use salmon (skin removed) or mahi-mahi, but reduce baking time by 2-3 minutes—these fish cook faster. Avoid delicate fish like flounder or sole, as they may fall apart with the coating.
Can I make this gluten-free?
Replace the all-purpose flour with almond flour or a 1:1 gluten-free baking flour blend (like Bob's Red Mill). For the chips, use cornstarch**> instead of flour for coating. Add an extra 1 egg to help bind the coating. The texture will be slightly different but still delicious.
Why did my fish turn out dry?
Overcooking is the most common culprit—fish is done at 145°F internal temp. Pull it out immediately when it flakes easily with a fork. Another issue could be using too much flour in the coating (stick to 1.5 cups total) or baking at too high a temperature. For extra moisture, brush the fillets with a little olive oil before dredging.