
Beverages
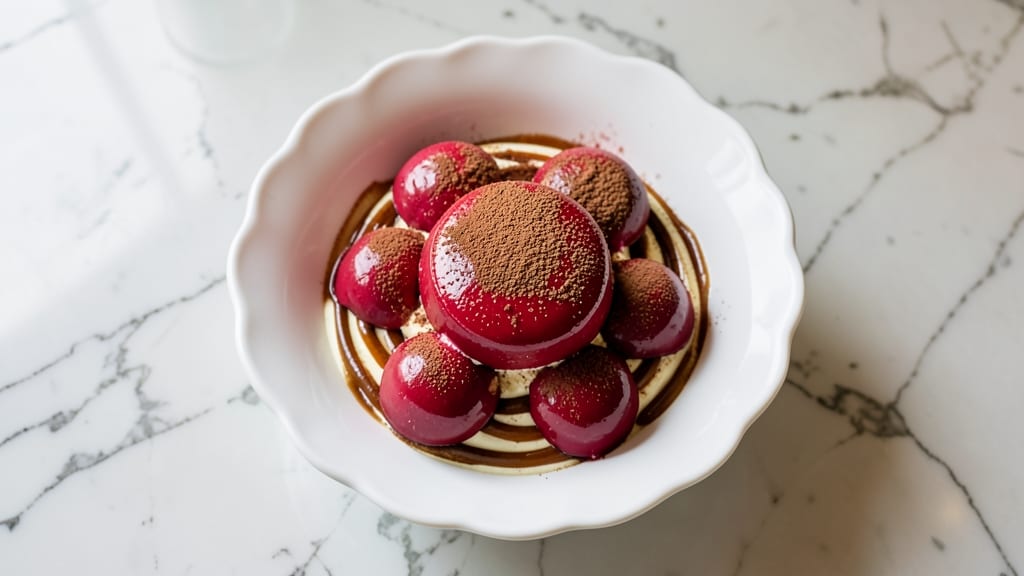
Creating red velvet truffles with a bold cocoa-cream filling is a game-changer for dessert lovers who crave rich texture and vibrant flavor. This recipe delivers restaurant-quality results in just 15 minutes of active prep, with a secret ingredient that transforms ordinary cream cheese into something extraordinary.
The key lies in balancing cocoa powder and cream cheese for that signature red velvet taste, wrapped in a smooth coating that melts in your mouth.
What sets these truffles apart is their foolproof technique—no baking required, just mixing, chilling, and rolling. The filling stays luscious and creamy while the outer layer provides a satisfying contrast, whether you choose classic cocoa powder, velvety white chocolate, or playful sprinkles.
This method also allows for easy customization, so you can adjust sweetness or add extracts like vanilla or almond for depth.
By the time you're done, you'll have perfectly portioned truffles with a velvety interior and a smooth, glossy exterior that looks as impressive as it tastes.
The chilling process ensures they hold their shape while developing that signature red velvet flavor, making them ideal for gifting, parties, or satisfying a sweet craving. Each bite delivers a perfect balance of cocoa richness and creamy sweetness.
These truffles are versatile enough for any occasion—serve them as an elegant dessert, pack them in boxes for holidays, or use them as a stunning centerpiece for your next gathering.
The recipe scales easily, so you can make just a few for personal indulgence or dozens for sharing. Let's get started on creating these decadent treats!
Ingredients for red velvet truffles
Twelve ingredients transform into decadent red velvet truffles with a creamy cocoa filling.
| Ingredient | Amount | Notes |
|---|---|---|
| Cream Cheese 🧀 | 8 oz | Full-fat, room temperature |
| Unsalted Butter 🧈 | ½ cup | Cold, cubed for texture |
| Powdered Sugar 🍚 | 1 cup | Sifted for smoothness |
| Cocoa Powder 🍫 | ¼ cup | Dutch-processed, high quality |
| Vanilla Extract 🌿 | 1 tbsp | Pure, high-proof preferred |
| Red Food Coloring 🎨 | ½ tsp | Gel form for precision |
| Heavy Cream 🥛 | ½ cup | Cold, for coating |
| White Chocolate Chips 🍫 | 1 cup | Melted for coating (or cocoa powder) |
| Powdered Sugar 🍚 | ¼ cup | For rolling and dusting |
| Almond Extract 🌿 | ½ tsp | Optional, for depth |
| Coconut Oil 🥥 | 1 tbsp | For easy rolling |
| Coarse Sugar 🍬 | ¼ cup | For optional decorative coating |
The cream cheese is the foundation—Philadelphia brand is my go-to for consistency, but any full-fat, high-quality block works. Room temperature is key; cold lumps ruin the texture. Whole Foods carries the best selection of European-style cream cheese if you want to splurge. For the cocoa powder, Valrhona or Ghirardelli make all the difference—Dutch-processed ensures smoothness and rich flavor. The red food coloring? Gel form (like Wilton) mixes perfectly without turning your filling pink sludge. I always double-check the expiration dates on extracts—stale vanilla or almond can ruin the delicate balance.
No white chocolate chips? Melted dark chocolate works too, though the flavor profile shifts slightly. Short on powdered sugar? Confectioners' sugar from the bulk bins is cheaper and just as fine. The almond extract is optional but adds that subtle sophistication—trust me, it elevates the whole thing. For the coating, melted white chocolate is foolproof, but a dusting of cocoa powder gives a classic red velvet look. Pro tip: if your filling feels too soft after chilling, pop it in the fridge for another 15 minutes. And if you're feeling fancy, mix in a teaspoon of espresso powder with the cocoa for a mocha twist.
These truffles keep beautifully—2 weeks in the fridge, wrapped tightly in parchment. Freeze for 3 months if you're prepping ahead, but let them thaw in the fridge overnight for best texture. I always make a double batch and portion them into mini silicone molds for easy gifting. The filling stays creamy when stored properly, so no need to rush eating them. For serving, dust with extra cocoa powder or roll in crushed pistachios—the possibilities are endless. Just don't skip the chilling step; patience is what makes these truffles hold their shape.
Why You'll Love This Recipe
- No Mixing Madness: I swear by this recipe because it’s literally three ingredients mixed by hand—just cream cheese, butter, and powdered sugar until smooth. No electric mixers, no waiting for dough to chill, just you, a bowl, and five minutes of elbow grease. (Yes, even on a Tuesday night.)
- Velvet Magic: That first bite? Creamy, tangy, with just enough cocoa to tease your taste buds—like red velvet cake’s dreamy cousin. The vanilla extract ties it all together, making it taste homemade without a single drop of artificiality.
- Party in a Jar: Roll them into balls, dip in chocolate, or leave them naked—these truffles work for anything. Holiday gifts? Check. Last-minute dessert? Check. Even my picky teenager sniffs them out of the fridge first.
- Zero-Waste Luxury: Make a double batch and store them in the fridge for a week. The cream cheese keeps them rich but stable, and the powdered sugar coating keeps them from sticking. Budget-friendly, foolproof, and they taste even better the next day. (Between us, I’ve been known to “accidentally” leave extras out.)
Step-by-step instructions for red velvet truffles
Here's how to create these decadent cocoa-cream truffles with velvety texture and vibrant color.
Prepare the Cream Cheese Base
In a stand mixer fitted with the paddle attachment, beat the 8 oz cream cheese and 0.5 cup unsalted butter on medium speed for 2-3 minutes until completely smooth and creamy. This step is crucial—you want to eliminate any lumps to ensure a silky filling. Scrape down the sides of the bowl as needed to keep the mixture moving.
While the mixer runs, gradually add the 1 cup powdered sugar and 0.25 cup cocoa powder, mixing on low speed until fully incorporated. The dough should be thick and smooth, almost like a rich cookie dough. If it feels too stiff, you can add 1-2 teaspoons of heavy cream to help bind it together. The texture should be pliable but not sticky.
Add Flavors and Color
With the mixer still running, add the 1 tbsp vanilla extract, 0.5 tsp red food coloring, and 0.5 tsp almond extract (if using). Mix on low speed for 1-2 minutes until the color is evenly distributed and the flavors are fully combined. The mixture should be a vibrant red with no streaks of color remaining. Taste a small amount to ensure the sweetness and cocoa balance are just right.
If the dough feels too soft or sticky after adding the extracts, chill it in the refrigerator for 10-15 minutes while you prepare the next components. This helps firm it up for easier rolling. The dough should hold its shape when pressed gently but still be malleable enough to roll into balls.
Roll and Chill the Truffles
Line a baking sheet with parchment paper and set aside. Using your hands, roll the dough into 1-inch balls, placing them 1 inch apart on the prepared sheet. For a smoother finish, dip your fingers in powdered sugar before rolling. Once all the balls are formed, transfer the baking sheet to the refrigerator and chill for 30 minutes to firm up the truffles.
While they chill, melt the 1 cup white chocolate chips and 1 tbsp coconut oil together in a microwave-safe bowl in 30-second intervals, stirring between each interval until completely smooth. The mixture should be glossy and fluid, ready for dipping. If the white chocolate thickens as it cools, reheat it gently over a double boiler to restore its consistency.
Coat and Decorate the Truffles
Remove the chilled truffles from the refrigerator and dip each one halfway into the melted white chocolate, allowing any excess to drip off. Place them back on the parchment-lined baking sheet and sprinkle the tops with 0.25 cup coarse sugar for a decorative touch. For extra flair, you can also dust them with additional powdered sugar or a pinch of cocoa powder.
Let the white chocolate set at room temperature for 10-15 minutes or refrigerate for 5 minutes if you're in a hurry. The truffles should have a smooth, glossy coating with crisp sugar crystals on top. Serve immediately or store in an airtight container in the refrigerator for up to 5 days, though they're best enjoyed fresh.
Serve with Confidence
These truffles are perfect for holidays, gift-giving, or simply indulging in a moment of decadence. The contrast of the red velvet filling with the creamy white chocolate exterior creates a striking visual and flavor experience. Pair them with a cup of coffee or a glass of milk for the ultimate treat.
For a professional touch, arrange the truffles on a platter with a dusting of cocoa powder or a drizzle of melted chocolate. The key to success lies in the smoothness of the filling and the precision of the coating—once you master these steps, you'll have a showstopping dessert that's sure to impress.
Pro Tips For Making Red Velvet Truffles
- Melt Butter Slowly: If you dump cold butter into the cream cheese, you’ll end up with lumps that never smooth out—no matter how long you beat it. Warm the butter to room temp first (about 10 minutes out of the fridge), then microwave it for 10 seconds just to soften. The mix will come together like butter.
- Sift the Cocoa: Unsifted cocoa powder clumps like a grumpy cat in a ball of yarn, and those lumps ruin the texture. Use a fine-mesh sieve and tap it firmly against the bowl—twice—before mixing. This keeps the truffles silky, not grainy.
- Chill the Dough: Rolling truffles in cocoa or powdered sugar when the dough’s still warm means they’ll stick like glue to your fingers and the bowl. Pop the whole bowl in the fridge for 20 minutes before shaping—it’s the only way to get clean, easy-to-handle balls.
- Add Vanilla Last: I used to mix in the vanilla early, thinking it didn’t matter, but it dulls the flavor if it sits too long. Stir it in right before rolling the truffles—just a splash, but it’ll make the difference between "meh" and "worth the effort." (And yes, use real vanilla extract, not imitation.)
Troubleshooting great red velvet truffles
Filling Too Soft
If your red velvet filling feels too soft after chilling, it’s usually because the cream cheese didn’t firm up enough. I’ve found that chilling the dough for an extra 15-20 minutes often solves this—just pop it back in the fridge while you melt the chocolate.
Another trick? Add 1-2 tablespoons of powdered sugar to absorb excess moisture. For a firmer texture, try substituting 2 oz of the cream cheese with mascarpone cheese, which holds its shape better. 💡
Color Uneven
Streaks of color in your filling happen when the red food coloring isn’t fully incorporated. To fix this, mix the coloring with 1 tablespoon of heavy cream first, then add it to the mixer while running on low speed for 3-4 minutes.
For a more vibrant red, use Wilton gel food coloring—it disperses better than liquid dyes. If the color is too pale, add a tiny pinch more (start with ¼ tsp increments) and mix again. 🎨
Chocolate Coating Cracking
White chocolate cracks when it sets too quickly or the truffles aren’t fully chilled. To prevent this, ensure your truffles are firm after 30 minutes in the fridge—they should hold their shape when gently pressed.
Also, work in a cool environment (not a hot kitchen) and avoid dipping truffles that are still warm. For extra insurance, add ½ tsp coconut oil to the melted chocolate to improve flexibility. Let the coating set at room temperature for 15 minutes before moving them. ❄️
Truffles Stick to Hands
Sticky dough is a classic issue, but it’s easily fixed. First, make sure your cream cheese is fully softened—cold lumps disrupt the texture. If the dough is still sticky after mixing, chill it for 20 minutes before rolling.
For easier handling, dip your hands in powdered sugar or lightly dust your work surface. If the problem persists, add 1 tablespoon of almond flour to absorb excess moisture. 🧤
Filling Too Sweet
If your truffles taste overly sweet, the cocoa powder or powdered sugar ratio might be off. Start by reducing the powdered sugar by 1-2 tablespoons and taste as you go. For a richer cocoa flavor, increase the cocoa powder by 1 tablespoon while keeping the sugar the same.
A pinch of espresso powder (½ tsp) can also deepen the chocolate notes without adding sweetness. Balance is key—adjust in small increments! 🍫
Coating Won’t Stick
If the white chocolate coating won’t adhere, your truffles might not be dry enough or the chocolate is too thin. First, ensure your truffles are fully chilled (30 minutes in the fridge). For the coating, melt the chocolate with 1 tbsp coconut oil** for a smoother, stickier finish.
Dip the truffles halfway into the chocolate, then let excess drip off completely before placing them back on the parchment. If needed, lightly dust the truffles with powdered sugar before dipping to help the coating grip. 🍫
Nutrition facts
Frequently asked questions
Can I make these truffles without a stand mixer?
Use a hand mixer or even a sturdy fork to beat the cream cheese and butter until smooth. For the cocoa powder and sugar, mix everything by hand in a large bowl until fully combined. Just be patient—it'll take a bit more elbow grease, but the result will be just as delicious!
How do I store red velvet truffles for gifting?
Store them in an airtight container lined with parchment paper, separated by layers of wax paper. They'll keep fresh in the fridge for 5-7 days or freeze for 3 months. For gifting, portion them into clear cellophane bags tied with ribbon for a professional touch.
What can I use if I don't have white chocolate chips?
Try melted dark chocolate (60-70% cocoa) or even milk chocolate for coating. For a classic red velvet look, dust them with unsweetened cocoa powder instead. The flavor will differ slightly, but it still works beautifully.
Why is my filling separating?
This usually happens if the cream cheese wasn't fully softened or if you added too much liquid. Make sure your cream cheese is at room temperature (not warm) and mix everything on low speed until smooth. If it separates after mixing, gently fold it together with a spatula.
Can I make these truffles gluten-free?
Yes! Just ensure your cocoa powder and powdered sugar are certified gluten-free. The recipe itself is naturally gluten-free, but always double-check labels. For extra insurance, use a dedicated gluten-free kitchen space if you're highly sensitive.