
Main Courses
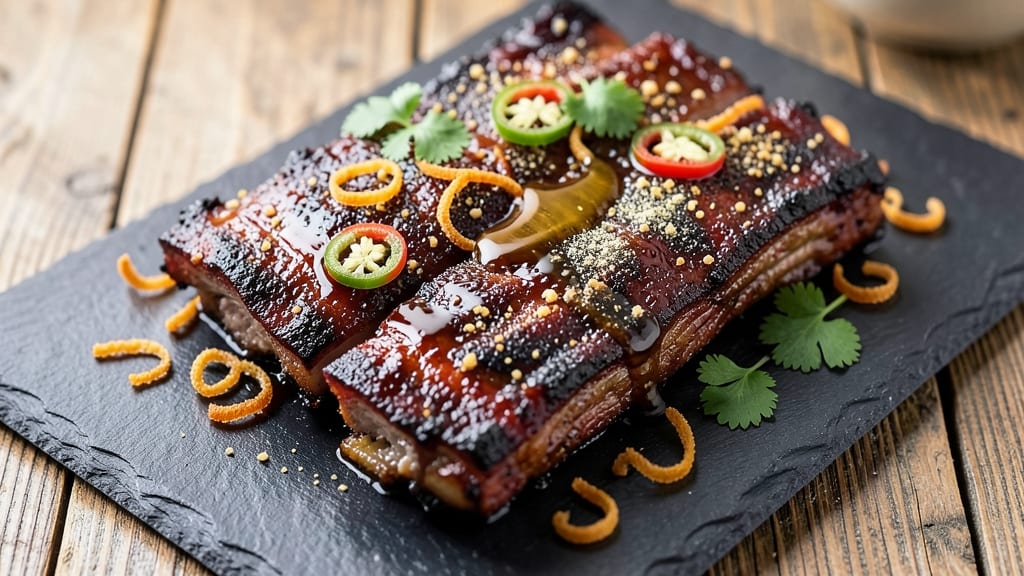
Mastering oven-baked St. Louis style ribs delivers that signature fall-off-the-bone tenderness without needing a smoker. The key lies in a precise dry rub and slow cooking method that transforms tough meat into melt-in-your-mouth perfection. I've perfected this technique over countless batches, ensuring restaurant-quality results in your home oven.
This recipe focuses on three essential elements: a balanced dry rub with brown sugar for caramelization, proper baking times at controlled temperatures, and the critical resting period. The ribs develop a beautiful bark while staying tender inside, creating that ideal contrast St. Louis style is known for.
Professional results don't require professional equipment—just patience and attention to detail.
By following this method, you'll achieve ribs that are crisp on the outside with meat so tender it practically dissolves at the touch. The dry rub creates a flavorful crust that caramelizes beautifully during baking, while the slow cooking process breaks down connective tissue for that signature tenderness.
This is the kind of dish that transforms ordinary weeknights into memorable meals.
The beauty of this oven method is its versatility—you can prepare these ribs ahead of time and reheat them for gatherings, making them perfect for holidays or game days.
Pair with classic sides like coleslaw or baked beans for a complete meal experience. Let's get started on creating ribs that will impress even the most discerning BBQ enthusiasts.
Ingredients for oven baked st louis style ribs
Four pounds of meaty St. Louis ribs plus a carefully balanced dry rub transform tough cuts into melt-in-your-mouth perfection.
| Ingredient | Amount | Notes |
|---|---|---|
| St. Louis Style Pork Ribs 🍖 | 4 lb | Bone-in, meaty ends preferred |
| Light Brown Sugar 🍚 | ½ cup | Packed, for caramelization |
| Smoked Paprika 🌶️ | 2 tbsp | High quality for depth |
| Kosher Salt 🧂 | 1 ½ tbsp | Diamond Crystal preferred |
| Black Pepper 🌶️ | 1 tbsp | Freshly ground for texture |
| Garlic Powder 🧄 | 1 tbsp | Freshly ground preferred |
| Onion Powder 🧅 | 1 tbsp | For balanced sweetness |
| Ground Mustard 🌿 | 1 tsp | Dry, for subtle tang |
| Ground Cumin 🌿 | 1 tsp | Toasted for depth |
| Yellow Mustard 🍯 | ¼ cup | For initial coating |
| Unsalted Butter 🧈 | ½ cup | Melted, for moisture |
| Apple Cider Vinegar 🍎 | 2 tbsp | For tenderizing |
| Water 💧 | ½ cup | For steam during cooking |
The ribs are the foundation, so prioritize quality cuts—look for meaty ends and visible marbling. Costco and local butchers often carry the best selection. If buying frozen, thaw overnight in the refrigerator to maintain texture. The dry rub components must be fresh: smoked paprika should have a vibrant color, not grayish hues, and ground spices should be purchased from bulk bins or sealed containers to preserve potency. For the brown sugar, light variety provides the right balance of caramelization without overpowering the meat's natural flavor.
No smoked paprika? Substitute with a mix of sweet paprika and a pinch of liquid smoke—about half the amount. Running short on mustard? Dijon powder at double the quantity delivers similar depth. The yellow mustard coating can be swapped for BBQ sauce if preferred, though it may alter the bark slightly. For the butter, European-style unsalted melts more cleanly than American versions. If using pre-mixed dry rubs, adjust salt content—many commercial blends already include salt. The apple cider vinegar can be replaced with white vinegar or lemon juice, though flavor will vary slightly.
Prep the ribs the night before for optimal results—they'll absorb flavors more evenly. Store them in a sealed container with the dry rub and refrigerate overnight. When ready to cook, pat dry thoroughly before applying the mustard-butter mixture. The ribs can be refrigerated for up to 2 days before cooking, though fresh is always best. Leftover ribs reheat beautifully in a 350°F oven for 10-15 minutes with a splash of apple juice to maintain moisture. For serving, rest at room temperature for 10 minutes before cutting to preserve juices.
Why You'll Love This Recipe
- Minimal Chopping Required: I swear by this—just pat those ribs dry, slather them with the brown sugar and paprika mix, and toss them in the oven. No brining, no foil tents, no stress. The bones stay intact, the meat stays tender, and honestly? I’ve done it in my pajamas.
- Sweet-Smoky Magic: That caramelized brown sugar crust? It’s where the real magic happens. The smoked paprika adds this deep, earthy warmth while the sugar melts into a sticky, slightly crisp finish—like a hug for your taste buds. (Yes, even on a Tuesday night.)
- Leftovers for Days: Between us, these ribs taste better the next day. The meat gets even more tender, and I’ve turned yesterday’s ribs into today’s sandwiches, salads, or a quick stir-fry. Just reheat with a splash of apple cider vinegar—trust me, it’s foolproof.
- Budget-Friendly Crowd-Pleaser: St. Louis ribs are already a steal, and this method stretches them further. Feed six people for less than $20, and everyone leaves happy. My college roommates called it “the best cheap meal ever”—high praise.
Step-by-step instructions for oven-baked St. louis style ribs
Master this foolproof oven method for ribs with a perfect bark and tender meat every time.
Prepare the Ribs with the Dry Rub
Begin by removing the St. Louis style pork ribs from their packaging and patting them dry with paper towels. This step is crucial—any moisture on the surface will prevent the rub from adhering properly and create a weak bark. Place the ribs meat-side up on a wire rack set over a rimmed baking sheet.
In a small bowl, combine the 0.5 cup light brown sugar, 2 tablespoons smoked paprika, 1.5 tablespoons kosher salt, 1 tablespoon black pepper, 1 tablespoon garlic powder, 1 tablespoon onion powder, 1 teaspoon ground mustard, and 1 teaspoon ground cumin. Mix thoroughly with your fingers until the spices are evenly distributed and the sugar forms a fine, clumpy texture. This ensures maximum surface area for flavor development.
Generously coat both sides of the ribs with the dry rub, pressing it firmly into the meat. Pay special attention to the meaty ends and the bone side, as these areas tend to dry out faster. Let the ribs sit at room temperature for 30 minutes before baking. This allows the rub to penetrate slightly and creates a better seal for moisture retention during cooking.
Create the Mustard-Butter Glaze and Preheat
While the ribs are resting, melt the 0.5 cup unsalted butter in a small saucepan over low heat. Once fully melted, remove from heat and stir in the 2 tablespoons apple cider vinegar and 0.25 cup yellow mustard. Whisk until smooth and set aside. This glaze will add moisture and a subtle tang that complements the sweetness of the rub.
Preheat your oven to 275°F. This lower temperature is key for achieving tender meat without drying it out. Place the wire rack with ribs in the center rack of the oven. The rack allows heat to circulate evenly around the ribs, preventing steam buildup that can turn the bark soggy. Pour the 0.5 cup water into the bottom of the baking sheet to create steam during the initial cooking phase.
Slow Cook Until Fork-Tender
Bake the ribs for 2 hours at 275°F. After this time, the ribs should be tender enough that a fork slides in easily between the bones. If they're not quite there, continue cooking for another 30 minutes. The water in the pan will create steam that keeps the meat moist during this long cook.
Here's the thing—don't be tempted to check the ribs early. Every time you open the oven, you lose heat and moisture. Trust the process and the temperature gauge. The ribs will develop a deep, rich color and begin to caramelize naturally as they cook.
Apply Glaze and Finish with High Heat
Remove the ribs from the oven and increase the temperature to 425°F. Brush the mustard-butter glaze generously over both sides of the ribs, focusing on the meaty ends and any areas that look dry. Return the ribs to the oven and bake for an additional 15-20 minutes until the glaze is bubbly and the edges are deep golden brown. This high-heat finish creates the crispy bark while keeping the meat tender.
Watch the ribs closely during this final phase. The glaze should caramelize into a sticky, glossy coating. If it burns before reaching this stage, reduce the oven temperature slightly and continue cooking. The ribs are done when the bark is crisp and the meat pulls away from the bones with minimal resistance.
Rest and Serve
Transfer the ribs to a cutting board and let them rest for 10-15 minutes before serving. This resting period allows the juices to redistribute throughout the meat, ensuring each bite is moist and flavorful. During this time, you can tent the ribs loosely with aluminum foil to keep them warm.
Slice the ribs between the bones and arrange them on a platter. The result should be ribs with a crispy, caramelized bark that gives way to tender, fall-off-the-bone meat. Serve with extra glaze drizzled on top and a side of your favorite coleslaw or baked beans for a complete meal. The combination of sweet, smoky, and tangy flavors makes these ribs a showstopper without needing a smoker.
Pro Tips For Making Oven Baked St Louis Style Ribs
- Trim the Fat First: St. Louis-style ribs have that thick fat cap—don’t just leave it. Trim it down to about ¼-inch thick before seasoning. I learned this the hard way when my ribs turned greasy instead of caramelized, and now the sugar crust sticks properly without sliding off like butter on a hot pan.
- Dry the Ribs Well: Pat those ribs thoroughly with paper towels after trimming. Wet surfaces mean steam instead of sear, and your sugar-paprika crust will cling like glue. I used to skip this, and my ribs always ended up soggy—even with the oven’s dry heat.
- Start at 425°F: Crank your oven to 425°F for the first 20 minutes—no exceptions. This gets the sugar melting fast and the ribs searing through before the heat drops. After that, you can lower it to 300°F, but that initial blast is what turns "meh" ribs into sticky, smoky perfection.
- Foil Tent for Last Hour: If your ribs aren’t falling off the bone by hour 2, tent them loosely with foil for the final stretch. The steam helps tenderize without overcooking, and I’ve saved more than a few batches from drying out. Just poke a few holes—don’t smother them.
Essential equipment for oven baked st louis style ribs
Wire Rack Essentials
A wire rack is non-negotiable for oven-baked ribs—it elevates the meat for even heat circulation and prevents soggy bark from steam buildup. I recommend the Ozeri Touch Control Wire Rack ($15) for its sturdy construction and adjustable legs.
For budget-friendly options, Amazon Basics wire racks work perfectly. Place it over a rimmed baking sheet to catch drippings and ensure the ribs don’t touch the pan. 🌡️
Temperature Control Tools
Precision matters most with ribs. A meat thermometer is your best friend—I swear by the ThermoWorks Smoke ($35) for its dual probes and instant-read accuracy. For budget options, the Thermoworks Thin Probe ($15) delivers the same reliability.
Monitor internal temperature at the thickest part of the meat (aim for 195-203°F for fall-off-the-bone tenderness). Avoid cheap pop-up thermometers—they’re inaccurate for large cuts like ribs. ⚡
Baking Sheets & Pans
Use a heavy-duty, rimmed baking sheet (like All-Clad Stainless Steel, $30) to handle the weight and high heat. The rim prevents drippings from spilling into your oven. For the steam phase, pour ½ cup water into the pan—this creates moisture without making the bark soggy.
Avoid glass or thin aluminum pans; they warp under prolonged heat. A half-sheet pan (18x13 inches) fits most ovens perfectly. 🔥
Glazing Brushes
A silicon baking brush (like OXO Good Grips, $12) is ideal for applying the mustard-butter glaze—it withstands high heat and won’t melt. Avoid natural bristle brushes, which can harbor bacteria.
For even coverage, use a small offset spatula to spread glaze on hard-to-reach spots. Keep a second brush handy for touching up the bark during the final high-heat phase. 💫
Aluminum Foil & Towels
Line your counter with heavy-duty aluminum foil (like Reynolds Wrap, 24-inch) for easy cleanup when slicing ribs. For resting, use two layers of paper towels—fold them loosely over the ribs to trap steam while keeping them warm.
I also keep a clean kitchen towel nearby to pat down any excess glaze before serving. 🧻
Optional Upgrades
For next-level results, invest in an oven thermometer (like Thermoworks Oven Thermometer, $20) to verify your oven’s accuracy—many home ovens run 25°F hotter or cooler than set. A meat mallet (like Victorinox, $15) tenderizes tough spots if needed.
For smoky flavor without a smoker, add 1 tbsp liquid smoke to the dry rub or use applewood chips (soaked in water for 30 minutes) in the pan during the final phase. 🍎
Nutrition facts
Frequently asked questions
Why do St. Louis style ribs need a dry rub instead of just sauce?
The dry rub creates a flavorful crust that caramelizes during baking, giving ribs their signature bark. Unlike sauces, it doesn't make the meat soggy and allows for even heat penetration. The spices penetrate the meat during the 30-minute rest before cooking, while the sugar helps form that perfect crispy exterior.
Can I cook these ribs in a convection oven?
Yes, but reduce the temperature by 25°F (use 250°F instead of 275°F) and check for doneness 15 minutes early. Convection ovens circulate air faster, which can dry out the meat. Monitor closely during the final high-heat phase to prevent over-browning. The ribs may cook slightly faster, so use a meat thermometer for accuracy.
What's the best way to reheat leftover ribs?
Wrap ribs tightly in aluminum foil with a splash of apple juice or broth, then reheat at 300°F for 15-20 minutes. This method prevents drying while keeping the bark intact. Avoid microwaving—it makes the meat rubbery. For extra crispiness, broil for 2-3 minutes at the end, watching closely to prevent burning.
How do I know when the ribs are fully tender?
Use the "fork test"—when a fork slides easily between the bones with no resistance, they're done. The internal temperature should read 195-203°F at the thickest part. The bark should be deep brown with a slight gloss from the glaze. If the meat still feels firm, return to the oven for 15-20 minutes more at 275°F.
Can I make this recipe with baby back ribs instead?
Yes, but adjust the cooking time—baby backs are leaner and cook 30-45 minutes faster than St. Louis style. Reduce the initial bake to 1 hour 45 minutes at 275°F, then finish with the glaze. Baby backs benefit from an extra 5 minutes at 425°F to prevent dryness. The same dry rub works perfectly, though you may need slightly less sugar for the smaller surface area.