
Soups & Stews
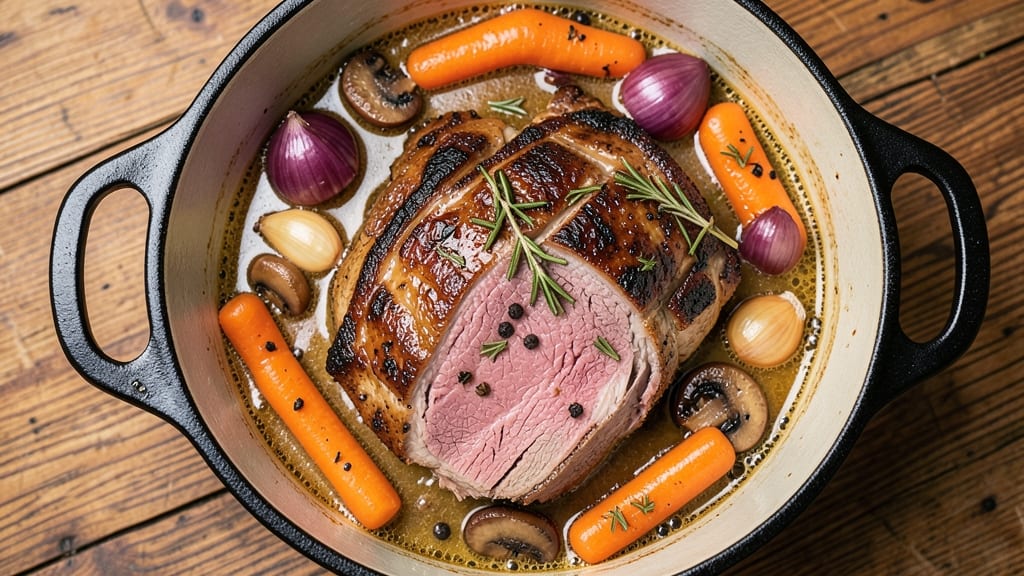
Martha Stewart's classic pot roast recipe transforms tough beef chuck into melt-in-your-mouth tenderness through slow cooking and caramelized fond—a technique that builds deep, complex flavors over hours. The secret lies in browning the meat first to develop that rich, savory crust before it braises in aromatics until fork-tender. This isn't just a stew; it's a Sunday dinner showstopper that smells like home the moment you walk in the door.
The process is straightforward but requires patience: a Dutch oven, beef chuck roast, and simple pantry staples come together for a dish that feels luxurious yet approachable. You'll start with a well-seared roast, then layer in onions, carrots, and herbs before slow-cooking until the meat nearly falls apart.
The result? A dish so rich and satisfying, it becomes the centerpiece of any meal—no fancy ingredients required.
By the time you're ready to serve, you'll have perfectly tender beef swimming in a gravy thickened by its own caramelized fond, with vegetables softened just enough to melt in your mouth.
The aroma alone will have everyone gathering at the table, and the first bite delivers that unmistakable comfort of slow-cooked perfection. This is the kind of recipe that turns weeknights into special occasions.
Pair it with crusty bread to soak up every last drop of that velvety sauce, or serve alongside roasted potatoes and buttered peas for a complete, hearty meal.
The beauty of this classic pot roast is its versatility—simple enough for a weeknight dinner but impressive enough for guests. Let's get started on creating this timeless dish.
Ingredients for martha stewart classic pot roast
Simple pantry staples transform tough beef into melt-in-your-mouth perfection through slow cooking magic.
| Ingredient | Amount | Notes |
|---|---|---|
| Beef Chuck Roast 🥩 | 3 lb | 3-4 inches thick, well-marbled |
| Yellow Onions 🧅 | 1 whole | Cut into 1-inch chunks |
| Carrots | 4 medium | Peeled, cut into 2-inch sticks |
| Garlic Cloves 🧄 | 6 cloves | Smashed, not minced |
| All-Purpose Flour 🌾 | 2 tbsp | For dredging meat |
| Dry Red Wine 🍷 | 1 cup | Bold, like Cabernet Sauvignon |
| Beef Broth 💧 | 2 cups | Low-sodium preferred |
| Tomato Paste 🍅 | 2 tbsp | Smooth, not chunky |
| Fresh Thyme 🌿 | 2 sprigs | Or 1 tsp dried |
| Fresh Rosemary 🌿 | 1 sprig | Woody stems removed |
| Bay Leaves 🍃 | 2 whole | Remove before serving |
| Salt 🧂 | 1 ½ tsp | Kosher or sea salt |
| Black Pepper 🌶️ | 1 tsp | Freshly cracked |
| Olive Oil 🫒 | 2 tbsp | For browning meat |
The beef chuck roast is non-negotiable here—look for good marbling at the grocery store's butcher counter or frozen section. Costco and Whole Foods often have great cuts, but any well-stocked supermarket should carry it. If buying frozen, thaw overnight in the fridge—never at room temperature. The onions and carrots? Baby carrots work fine, but whole carrots hold up better during long cooking. For the garlic, peel and smash the cloves with the side of your knife—it releases more flavor than mincing.
No red wine? Substitute beef broth with 1 tbsp balsamic vinegar for depth. Fresh thyme and rosemary are ideal, but dried works at half the amount. The tomato paste can be skipped if you're short—just add an extra splash of wine. For the flour, all-purpose works perfectly, but if you've got bread flour, use that instead. The beef broth should be low-sodium—you'll be adding plenty of salt during cooking. And trust me on the olive oil—use a good quality extra-virgin for browning, not the cheap stuff.
This dish tastes even better the next day, so make extra if you can. The roast keeps 4-5 days in the fridge, and the sauce freezes beautifully for up to 3 months. I like to portion it into containers for easy lunches—just reheat with a splash of water or broth. The vegetables will soften further when reheated, so if you prefer them slightly crisp, serve them immediately. Leftovers reheat best in a skillet with a splash of broth to loosen the sauce.
Why You'll Love This Recipe
- One-Pan Magic: I swear by this recipe because it’s the rare dish where you dump everything in one pot and walk away. No fancy techniques—just browned beef, a sprinkle of flour, and slow simmering until the carrots melt into the sauce. Honestly, I’ve made it while watching movies, scrolling on my phone, or even pretending to pay attention to a meeting.
- Garlic-Kissed Perfection: That moment when you pull the roast out and the crust is golden, the meat falls apart, and the aroma hits you—it’s like a hug in food form. The garlic and onions caramelize into this deep, savory base that makes even the simplest dinner feel like a restaurant meal. Between us, my picky-eating husband actually licks his plate clean.
- Weeknight to Holiday: I’ve served this to exhausted parents at a PTA meeting and my in-laws for Thanksgiving—same recipe, different occasions. The rich sauce freezes beautifully, and reheating it later? Still tastes like you slaved over it. (Yes, even on a Tuesday night when you’re too tired to care.)
- Leftovers That Don’t Suck: Most pot roasts turn into sad, dry meat the next day, but not this one. The flour-thickened gravy keeps everything moist, and I’ve packed lunches with it for days. Budget-friendly? Absolutely. A lifesaver when you’ve got a houseful and a fridge full of hungry people. My daughter picks out the carrots first, but still asks for seconds.
Step-by-step instructions for Martha Stewart's classic pot roast
Here's how to create Martha Stewart's legendary pot roast with tender beef and rich, caramelized fond.
Sear the Beef Chuck Roast for Maximum Flavor
Pat the 3 lb beef chuck roast dry with paper towels—this ensures a perfect sear. Heat 2 tablespoons olive oil in a heavy Dutch oven over medium-high heat until shimmering. Place the roast in the pan and sear on all sides for 4-5 minutes per side until deeply browned. You'll see the fat begin to render and the meat develop a rich crust.
While searing, I like to press down gently on the roast during the first minute—this prevents it from curling and ensures even contact with the pan. Remove the roast and set it aside on a plate. You'll want to keep that beautiful browned fond for the sauce later, so don't wipe out the pan yet.
Build the Flavor Base with Vegetables and Aromatics
In the same Dutch oven (with all those flavorful browned bits), add the 1 whole yellow onion cut into 1-inch chunks and the 4 medium carrots cut into 2-inch sticks. Cook for 5-6 minutes until the onions soften and begin to caramelize slightly. Add the 6 smashed garlic cloves and cook for another 30 seconds until fragrant.
Here's where it gets good—sprinkle the 2 tablespoons all-purpose flour over the vegetables and stir vigorously for 1-2 minutes to create a light roux. This will thicken your sauce beautifully. Add the 2 tablespoons tomato paste and stir to combine, letting it cook for 30 seconds to deepen its flavor.
Deglaze and Simmer the Pot Roast
Pour in the 1 cup dry red wine, scraping up all those delicious browned bits from the bottom of the pan. Let it simmer for 3-4 minutes until reduced by half. Add the 2 cups beef broth, 2 sprigs fresh thyme, 1 sprig fresh rosemary, and 2 whole bay leaves, then return the roast to the pot.
Bring everything to a gentle simmer, then reduce heat to low. Cover the pot and let it cook for 2.5-3 hours until the beef is fork-tender. I know it seems like a long time, but patience is key here—the slow cooking breaks down the tough fibers and creates melt-in-your-mouth texture. The liquid should reduce to about 1 cup by the end.
Finish with Perfectly Cooked Vegetables
About 30 minutes before the roast is done, check the vegetables. If they're not tender enough, you can increase the heat slightly to speed up cooking. The carrots should be fork-tender with a slight bite, and the onions should be soft and sweet. Remove the bay leaves before serving—they're not meant to be eaten.
Once the beef reaches an internal temperature of 203°F (use a meat thermometer), it's ready. Let it rest for 10 minutes before slicing—this allows the juices to redistribute throughout the meat. The result should be perfectly tender beef with a rich, caramelized sauce that clings to every bite.
Serve with Classic Accompaniments
Slice the pot roast against the grain into ½-inch thick pieces. Spoon the reduced sauce over the top and serve immediately with the tender vegetables. This classic dish pairs beautifully with mashed potatoes or crusty bread to soak up all that delicious sauce. The combination of rich beef, caramelized vegetables, and wine-infused sauce makes this a true comfort food masterpiece.
Pro Tips For Making Martha Stewart Classic Pot Roast
- SEAR THE ROAST FIRST: Martha’s recipe skips searing, but trust me—browning that chuck roast in a hot Dutch oven for 3-4 minutes per side builds flavor you’ll taste later. Use 2 tablespoons of oil (enough to coat the bottom) and don’t crowd the pan. I learned this the hard way after making stews that tasted more like broth.
- CUT ONIONS IN EVEN SLICES: Thin, even slices of onion cook faster and soak up the sauce better than chopped chunks. Aim for ⅛-inch-thick rounds—thicker pieces stay tough, and thinner ones burn before tenderizing. My grandmother swore by this, and she was right: the texture matters more than you’d think.
- SKIP THE CROWDED POT: If your Dutch oven is packed with veggies and liquid, the roast will steam instead of braise. Start with half the carrots and onions, let them soften for 10 minutes, then add the rest. This isn’t the prettiest method, but it’s the tastiest—your roast will stay moist, not soggy.
- USE COLD BROTH FOR LAYERS: Pouring cold beef broth into the hot pot causes a sudden temperature drop, which locks in juices as the roast cooks. I was skeptical until I tried it—now I always chill my broth for 10 minutes before adding it. The difference in tenderness is noticeable, especially with chuck.
Troubleshooting your martha stewart classic pot roast
Meat Not Tender Enough
If your beef chuck roast isn't tender after 3 hours, it likely needs more time. The key is low-and-slow cooking—never rush it. I've found that 225°F is the ideal temperature for breaking down tough fibers.
If you're short on time, try adding ½ cup hot water or broth to the pot and covering tightly for another 30-45 minutes. The moisture helps tenderize the meat without drying it out.
Another trick is to score the fat cap (the thick layer of fat on top) in a crosshatch pattern before searing. This allows flavor to penetrate deeper during cooking.
Also, check your roast's internal temperature—it should reach 203°F for perfect tenderness. If it's still tough at 195°F, give it another 30 minutes covered.
Sauce Too Thin or Watery
A thin sauce usually means the liquid didn't reduce enough. After the initial simmer, uncover the pot and let it cook uncovered for the last 30-45 minutes to thicken the sauce naturally. The fond (browned bits) will caramelize further, creating a richer, thicker sauce.
If it's still too thin, mix 1 tablespoon cornstarch with 2 tablespoons cold water, stir into the sauce, and simmer for 3-5 minutes until thickened.
For extra richness, deglaze the pan with ½ cup beef broth instead of wine after searing. The wine adds acidity, which can thin the sauce further. If you're using dried herbs, reduce the amount by half—fresh herbs release more flavor and can overpower the sauce if overused.
Vegetables Overcooked or Mushy
If your carrots and onions turn to mush, they likely cooked too long in the liquid. To fix this, add them later in the cooking process. After the roast has simmered for 1.5 hours, transfer it to a plate, then add the vegetables to the pot.
Cook them for just 30-45 minutes covered to soften without falling apart. For extra texture, keep a few whole baby carrots or pearl onions whole—they hold their shape better.
For crisp-tender vegetables, blanch them first: Boil the carrots and onions in salted water for 3-4 minutes, then drain and add them to the pot with the roast. This jumpstarts their cooking time so they don't oversoften.
I also like to parboil baby carrots for 2 minutes before adding them to the pot—they stay vibrant and slightly crisp.
Dry or Tough Meat
Dry meat usually means the roast lost too much moisture during cooking. To prevent this, add ½ cup beef broth to the pot during the last hour of cooking. The broth will rehydrate the meat without making the sauce watery.
Another trick is to cover the pot tightly with foil (not just a lid) to trap steam and keep the meat moist. If the meat is already dry, slice it thinly against the grain and serve with extra sauce to compensate.
For future attempts, don't skip the sear—it creates a flavorful crust that locks in juices. If your roast is particularly lean, marinate it overnight in ¼ cup olive oil, 2 tbsp soy sauce, 1 tbsp Worcestershire sauce, and 1 tbsp brown sugar before cooking.
This adds moisture and depth of flavor.
Sauce Too Salty
If your sauce tastes too salty, dilute it by adding ¼ cup warm water or beef broth and simmering for 5 minutes to balance the flavors. For a sweeter contrast, stir in 1 tsp honey or maple syrup to offset the saltiness.
If the sauce is still too strong, serve the roast with a side of fresh herb salad (like arugula with lemon vinaigrette) to cleanse the palate.
To prevent oversalting in the first place, taste the broth and wine mixture before adding the roast. Season gradually—you can always add more salt, but you can't take it out.
I like to reserve ¼ cup of the cooking liquid before tasting so I can adjust the seasoning without thinning the sauce too much.
Nutrition facts
Frequently asked questions
Can I make this pot roast in a slow cooker instead of a Dutch oven?
For a slow cooker version, sear the roast first as directed, then transfer it to your slow cooker with all the aromatics. Add the wine, broth, and herbs, then cook on low for 8-10 hours or high for 5-6 hours. The meat will be just as tender, though the sauce may be thinner. For extra richness, remove the roast after cooking and reduce the sauce in a skillet before serving.
What’s the best way to reheat leftovers?
Reheat leftovers in a skillet over medium-low heat with a splash of beef broth or water to loosen the sauce. Cover and warm for 5-7 minutes, stirring occasionally. Avoid microwaving—it can make the meat dry. For extra flavor, add a pinch of garlic powder or thyme while reheating. Leftovers keep for 4-5 days in the fridge.
Can I substitute red wine with something else?
Yes! If you don’t have red wine, use 1 cup beef broth + 1 tbsp balsamic vinegar for depth. For a non-alcoholic version, try 1 cup apple cider + 1 tbsp soy sauce. The key is balancing acidity and richness—just avoid vinegar-heavy substitutes like lemon juice, which can overpower the dish.
How do I know when the roast is done?
The roast is ready when it reaches an internal temperature of 203°F (use a meat thermometer) and the meat easily pulls apart with a fork. If it’s still tough at 195°F, let it cook another 30 minutes covered. The sauce should reduce to a thick, glossy consistency—if it’s watery, simmer uncovered for the last 15 minutes to thicken.
What’s the secret to making the sauce extra rich?
Don’t skip the sear—those browned bits (fond) are pure flavor gold! After removing the roast, deglaze the pan with wine, then reduce it by half before adding broth. For extra depth, whisk in 1 tbsp cold butter at the end or add 1 tsp Dijon mustard for a tangy twist. The longer you cook the sauce uncovered, the more it caramelizes and thickens.