Breakfast & Brunch
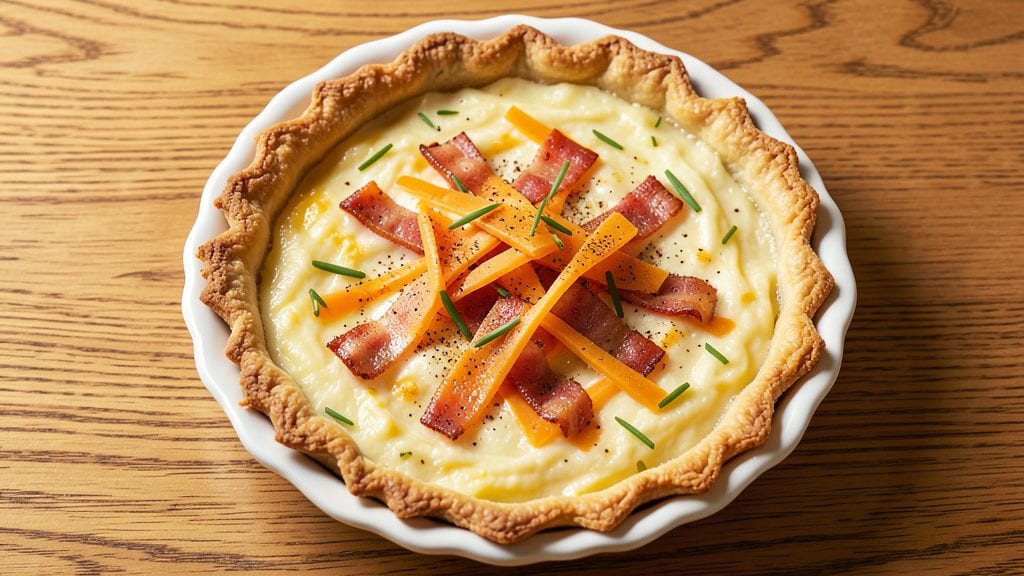
Mastering a joy of cooking quiche recipe starts with a flaky crust and a velvety egg filling that transforms any breakfast into a showstopper. I remember my first attempt—overly dense crust and rubbery eggs—until I discovered the secret to balancing crispness with tenderness.
This recipe delivers that perfect harmony, inspired by French tradition but simplified for home cooks.
The foundation lies in a precise method for the crust: cold butter cut into flour until it resembles coarse crumbs, then chilled before baking. Meanwhile, the egg mixture—rich with cream, sharp cheddar, and your choice of fillings—gets poured over a pre-baked crust to create that signature golden top.
Every layer matters, from the buttery crust to the silky custard, ensuring each bite is both satisfying and elegant.
What you'll achieve is a quiche with a flaky, golden crust that shatters slightly at the edges and a custard so smooth it practically melts on your tongue. The aroma alone—warm, buttery, with hints of cheese—will fill your kitchen and have everyone gathering at the table.
Whether you're serving it for brunch or a light dinner, this quiche lives up to its reputation as a timeless classic.
For those who love tradition, stick with classic ham and Gruyère, but feel free to experiment with spinach and feta, mushrooms, or even a vegan crust. The beauty of quiche lies in its versatility—this recipe serves as your foundation, ready to adapt to any taste or dietary need.
Let's get started on creating your perfect quiche.
Ingredients for joy of cooking quiche
Cold butter, sharp cheddar, and room-temperature eggs—these are your building blocks for a quiche that tastes like a French bistro.
| Ingredient | Amount | Notes |
|---|---|---|
| All-Purpose Flour 🌾 | 2 ½ cups | Sifted for light texture |
| Unsalted Butter 🧈 | 1 cup | Cold, cubed for flaky crust |
| Ice Water 💧 | ⅓ cup | Chilled for crust binding |
| Large Eggs 🥚 | 4 whole | Room temperature for smooth custard |
| Heavy Cream 🥛 | 1 cup | Full-fat for richness |
| Sharp Cheddar Cheese 🧀 | 2 cups | Shredded, aged for flavor |
| Gruyère Cheese 🧀 | 1 cup | Shredded, nutty depth |
| Diced Ham 🥓 | 1 cup | Low-sodium preferred |
| Salt 🧂 | 1 ½ tsp | Diamond Crystal kosher |
| Black Pepper 🌶️ | ½ tsp | Freshly cracked for heat |
| Nutmeg 🌿 | ¼ tsp | Freshly grated for warmth |
| Milk 🥛 | ½ cup | Whole milk for creaminess |
The crust starts with cold butter—never softened, or you'll end up with a dense mess. Plugrá brand is my go-to for its high butterfat content, but any good-quality unsalted works. Cut it into the flour until it looks like coarse crumbs, then add ice water one teaspoon at a time. The dough should hold together when pressed but still feel cool to the touch. If it's too sticky, add a little more flour; if it crumbles, add another splash of water. Most grocery stores carry Plugrá in the baking aisle, but if not, Land O'Lakes is a solid backup. Shape it into a disk, wrap tightly in plastic, and chill for at least 1 hour—this resting time is non-negotiable for that perfect flaky layer.
For the custard, sharp cheddar and Gruyère are non-negotiable—their flavors cut through the richness of the eggs and cream. If you can't find Gruyère, Comté is a good substitute, but it'll taste different. The ham can be swapped for sautéed mushrooms or spinach if you're vegetarian, but don't skip the cheese entirely—it's what makes quiche a quiche. Freshly cracked black pepper and nutmeg are worth the extra minute; pre-ground spices lose their punch fast. No heavy cream? Whole milk plus 2 tablespoons melted butter works in a pinch, though the texture won't be as luscious. And for the love of all things flaky, measure your eggs accurately—4 large eggs is the sweet spot for that silky custard.
This quiche is best made a day ahead—trust me, the flavors meld even better after resting. Store it in an airtight container in the fridge for up to 4 days, though I rarely have leftovers that long. To reheat, cover with foil and warm at 350°F for 15 minutes—the crust stays crisp, and the custard reheats perfectly. Freeze portions in individual slices for up to 3 months; just thaw overnight in the fridge before reheating. And if you're making it ahead for a brunch crowd, assemble the filling the night before and bake straight from the fridge—it bakes up just as beautifully.
Why You'll Love This Recipe
- No-Fuss Crust: I swear by this butter-and-flour crust—just mix, chill, roll. No fancy tricks, no overworked dough. The ice water keeps it from cracking, and that flaky magic happens while you make the filling.
- Creamy Rich Core: Heavy cream and eggs transform into that velvety, golden custard. Honestly, the first bite makes me pause—it’s like a hug in dish form, especially when the edges get that perfect crisp.
- Meal Prep Hero: Slice it up, store it in the fridge, and grab a piece for days. My kids love it cold for lunch, and I reheat slices in minutes. No sad leftovers here—just happy seconds.
- Budget Breakfast Winner: Flour, butter, eggs—these are pantry staples that won’t break the bank. I make this for brunch, potlucks, or even a quick dinner with greens on top. Reliable, filling, and always a crowd-pleaser.
Step-by-step instructions for flaky crust and silky egg mixture in one dish
Here's how to create a quiche with a golden crust and creamy filling that's foolproof every time.
Prepare the Crust with Cold Butter for Maximum Flakiness
In a large bowl, combine the 2.5 cups all-purpose flour and 1.5 teaspoons salt. Cut in the 1 cup unsalted butter (cold and cubed) using a pastry cutter or your fingers until the mixture resembles coarse crumbs with pea-sized butter pieces. This texture is crucial—it ensures steam pockets form during baking, creating that signature flaky layer.
Gradually add the 0.33 cup ice water, sprinkling it just until the dough begins to come together. Avoid overmixing—just work it until it forms a shaggy mass. Turn the dough onto a lightly floured surface and knead it 5-6 times until it holds together. The dough should be cool to the touch; if it feels sticky, refrigerate it for 10 minutes before proceeding.
Roll out the dough between two sheets of parchment paper to ¼-inch thickness and transfer it to a 9-inch pie dish. Press it gently into the bottom and up the sides, trimming any excess. The crust should be even and smooth—this prevents uneven baking. Prick the bottom all over with a fork to prevent puffing during baking. Chill the crust in the refrigerator for 30 minutes while you prepare the filling.
Whisk the Egg Mixture to Silky Perfection
In a separate bowl, whisk together the 4 whole large eggs, 1 cup heavy cream, 0.5 cup milk, and 0.5 teaspoon black pepper until fully combined. The mixture should be smooth with no streaks of egg white. Add the 2 cups sharp cheddar cheese and 1 cup gruyère cheese, stirring until the cheeses are evenly distributed and no lumps remain. This step is where the magic happens—the cheese should melt into a velvety texture.
Fold in the 1 cup diced ham and 0.25 teaspoon nutmeg, ensuring the ham is evenly distributed. Taste the mixture and adjust the seasoning if needed—you might want to add a pinch more salt, as cheddar can vary in saltiness. The filling should be rich and fragrant, with a hint of nutmeg warmth. Let the mixture sit at room temperature for 5 minutes while the crust chills.
Blind-Bake the Crust for Structural Support
Preheat your oven to 375°F. Line the chilled crust with a sheet of parchment paper and fill it with pie weights or dried beans. Bake for 15 minutes until the edges begin to turn golden. Remove the weights and bake for an additional 5 minutes to ensure the crust is fully set and slightly crisp. This step is non-negotiable—it prevents a soggy bottom and gives your quiche the perfect foundation.
While the crust bakes, increase the oven temperature to 400°F. This higher heat will help create a golden, crispy top on the filling. Once the crust is done, remove it from the oven and reduce the heat to 400°F (you can leave the oven on this setting). Sprinkle the bottom of the crust with a thin layer of shredded cheese if desired—this adds extra flavor and texture.
Assemble and Bake to Golden, Silky Completion
Pour the egg mixture evenly into the pre-baked crust, spreading it out to the edges. The filling should come about ½-inch below the rim of the crust to allow for rising. Place the quiche on the middle rack of the oven and bake for 35-40 minutes. The center should be just set but still slightly jiggly—it will continue cooking as it rests.
Watch for the edges to turn golden brown and the top to develop a slight crust. If the edges brown too quickly, cover them loosely with aluminum foil. The quiche is done when it springs back slightly when touched in the center. Let it rest for 10 minutes before slicing—this allows the filling to set and makes it easier to serve without spilling.
Serve Warm with Fresh Herbs for a Restaurant-Worthy Finish
Garnish the quiche with fresh herbs like parsley or chives if desired, and serve it warm. The crust should be crisp and flaky, while the filling remains silky and rich. Each slice should hold its shape well, with a perfect balance of creamy cheese, savory ham, and the subtle warmth of nutmeg. This quiche is best enjoyed within 2-3 hours of baking, when the crust is at its crispiest and the filling is at its most luxurious.
For leftovers, store in an airtight container in the refrigerator for up to 3 days. Reheat individual slices in a 350°F oven for 10-15 minutes to restore the crispiness of the crust and the creaminess of the filling. This quiche is a showstopper—flaky, rich, and perfectly balanced in every bite.
Pro Tips For Making Joy Of Cooking Quiche
- CHILL THE BUTTER FIRST: Cold butter isn’t just for pie crusts—it’s the thing that matters most for this quiche. Cut the unsalted butter into cubes and refrigerate them for 30 minutes before mixing with flour. I learned this the hard way when my crust turned out greasy and tough; the butter needs to stay firm enough to create those tiny pockets of flaky goodness.
- WHISK EGGS AND CREAM: Don’t just crack and stir—actually whisk the eggs and heavy cream together until the yolks and whites are fully combined and the mixture is smooth. This ensures an even texture in your quiche, no matter where it sets. (Yes, even if you’re impatient like me, take the 30 seconds—your future self will notice the difference.)
- SKIP THE OVERMIXING: Once you’ve added the ice water to your flour-butter mixture, stop stirring the second it comes together. Overmixing develops gluten, and that’s what makes your crust tough instead of tender. Just press it into the pan and chill—no need to work it like dough.
- BAKE UNTIL GOLDEN: The moment the top turns a deep, even golden brown is when you pull it out—not when the center jiggles or the recipe says "30-35 minutes." Use a toothpick to check: it should come out clean, but the crust should be crisp, not pale. (Your quiche will taste done long before the recipe’s suggested time, so resist the urge to rush.)
Make-ahead tips for leftovers
Crust Prep Ahead
Roll out your crust and blind-bake it up to 2 days in advance—store it in an airtight container at room temperature. I like to wrap it tightly in plastic wrap and place it in the fridge overnight to firm up.
When ready to assemble, simply remove it from the container and let it sit at room temperature for 15 minutes before adding your filling. This method saves time and ensures your crust stays crisp even after reheating. 💫
Filling Prep
Mix your egg filling the night before and store it in a sealed container in the fridge. The flavors meld beautifully overnight, and the cheese melts more evenly when added straight from the fridge. Just give it a quick whisk before pouring into your crust.
For extra convenience, pre-cook any fillings like ham or mushrooms and store them separately in the fridge. This way, you only need to assemble and bake in the morning. ✨
Overnight Baking
For a truly hands-off brunch, assemble your quiche in the evening and bake it overnight at 275°F for 4-5 hours. The low-and-slow method creates an incredibly tender crust and custard. Wrap the baked quiche tightly in foil and store it in the fridge until serving.
This works especially well for large gatherings—just reheat individual slices as needed. Honestly, this is my secret weapon for lazy weekend mornings. 🌟
Freezer-Friendly
Assemble your quiche completely, then freeze it unbaked in its pie dish. When ready to bake, thaw it in the fridge overnight, then bake as directed. The crust stays flaky, and the filling emerges perfectly creamy.
I use this trick for holiday brunches—just pull it from the freezer the night before, and it bakes up like it was made fresh. Label your dish with the date to track freshness. ❄️
Portion Control
Divide your filling into individual 9-inch ramekins and bake them separately for easy single servings. This is perfect for meal prep—I bake a batch on Sundays and store them in the freezer.
To reheat, bake at 350°F for 15 minutes covered with foil, then uncover for the last 2 minutes to crisp the tops. These mini quiches are ideal for office lunches or quick breakfasts. 💡
Herb Garnish Prep
Chop your fresh herbs like parsley or chives the day before and store them in a small container with a damp paper towel. This keeps them vibrant longer. Just sprinkle them over your quiche right before serving for that restaurant-fresh touch.
I also like to toast 1 teaspoon of breadcrumbs with ½ teaspoon garlic powder for an extra crunchy garnish—toss them in a dry pan over medium heat for 2 minutes until golden. 🌿
Nutrition facts
Frequently asked questions
Can I make this quiche without a traditional crust?
For a crustless version, simply pour the egg mixture into a 9-inch oven-safe skillet or ceramic dish and bake at 375°F for 25-30 minutes until set. The filling will develop a golden crust on top. For extra richness, sprinkle ½ cup breadcrumbs mixed with 2 tablespoons melted butter over the top before baking. This works beautifully for gluten-free or low-carb diets.
How do I prevent a soggy crust when baking?
Always blind-bake your crust for 15-20 minutes before adding the filling—this creates a barrier that prevents moisture from seeping in. If you're short on time, sprinkle ¼ cup cornmeal or crushed graham crackers on the bottom of the crust before adding the filling. These absorb excess moisture while adding a subtle crunch.
What's the best way to reheat leftover quiche?
For individual slices, cover with foil and warm at 350°F for 10-15 minutes—this keeps the crust crisp while gently reheating the custard. For a whole quiche, wrap it tightly in foil and bake at 325°F for 20 minutes, then uncover for the last 5 minutes to refresh the top. Avoid microwaving—it turns the crust rubbery.
Can I use frozen vegetables in my quiche filling?
Yes, but thaw and drain them first to avoid excess moisture. For best results, sauté frozen spinach or mushrooms in a pan until tender, then season with salt and pepper before adding to the egg mixture. This removes water and intensifies their flavor. Avoid using frozen veggies straight from the freezer—they'll make your quiche filling watery.
Why did my quiche filling come out watery?
Watery filling usually means one of three things: overmixing the egg mixture (which incorporates too much air), not pre-baking the crust (leading to moisture absorption), or using wet ingredients like unthawed frozen veggies. Always whisk eggs gently, blind-bake the crust, and measure liquids precisely. For extra insurance, add 1 tablespoon cornstarch** to the egg mixture before baking.