
Sauces & Condiments
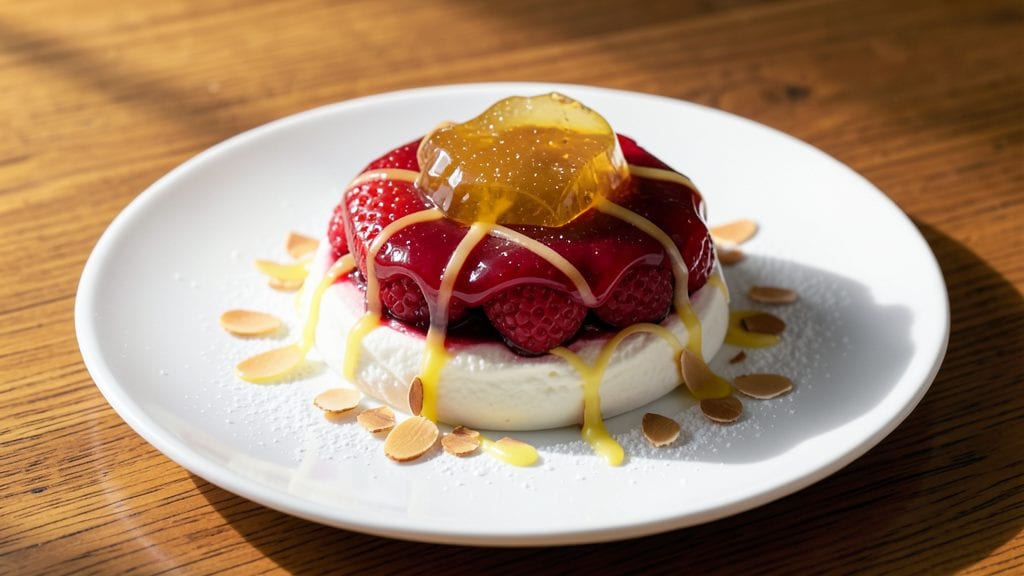
This jelly icing recipe transforms ordinary desserts into showstopping masterpieces with its glossy, vibrant layers that stay perfectly in place. ✨ The secret lies in balancing powdered sugar with gelatin or fruit jelly for a smooth, spreadable texture that sets just enough to hold its shape—ideal for layering on cakes or piping onto cupcakes.
I developed this recipe after struggling with overly runny icings that ruined the presentation, and this version solves that problem completely.
The foundation of this icing is simple yet precise: powdered sugar for sweetness, gelatin or jelly for body, and a touch of lemon juice or vinegar to stabilize the mixture.
Unlike traditional buttercream, this icing requires no butter or cream, making it lighter and easier to work with in warm kitchens. The key is achieving the right consistency—thick enough to hold layers but still smooth enough to pipe or spread without tearing.
What sets this jelly icing apart is its vibrant color and glossy finish, achieved through natural fruit flavors and a slight sheen from corn syrup or clear gelatin. It dries to a satin-like texture that reflects light beautifully, turning simple frosted cakes into elegant centerpieces.
Whether you're decorating a tiered wedding cake or adding a pop of color to cupcakes, this icing delivers professional results with minimal effort.
Use it to create ombré effects, layered designs, or even as a filling between cake layers. For best results, prepare it ahead of time and store in an airtight container—it keeps for up to 5 days in the refrigerator. Let’s get started on transforming your desserts with this foolproof technique.
Ingredients for jelly icing
Eight ingredients create a flawless, professional-grade icing that stays put and dazzles.
| Ingredient | Amount | Notes |
|---|---|---|
| Powdered Sugar 🍚 | 4 cups | Sifted for smooth texture |
| Unflavored Gelatin 🍬 | 1 ½ tbsp | Or 1 packet (2.25 tsp) |
| Fruit Jelly 🍓 | ½ cup | Any flavor (strawberry, raspberry) |
| Light Corn Syrup 🍯 | ¼ cup | For glossy finish |
| Lemon Juice 🍋 | 1 tbsp | Freshly squeezed |
| Vanilla Extract 🌸 | ½ tsp | Pure vanilla preferred |
| Food Coloring 🎨 | ½ tsp | Gel-based for vibrancy |
| Distilled White Vinegar 🍶 | ½ tsp | For stability |
Powdered sugar is the backbone here, so sift it thoroughly—no lumps allowed. For gelatin, Knockoff brand or store-brand works fine—just measure precisely. The jelly can be any fruit variety, but strawberry or raspberry adds the most natural vibrancy. Corn syrup isn't optional: it's what gives that signature gloss. Grab the light variety at any grocery store—it's cheaper than honey and does the job perfectly. If you're color-sensitive, Wilton or Americolor gel pastes are the gold standard for professional results without bleeding.
No gelatin? Unsweetened applesauce at half the amount adds body, though it won't set as firmly. Short on jelly? Fruit preserves strained through a sieve work in a pinch. The vinegar might seem odd, but it's what keeps the icing from getting sticky—white vinegar only. For color, liquid food coloring, so stick with gel. The vanilla extract? Pure Madagascar bourbon makes all the difference, but imitation will get you by. Want extra shine? Add 1 tsp clear alcohol like vodka or rum to the finished icing.
This icing keeps for 5 days in an airtight container, but it's best made fresh for maximum gloss. For layering, spread a thin base first, let it set 10 minutes, then add the next color. To store between uses, cover the surface with parchment paper to prevent drying. Freezes beautifully for 3 months—thaw at room temperature before using. If it thickens too much, thin with 1 tsp water at a time. Never microwave—it ruins the texture.
Why You'll Love This Recipe
- Here’s what sold me: that bright lemon juice cuts through the jelly’s sweetness like a citrusy wake-up call, while the gelatin gives it a chewy lift instead of just being sticky. Swap the jelly for strawberry or raspberry? Suddenly you’ve got a whole mood board of colors without extra effort.
- No Boiling Required: I swear by this trick—just mix the gelatin with cold water first, then fold it into the jelly while the powdered sugar and corn syrup sit idle. No thermometer, no stress, no waiting for temps. Five minutes of actual stirring, and you’re done.
- Flavor Flexibility: Here’s what sold me: that bright lemon juice cuts through the jelly’s sweetness like a citrusy wake-up call, while the gelatin gives it a chewy lift instead of just being sticky. Swap the jelly for strawberry or raspberry? Suddenly you’ve got a whole mood board of colors without extra effort.
- Cake Decorating Hack: Between us, this icing is my secret weapon for when I’m too tired to pipe frosting. Spread it on cupcakes, drizzle it over sheet cake layers, or even slather it on cookies—it sets fast but still stays soft enough to slice. No crumbly mess, no fuss.
Step-by-step instructions for jelly icing recipe
Master this professional technique for creating vibrant, glossy jelly icing that stays stable and layers beautifully.
👨🍳 Step 1: Bloom the Gelatin
In a small heatproof bowl, sprinkle the 1.5 tablespoons unflavored gelatin evenly over the 0.5 cup fruit jelly. This creates a thin layer that blooms evenly. Add 2 tablespoons cold water (not from the ingredients list) and let sit for 5 minutes—you'll see the gelatin transform from powder to translucent granules.
Here's the thing—don't skip the blooming step. If you add dry gelatin directly to hot liquids, it won't set properly. The bloomed gelatin will dissolve smoothly into your icing mixture, creating that signature firm yet glossy texture that holds up for layering.
🥘 Step 2: Warm and Combine Ingredients
In a medium saucepan, combine the 4 cups powdered sugar, 0.25 cup light corn syrup, 1 tablespoon lemon juice, 0.5 teaspoon vanilla extract, 0.5 teaspoon food coloring, and 0.5 teaspoon distilled white vinegar. Warm over medium-low heat for 3-4 minutes, stirring constantly until the mixture reaches 110°F—just warm enough to dissolve the sugar completely but not hot enough to caramelize.
Watch for tiny sugar crystals dissolving—this ensures a smooth icing. Remove from heat immediately once fully combined. The warmth helps the gelatin dissolve properly when added next. If you see any undissolved sugar, strain through a fine-mesh sieve for a silky texture.
🍳 Step 3: Incorporate Bloomed Gelatin
Carefully pour the bloomed gelatin mixture into the warm sugar mixture while stirring continuously with a silicone spatula. Work quickly but thoroughly—you want to distribute the gelatin evenly. Return the pan to low heat and stir constantly for 2-3 minutes until the icing reaches 120°F and becomes completely smooth.
This is the moment that matters: the heat activates the gelatin, transforming it from translucent granules to an invisible binder that gives your icing structure. If you see any lumps, strain again through a fine-mesh sieve for a flawless finish. The icing should now coat the back of a spoon with a glossy sheen.
⏰ Step 4: Cool and Set the Icing
Transfer the icing to a clean bowl and press plastic wrap directly onto the surface to prevent a skin from forming. Refrigerate for 30 minutes until it reaches 65°F—it should thicken noticeably but still be spreadable. If it sets too firm, warm gently in 20-second bursts in the microwave to achieve the perfect consistency.
Real talk: the cooling process is crucial. If you use it too soon, it'll be runny and slide off your cake. If you wait too long, it'll be too stiff. You want it thick enough to hold peaks when piped but still smooth enough to spread. Test by dipping a spatula in—it should hold its shape but still be workable.
🎨 Step 5: Apply to Cakes or Cupcakes
Use the icing immediately to create vibrant layers on cakes or cupcakes. For cakes, spread ¼-inch thick layers between each cake tier, then smooth the final layer. For cupcakes, pipe swirls or rosettes directly onto the cooled cupcakes. Work quickly as the icing sets faster at room temperature.
The light corn syrup and lemon juice in this recipe create that signature glossy finish that makes professional bakers jealous. The distilled white vinegar stabilizes the icing, preventing it from becoming too sticky or melting in warm conditions. Store any leftovers in the refrigerator for up to 1 week—just warm gently before using again.
Pro Tips For Making Jelly Icing
- Bloom the Gelatin: Sprinkle the unflavored gelatin over cold water first—just enough to cover it—and let it sit for 5 minutes. I learned this the hard way: trying to mix dry gelatin into hot liquid clumps like glue. Cold water softens it evenly, so it dissolves cleanly without lumps when you add it to the syrup.
- Strain the Jelly: If your fruit jelly has seeds or chunks, strain it through a fine-mesh sieve before mixing. I used to skip this, and the icing would have weird texture spots. A quick strain makes the finish silky—worth the extra 30 seconds.
- Warm Syrup First: Heat the corn syrup just until it’s warm to the touch (not boiling) before mixing with the gelatin. Cold syrup forces the gelatin to work harder to dissolve, and you’ll end up with a thin, runny icing. A gentle warm-up keeps everything smooth.
- Acid Test the Lemon: Use fresh lemon juice—not bottled—because the acidity matters. Bottled juice can be too diluted, and your icing might not set properly. A splash of fresh juice brightens the flavor and ensures the gelatin firms up right. (Yes, even if you’re impatient like me.)
Troubleshooting great jelly icing
Icing Too Runny
If your jelly icing is too thin and slides off the cake, you likely didn’t bloom the gelatin properly or used too much liquid. First, check if you followed the 5-minute blooming step—this is critical for proper setting.
If the issue persists, mix in ½ teaspoon additional unflavored gelatin dissolved in 1 teaspoon cold water, then reheat gently until smooth. For a quick fix, add 1 tablespoon powdered sugar at a time while stirring until you reach the right consistency. 💡
Icing Too Thick
Over-thickened icing can happen if you over-cool it or add too much gelatin. To fix, gently warm the icing in 20-second bursts in the microwave, stirring between each interval. Add ½ teaspoon water at a time if it’s still too stiff.
Never microwave for more than 10 seconds total—this can break down the gelatin and ruin the texture. If the icing is clumpy, strain it through a fine-mesh sieve for a silky finish.
Color Bleeding
When layers of different colors blend together, it’s usually because you used liquid food coloring instead of gel-based. For vibrant, non-bleeding colors, always use Wilton or Americolor gel pastes.
If you’ve already made the icing, add a thin layer of plain jelly icing (without color) between colored layers to create a barrier. For a quick fix, chill the cake between layers to help the colors set more firmly. 🎨
Icing Not Setting
If your icing stays soft and doesn’t hold its shape, the gelatin may not have activated properly. Double-check that you warmed the mixture to at least 120°F—this is the minimum temperature for gelatin to set. If you skipped the blooming step, start over with fresh gelatin.
For a temporary fix, add ½ teaspoon additional gelatin dissolved in 1 teaspoon water and reheat gently. Store the icing in the fridge for 30 minutes before using to help it firm up.
Grainy Texture
Gritty icing usually means undissolved powdered sugar or improperly bloomed gelatin. First, strain the icing through a fine-mesh sieve to remove any lumps. If the issue persists, sift the powdered sugar again before using and ensure you’re using unflavored gelatin (flavored versions can leave a bitter taste and affect texture).
For extra smoothness, add 1 teaspoon light corn syrup to help bind any remaining grains.
Sticky Residue
Sticky icing often happens when the vinegar or lemon juice isn’t balanced properly. To fix, add ¼ teaspoon additional white vinegar and mix well. If the stickiness remains, the icing may need more time to set—chill it for an extra 15-20 minutes in the fridge.
For a quick test, dip a clean finger into the icing: if it leaves a sticky residue, it needs more time or vinegar. Avoid over-mixing, as this can introduce air bubbles and make the icing even stickier. 💫
Nutrition facts
Frequently asked questions
Can I make this jelly icing without gelatin?
Yes! For a gelatin-free version, replace the 1.5 tbsp gelatin with ½ cup unsweetened applesauce or 2 tbsp arrowroot powder mixed with 2 tbsp cold water. The texture will be softer and less stable, but it works well for cupcakes or quick decorating. For layering, add 1 extra tbsp powdered sugar to compensate for the reduced binding.
How long does jelly icing last before it dries out?
Fresh jelly icing stays vibrant for 5 days in an airtight container in the fridge. To prevent drying, press plastic wrap directly onto the surface before sealing. For longer storage, freeze in portions for up to 3 months. Thaw overnight in the fridge—never at room temperature to avoid condensation.
Can I use this icing as a cake filling instead of frosting?
This icing works beautifully as a filling between cake layers. Spread ¼-inch thick between cooled layers, then chill the cake for 1 hour to let it set. For extra stability, brush layers with a light syrup (equal parts water and sugar) before adding the icing. It’s especially stunning in layered cakes with contrasting colors.
Why does my jelly icing turn cloudy after chilling?
Cloudiness usually means the gelatin didn’t fully dissolve or the icing cooled too quickly. To fix it, gently reheat the icing to 110°F while stirring until smooth, then chill again. For prevention, ensure you bloom the gelatin properly and warm the mixture gradually. If the issue persists, strain the icing through a fine-mesh sieve for a crystal-clear finish.
What’s the best way to create ombre effects with this icing?
Start with the darkest color and gradually add lighter shades, mixing 1 tsp at a time until you reach the desired gradient. Spread the first layer, let it set for 10 minutes, then add the next shade. For a seamless blend, use a palette knife to smooth transitions. Work quickly—jelly icing sets faster at room temperature than buttercream.