
Breakfast & Brunch
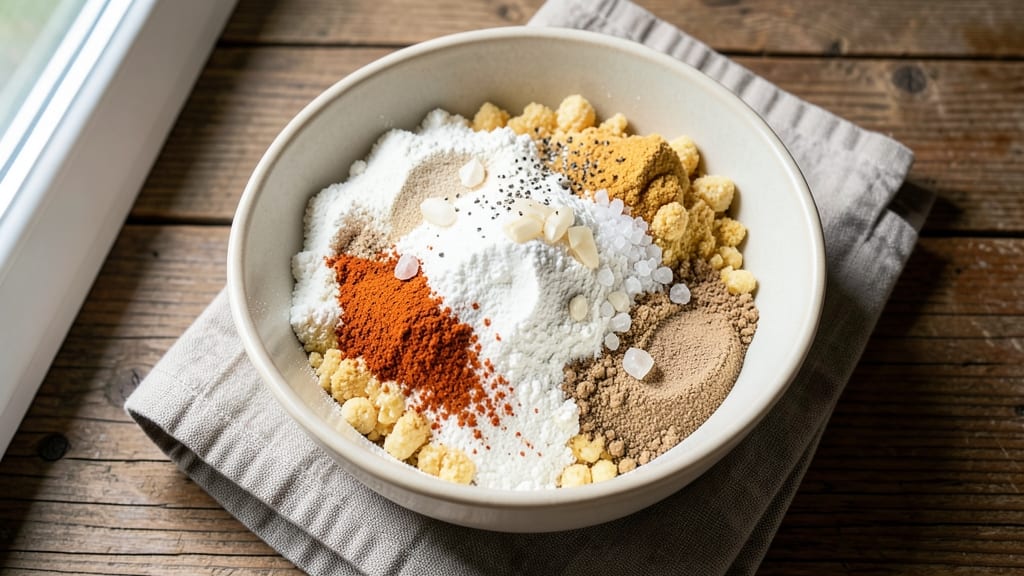
Mastering the perfect French fry coating transforms simple potatoes into golden, crispy layers that hold like professional chips—this recipe delivers restaurant-quality results at home. The secret lies in the right flour-to-liquid ratio and precise frying technique, which creates that irresistible crunch while keeping the inside tender.
I’ve tested countless variations to find the foolproof method that works every time, whether you’re making classic diner fries or gourmet twists.
This coating recipe uses a simple but effective blend of all-purpose flour, cornstarch, and spices for extra crunch and flavor retention. The key is double-dipping the fries in the coating mixture before frying them in hot oil until golden brown—375°F is the ideal temperature for even cooking without burning.
For best results, work in small batches to maintain consistent heat and texture throughout.
The outcome is fries with a shatteringly crispy exterior that stays intact even when dipped, paired with a light, airy interior that melts in your mouth. This technique works for traditional salted fries or spiced variations like garlic-parmesan or Cajun seasoning.
Serve immediately with your favorite dipping sauce—ranch, ketchup, or aioli—to lock in that perfect crunch.
Whether you’re serving up a classic diner-style plate or elevating game day snacks, this coating method guarantees professional-quality fries every time. The same principles apply to other crispy batters, like onion rings or chicken tenders, making it a versatile skill for any kitchen. Let’s get started!
Ingredients for french fry coating
Six simple ingredients transform fries into crispy, golden layers that hold like pro chips.
| Ingredient | Amount | Notes |
|---|---|---|
| All-Purpose Flour 🌾 | 1 ½ cups | Light flour for airy texture |
| Cornstarch 🌾 | ½ cup | For extra crispiness |
| Granulated Garlic Powder 🧄 | 1 tbsp | Freshly ground preferred |
| Onion Powder 🧅 | 1 tbsp | Fine grind for even flavor |
| Paprika 🌶️ | ½ tbsp | Smoked or sweet variety |
| Ground Black Pepper 🌶️ | ½ tsp | Freshly cracked for bite |
| Diamond Crystal Kosher Salt 🧂 | 1 ½ tsp | Coarse grain for texture |
| Vegetable Oil 🫒 | 2 cups | High smoke point preferred |
| Russet Potatoes 🥔 | 2 ½ lb | Uniform size for even cooking |
| Ice Water 💧 | ½ cup | For binding coating |
| Butter (optional) 🧈 | 1 tbsp | Melted for extra richness |
The flour-to-cornstarch ratio is everything—1.5 cups flour to 0.5 cup cornstarch gives you that perfect crunch without turning into a brick. Grab Diamond Crystal kosher salt if you can—it’s coarser and clings better than table salt. For the potatoes, Russet potatoes are non-negotiable; their high starch content is what makes them crispy. I always cut them into even-sized sticks (about 1/4-inch thick) so they cook uniformly. Store-bought frozen fries? Toss them in the coating right out of the freezer—no thawing needed.
No garlic powder? Fresh garlic minced and dried works in a pinch, but it’s more potent, so use half the amount. Short on paprika? Smoked paprika or cayenne adds depth, but adjust heat preference. The vegetable oil is your best friend here—high smoke point oils like canola or peanut oil prevent burning. For extra flavor, melt 1 tablespoon of butter into the coating mixture—it adds a rich, savory note that takes these fries from good to restaurant-quality. If you’re making a big batch, double the coating and store it in an airtight container for up to 1 week.
This coating is best used fresh, but you can prep it ahead and store it in the fridge for up to 3 days in a sealed container. For the potatoes, soak them in ice water for 30 minutes before coating—this removes excess starch and helps the coating adhere better. Frying in small batches is key; overcrowding the oil lowers the temperature and makes soggy fries. Serve immediately with your favorite dipping sauce to lock in that perfect crunch—ranch or garlic aioli are absolute winners.
Why You'll Love This Recipe
- Pantry Magic: I swear by this combo—just flour, cornstarch, and those three spices. No fresh herbs, no fancy ratios, just boom—crispy, savory perfection every time. The secret? That paprika gives it a subtle smokiness that makes it taste like it came from a diner.
- Crispy Without the Hassle: Between us, homemade fries get soggy if you’re not careful. This coating locks in the crunch—thank the cornstarch—and the garlic-onion powder punch means you don’t need to fry them twice. One dip, one bake, done. (Yes, even on a Tuesday night.)
- Game for Any Meal: Slap this on chicken tenders, roasted potatoes, or even cauliflower bites. It’s my go-to for game day wings or a lazy Sunday brunch—just adjust the heat of the paprika. Honestly, the only limit is your imagination (and your oven space).
- Leftovers That Don’t Suck: Most coatings turn to mush after reheating. Not this one. Store it in a sealed bag, and the next day? Still crispy enough to fool your roommates. Plus, it’s cheap—like, $3-worth-of-spices cheap—and stretches across multiple meals without breaking the bank.
Step-by-step instructions for crispy French fry coating
Here's how to create that legendary pro-chip coating—crunchy, golden, and clinging like a dream.
Create the Perfect Dry Coating Blend
In a large bowl, whisk together the 1.5 cups all-purpose flour, 0.5 cup cornstarch, 1 tablespoon granulated garlic powder, 1 tablespoon onion powder, 0.5 tablespoon paprika, 0.5 teaspoon ground black pepper, and 1.5 teaspoons diamond crystal kosher salt. This blend is the foundation of your coating—each ingredient plays a crucial role in texture and flavor.
I like to use a whisk to break up any potential flour clumps and ensure an even distribution of spices. The cornstarch is key here—it creates that signature crispiness while the flour provides structure. Don't skip the salt; it enhances flavor and helps draw out moisture from the potatoes for better adhesion.
Prepare the Potatoes for Maximum Crisp
Peel the 2.5 pounds russet potatoes and cut them into ½-inch thick sticks, ensuring uniform size for even cooking. Immediately soak them in ice water for 30 minutes—this crucial step removes excess starch that would otherwise prevent the coating from sticking properly.
After soaking, drain and pat the potatoes completely dry with paper towels. The drier they are, the better the coating will adhere. I use two layers of paper towels and press firmly to remove all moisture—this is where many home cooks go wrong and end up with uneven coating.
Assemble the Coating Mixture
In a separate bowl, combine the dry coating blend with 0.5 cup ice water (yes, ice water—this helps bind the coating without making it too wet). If using, add the 1 tablespoon melted butter to the mixture for extra richness. The consistency should be like thick pancake batter—it should hold its shape when scooped but still be fluid enough to coat properly.
Here's the thing—don't overmix. Just stir until everything is combined. Overworking the mixture develops gluten, which can make your coating tough instead of crispy. If it's too thick, add 1 teaspoon more ice water at a time until you reach the perfect consistency.
Coat the Potatoes Thoroughly
Working in batches to avoid overcrowding, dip each potato stick into the coating mixture, pressing gently to ensure full coverage. I use tongs for this step—it gives me better control than my hands. Let any excess coating drip off before placing them on a wire rack set over a baking sheet.
This resting step is crucial. Allow the coated potatoes to sit for 10-15 minutes at room temperature. This lets the coating firm up slightly and adhere better. Don't skip this—it makes all the difference in getting that professional chip texture.
Fry to Golden Perfection
Heat 2 cups vegetable oil in a deep fryer or heavy pot to 350°F. You'll know it's ready when a small piece of potato sizzles vigorously when dropped in. Fry the potatoes in small batches for 3-4 minutes until they're golden brown and crispy.
Here's where it gets exciting—remove the potatoes and drain on a wire rack or paper towels. They'll continue cooking from residual heat, so don't overcook them. The key is to get them to that perfect golden brown color while maintaining an internal temperature of 140-145°F. Serve immediately while they're at their crispest!
Pro Tips For Making French Fry Coating
- Sift the dry mix: Mixing flour and cornstarch by hand leaves lumps—your fries will clump in the oil like sad, uneven snowballs. Use a fine-mesh sieve or whisk the dry ingredients together in a bowl until you can’t see any white streaks. (Yes, even if you’re tempted to eyeball it.)
- Add cornstarch last: I used to toss everything in at once, and my coatings turned gummy instead of crisp. Weigh out your flour first, then sprinkle in the cornstarch and spices—this keeps the ratio tight and prevents soggy spots. (Proportion: 3 parts flour to 1 part cornstarch works every time.)
- Double-coat for crunch: One thin layer of batter? You’re asking for a sad, flaky mess. Pat fries dry first, then dip in a thin mix of flour and spices, shake off excess, and dip again in a slightly thicker batter (flour + cornstarch + 1 tbsp water). The first coat locks in flavor; the second seals the deal.
- Chill the coated fries: Freshly coated fries fry fast but stick together like glue. Toss them on a wire rack (not a plate—please) and refrigerate for 10–15 minutes. This firms up the coating so it doesn’t melt into a gooey disaster when you fry. (I know, it’s weird, but trust the science.)
Storing and reheating this recipe
Refrigerator Storage
Store your leftover coated potatoes in an airtight container with a paper towel pressed on top to absorb moisture. They’ll keep in the fridge for up to 2 days, but the coating loses crispness after 12 hours.
I like using glass containers with tight-sealing lids—they prevent sogginess better than plastic. Reheat only once for best results. 🥔
Freezer Prep
For longer storage, freeze uncooked coated potatoes on a parchment-lined tray for 1 hour to prevent sticking. Transfer to a freezer bag with all air removed, then store for up to 2 months.
Thaw overnight in the fridge before frying—never microwave frozen coated potatoes as it makes the coating gummy. 🧊
Reheating Crispy Fries
For oven reheating, bake at 425°F for 5-7 minutes on a wire rack (not a plate) to restore crispiness. For air fryer, cook at 375°F for 3-4 minutes, shaking halfway. Avoid microwaving—it turns fries soggy. A quick oven blast works best for that restaurant-style crunch. 🔥
Reviving Soggy Fries
If your fries lost crispness, sprinkle with 1 tsp cornstarch and reheat in a skillet with 1 tbsp oil over medium-high heat for 2 minutes. The cornstarch creates a fresh crispy layer. This trick works for any breaded or coated food—even chicken nuggets! ✨
Batch Prep Tips
Make double batches of coating and store dry in a sealed container for 1 week. Pre-cut potatoes (uncoated) freeze well for 3 months—just soak and dry before coating. I prep 2 lbs of coating mix every Sunday to save time during the week. 💡
Serving Warm
Keep fries warm in a 200°F oven on a wire rack for up to 30 minutes while you finish other dishes. The rack prevents steam buildup that makes coatings soggy. Serve with warm dipping sauces—ranch or garlic aioli pairs best with freshly reheated fries. 🍽️
Nutrition facts
Frequently asked questions
Can I use this coating recipe for other fried foods?
This same technique works perfectly for onion rings, chicken tenders, or even cauliflower bites. The flour-cornstarch blend creates that signature crispy texture while keeping the inside tender. Just adjust frying times based on food thickness—3-4 minutes for most items at 350°F.
Why does my coating keep falling off?
This usually happens when potatoes aren't dry enough or the coating mixture is too wet. Always pat potatoes completely dry with paper towels after soaking, and let coated fries rest 10-15 minutes before frying. For extra adhesion, dip potatoes in ice water first to remove surface starch.
Can I make this coating gluten-free?
Yes! Replace all-purpose flour with 1.5 cups gluten-free flour blend (like Bob's Red Mill 1:1) plus 0.25 cup cornstarch for best results. The extra starch helps compensate for gluten's binding properties. Test small batches first—some blends absorb more liquid.
How do I get extra crispy fries without burning them?
Use a thermometer to maintain 350°F oil temperature—never exceed 375°F or the coating burns before crisping. Fry in small batches (no more than 1/3 of the oil volume) and work quickly. For restaurant-style crunch, double-fry: cook once at 325°F for 2 minutes, then finish at 375°F for 1 minute.
What's the best way to store leftover coating mix?
Keep dry ingredients in an airtight container at room temperature for up to 1 week. For wet mixtures, store in the fridge for 3 days max—the cornstarch loses crispiness over time. Freeze unused portions in ice cube trays for single-use servings. Thaw overnight before using.