
Side Dishes
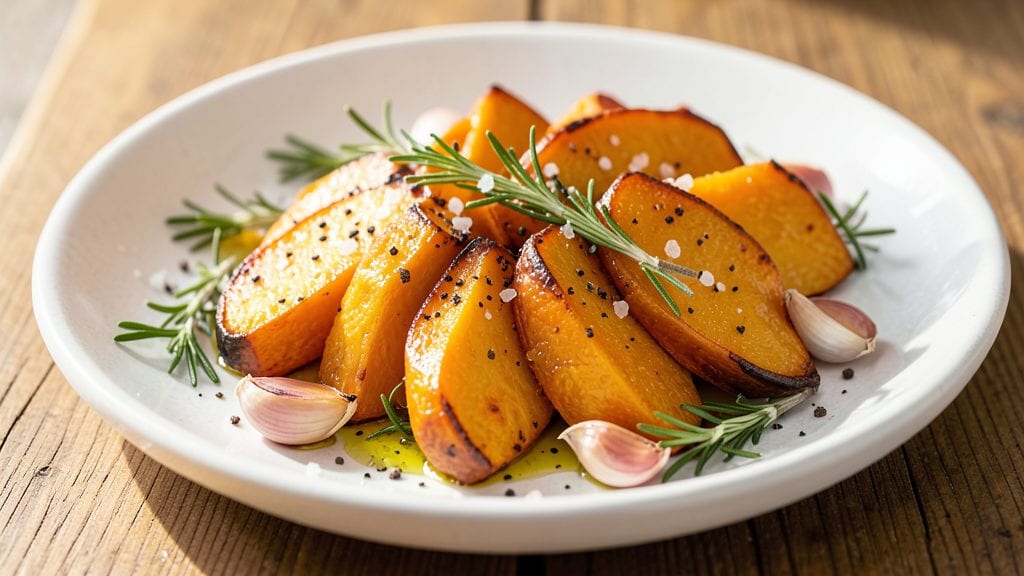
This butterstick squash recipe transforms humble winter squash into a caramelized, sweetly tender side that steals the show at any table.
Standing on a step stool in my grandmother’s kitchen in Sicily, I learned how to coax out the natural sugars in squash through simple roasting techniques—no fancy equipment needed.
The key lies in high heat and a touch of olive oil, which creates that perfect balance of crisp edges and velvety centers.
What makes this recipe special is its versatility and speed—ready in just 20 minutes, it pairs beautifully with roasted meats, hearty soups, or even as a vegetarian main. The secret weapon?
A sprinkle of salt and a drizzle of olive oil before roasting, which intensifies the squash’s natural sweetness. No peeling required—just scrub, slice, and roast for effortless, restaurant-quality results.
By the end, you’ll have golden, caramelized squash with a texture that’s crisp at the edges and tender inside, infused with a subtle nuttiness that’s pure comfort food. The aroma alone will have everyone at the table asking what’s for dinner.
This is the kind of side dish that turns simple vegetables into something extraordinary—without the fuss.
Serve it as a standalone side, stuff it with herbs and cheese, or toss it into salads for added texture. The possibilities are endless, but the method remains foolproof. Let’s get cooking!
Ingredients for butterstick squash
Five key ingredients transform simple squash into golden, caramelized perfection in minutes.
| Ingredient | Amount | Notes |
|---|---|---|
| Butterstick Squash 🍠 | 1 ½ lb | Scrubbed, sliced into 1-inch pieces |
| Extra-Virgin Olive Oil 🫒 | 2 tbsp | High quality, fruity flavor |
| Kosher Salt 🧂 | 1 tsp | Fine grain preferred |
| Freshly Ground Black Pepper 🌶️ | ¼ tsp | Freshly cracked for best flavor |
| Garlic Cloves 🧄 | 2 cloves | Minced, for optional garnish |
| Fresh Rosemary 🌿 | 1 tbsp | Chopped, stems removed |
| Fresh Thyme Leaves 🌿 | 1 tsp | Or 0.25 tsp dried thyme |
| Maple Syrup 🍯 | 1 tbsp | Grade B for deeper flavor |
| Balsamic Vinegar 🍶 | 1 tbsp | Aged 2+ years preferred |
| Toasted Walnuts 🥜 | ¼ cup | Chopped, for topping (optional) |
| Parmesan Cheese 🧀 | ¼ cup | Freshly grated, for garnish |
The butterstick squash is the star—its natural sweetness shines when roasted at high heat. Look for firm, heavy squash with a vibrant orange color; avoid any with soft spots or bruises. Most grocery stores carry butterstick, but specialty markets like Whole Foods or Trader Joe's often have the freshest selections. If you can't find butterstick, delicata squash works as a substitute—just peel it first. For best results, scrub the squash thoroughly under cold water before slicing; no peeling is needed. The slices should be uniform (about 1-inch thick) to ensure even cooking. Costco often sells pre-sliced squash in their produce section, which can save time.
Extra-virgin olive oil is non-negotiable here—it enhances the squash's natural sweetness while adding richness. California olive oil brands like Corto or Colavita work beautifully, but any high-quality EVOO will do. Fresh herbs elevate the dish, but dried thyme at one-third the amount works in a pinch. Short on time? Pre-minced garlic from a jar is fine, though fresh is always better. The maple syrup and balsamic vinegar add depth; Grade B maple syrup has a deeper flavor than Grade A. For a sugar-free option, omit the maple syrup and increase the balsamic to 2 tbsp. Walnuts and Parmesan are optional but add texture and umami—Trader Joe's sells pre-chopped walnuts for convenience.
Roasted squash keeps best at room temperature for up to 2 hours, but refrigerate leftovers in an airtight container for 3-4 days. Reheat gently in the oven at 350°F for 5-10 minutes to restore crispness. For meal prep, store components separately: roast the squash ahead, then assemble with toppings when ready to serve. The caramelized flavor actually improves after resting for 10 minutes, so let it sit before serving. Freeze cooked squash for up to 3 months—it reheats beautifully for quick weeknight sides. Portion into single servings before freezing for easy reheating.
Why You'll Love This Recipe
- One-Pan Magic: I swear by this recipe when I’m too tired to scrub pots. Halve the squash, roast it alongside the garlic cloves, and—boom—done. The oil pools at the bottom, so you’re basically self-cleaning.
- Garlic-Kissed Comfort: That moment when the squash caramelizes and the garlic cloves turn golden? Pure satisfaction. The salt and pepper cling to the tender flesh like it’s begging for another bite—honestly, I’ve caught myself sneaking seconds straight from the pan.
- Weeknight Workhorse: Between us, this is my go-to for busy nights. Toss it in the oven while you prep the rest of dinner, and it’s ready when you are. (Yes, even on a Tuesday night.) It pairs with everything—grilled chicken, a simple salad, or just a hunk of crusty bread.
- Budget-Friendly Staple: Butterstick squash is the unsung hero of affordable veggies. A single squash feeds four, and the ingredients cost pennies. Roast a batch on Sunday, and you’ve got lunch or dinner covered for days—no fancy prep, no waste.
Step-by-step instructions for roasted butterstick squash
Here's how to transform simple butterstick squash into caramelized, restaurant-quality sweetness.
Preheat and Prepare the Squash
Preheat your oven to 425°F with the rack positioned in the middle. While it heats, scrub the 1.5 lb butterstick squash thoroughly under cold running water to remove any dirt from the skin. Using a sharp chef's knife, cut the squash lengthwise into 1-inch thick slices, then slice each half crosswise into ½-inch thick half-moons.
Spread the squash slices on a clean kitchen towel and pat them dry completely. Removing all moisture ensures better browning and caramelization. Arrange the dried slices in a single layer on a baking sheet lined with parchment paper, leaving about ½ inch between each piece to allow for even cooking and crisping.
Season and Roast Until Tender
In a small bowl, combine 2 tbsp extra-virgin olive oil, 1 tsp kosher salt, and 0.25 tsp freshly ground black pepper. Drizzle this mixture evenly over the squash slices, making sure each piece is coated. Gently toss the squash to distribute the oil and seasoning completely.
Place the baking sheet in the preheated oven and roast for 15 minutes, flipping the squash pieces halfway through cooking. You'll know they're ready when the edges begin to brown and the squash feels tender when pierced with a fork. The aroma should be sweet and nutty—this is your cue that the natural sugars are caramelizing.
Add Herbs and Sweet Glaze
Remove the squash from the oven and transfer it to a large bowl. In a small saucepan over medium heat, combine 1 tbsp maple syrup and 1 tbsp balsamic vinegar. Simmer for 2 minutes until slightly reduced and thickened. Remove from heat and stir in 1 tbsp chopped fresh rosemary and 1 tsp fresh thyme leaves.
Pour this herb-infused glaze over the roasted squash and toss gently to coat. Return the baking sheet to the oven and roast for an additional 5-7 minutes until the squash is fork-tender and the glaze has caramelized slightly. The squash should be golden brown with a glossy sheen from the reduced glaze.
Garnish and Serve Warm
Transfer the roasted squash to a serving platter. Sprinkle evenly with 0.25 cup toasted walnuts and 0.25 cup freshly grated parmesan cheese. For extra flavor, sprinkle with the 2 cloves minced garlic (if using). The walnuts add crunch while the parmesan enhances the sweetness with a salty contrast.
Serve immediately while still warm. The squash should be tender enough to collapse slightly under gentle pressure, with caramelized edges that are slightly crisp. Each bite should deliver a perfect balance of sweet, savory, and herby flavors. This dish pairs beautifully with roasted meats, grilled fish, or as a standalone vegetarian main.
Pro Tips For Making Butterstick Squash
- Cut Squash Evenly: Use a sharp chef’s knife and rock back-and-forth—don’t saw—while keeping the blade flat against the cutting board. Uneven slices mean some pieces overcook into mush while others stay underdone. I learned this after serving a plate where half was perfect and half was sad.
- Salt Before Roasting: Toss the squash with salt before hitting the oven—it draws out moisture, helping the olive oil cling better and caramelizing the edges. Skip this, and you’re left with greasy, unevenly seasoned squash. (Yes, even if you’re impatient like me.)
- Don’t Overcrowd the Pan: Leave at least ½ inch between squash pieces for proper browning. I used to jam them in tight, thinking more heat = faster cooking, but it just steamed them instead. If your pan’s full, roast in batches—your squash will thank you with crispy edges.
- Roast Until Fork-Tender: Check doneness by piercing with a fork—it should slide in like butter, not meet resistance. Butterstick squash varies in size, so start testing at 20 minutes if your oven runs hot. Overcooked squash turns to glue; undercooked means chewing forever. (Your guests won’t complain about either, but you will.)
Make-ahead tips for leftovers
Prep Ahead Strategy
Roast the squash slices up to 2 days in advance and store them in an airtight container at room temperature. The flavors deepen as the natural sugars caramelize further. Reheat in a 350°F oven for 5-7 minutes to restore crispness—this is key for maintaining that perfect texture.
I always prep the squash the night before Sunday dinner; it saves time and adds complexity to the dish. 🌟
Component Prep
Chop all garnishes—walnuts, rosemary, thyme, and garlic—ahead of time and store them in separate glass jars in the fridge. Toast the walnuts in a dry skillet over medium heat for 3-4 minutes until fragrant, then let them cool completely before storing.
This saves 10 minutes on serving day and keeps everything organized. 🥜
Freezer-Friendly Method
For longer storage, freeze the roasted squash in a single layer on a baking sheet for 1 hour to firm up, then transfer to a freezer bag with all the air squeezed out. Thaw overnight in the fridge, then reheat in the oven as directed.
The texture holds up surprisingly well—just add 1 extra minute of reheating time. I freeze half the batch from every cook session for quick weeknight meals. ❄️
Glaze Prep Shortcut
Make the maple-balsamic glaze 3 days ahead and store it in a small glass jar in the fridge. Before using, warm it gently on the stovetop for 1 minute to restore its consistency.
This saves time and ensures you always have a ready-to-use flavor booster. I keep a jar in my pantry specifically for squash dishes—it works for roasted carrots too! 🍯
Portion Control
Divide the roasted squash into 4 individual serving containers before adding garnishes. This keeps portions consistent and makes it easy to grab and go. Store with the garnishes on top (they'll stay fresh for 2 days in the fridge).
For meal prep, I use Glasslock containers because they maintain flavor better than plastic. 📦
Reheating Perfection
For the crispiest results, reheat squash straight from the fridge on a baking sheet at 400°F for 8-10 minutes instead of the microwave. The high heat reactivates the caramelization.
If using leftovers, add a quick drizzle of olive oil before reheating to prevent drying. I swear by this method—it brings back that restaurant-quality crunch every time. 🔥
Nutrition facts
Frequently asked questions
Do I need to peel butterstick squash before cooking?
No peeling required! Butterstick squash has edible skin that becomes tender and slightly crispy when roasted. Simply scrub it thoroughly under cold water to remove any dirt before slicing. The skin adds texture and nutrients to your dish.
What's the best way to store leftover roasted squash?
Keep leftovers in an airtight container at room temperature for up to 2 hours, or refrigerate for 3-4 days. For longer storage, freeze portions in a single layer on a baking sheet for 1 hour before transferring to a freezer bag. Reheat at 350°F for 5-7 minutes to restore crispness.
Can I substitute butterstick squash with another type?
Yes! Delicata squash works well as a substitute—just peel it first since its skin is thinner. For a sweeter flavor, try butternut squash (peeled and cubed), though it requires 5-7 minutes longer to cook. The texture will be slightly softer but still delicious.
Why did my squash turn out mushy instead of caramelized?
Overcooking or uneven slices cause mushiness. Ensure your oven is at 425°F and slices are ½-inch thick. Flip halfway through cooking and avoid crowding the baking sheet. For extra caramelization, broil for 1-2 minutes at the end.
How can I make this dish vegetarian-friendly?
This recipe is already vegetarian! For extra protein, serve with white beans or toasted chickpeas. Add nutritional yeast for a cheesy flavor if avoiding dairy. The maple-balsamic glaze and herbs make it hearty enough as a main dish.