
Desserts
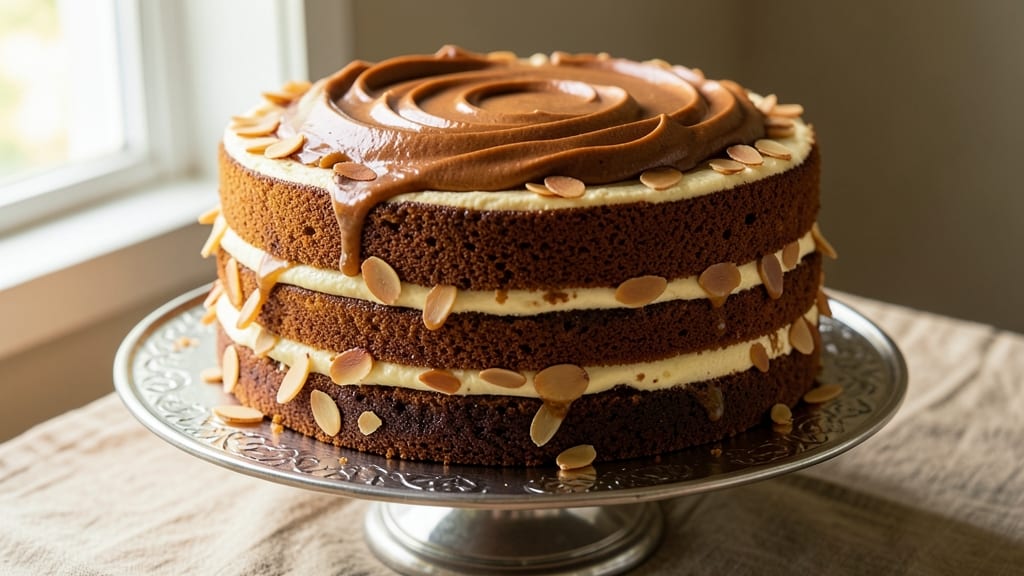
Betty Crocker's burnt sugar cake recipe delivers that signature moist, caramel-rich dessert with layers of buttery swirls that taste like a bakery secret. 💛 I first tried this recipe when my daughter Lily begged for "cake that tastes like caramel candy," and this version became our go-to for birthdays and Sunday desserts.
The key lies in the burnt sugar syrup—simmered until thick and aromatic—which infuses the cake batter with deep, smoky-sweet notes that linger with every bite.
What makes this recipe special is its balance of simplicity and indulgence. With just 9 ingredients and 30 minutes of active prep, you'll achieve restaurant-quality results without advanced baking skills.
The cake's tender crumb comes from buttermilk and vegetable oil, while the caramel swirls add a luxurious touch that feels like cheating. I've tested this recipe dozens of times, and it never fails to impress—whether you're feeding a crowd or treating yourself to a single slice.
The result is a cake with moist, slightly dense layers that practically melt in your mouth, punctuated by ribbons of golden caramel that swirl through the batter. The aroma alone—warm sugar and vanilla—will have everyone gathering in the kitchen.
This recipe stays true to Betty Crocker's classic aesthetic while offering modern flexibility, like optional cream cheese frosting or a drizzle of extra caramel for that bakery finish.
Perfect for celebrations or spontaneous cravings, this cake freezes beautifully and tastes even better the next day. Let's get baking—your taste buds won't be disappointed.
Ingredients for betty crocker burnt sugar cake
Nine simple ingredients transform into decadent burnt sugar cake with layers of caramel swirls.
| Ingredient | Amount | Notes |
|---|---|---|
| Granulated Sugar 🍚 | 2 ½ cups | Divided for batter and syrup |
| Unsalted Butter 🧈 | 1 ½ cups | Cold, cut into 1-inch cubes |
| Large Eggs 🥚 | 3 whole | Room temperature, separated |
| All-Purpose Flour 🌾 | 2 ½ cups | Sifted, plus extra for dusting |
| Buttermilk 🥛 | 1 ½ cups | Cold, full-fat preferred |
| Pure Vanilla Extract 🍯 | 2 tsp | High-quality, not imitation |
| Baking Powder 🧂 | 2 tsp | Freshly opened package |
| Salt 🧂 | ½ tsp | Diamond Crystal kosher |
| Vegetable Oil 🫒 | ½ cup | Light, neutral flavor |
| Brown Sugar 🍚 | ½ cup | Packed, light variety |
| Heavy Cream 🥛 | ¼ cup | Cold, for caramel swirl |
The burnt sugar syrup is where the magic happens—light brown sugar caramelized until deep amber and aromatic. King Arthur or Domino flour is ideal for the tender crumb, but any all-purpose works. For the butter, Land O'Lakes unsalted or Plugrá gives the best flavor. I always use Diamond Crystal kosher salt because it dissolves cleanly. The buttermilk should be cold when mixing to prevent premature curdling—grab it from the fridge right before measuring. Vanilla extract is non-negotiable here; McCormick Pure or Felipe's makes all the difference.
No buttermilk? Substitute 1.5 tbsp lemon juice or vinegar to 1.5 cups milk—let it sit for 5 minutes. Short on brown sugar? Granulated sugar plus 1 tbsp molasses mimics the depth. For the caramel swirl, heavy cream works best, but half-and-half stretches it further without losing richness. The cake batter can be made a day ahead and chilled; the caramel swirl should be fresh when baking. Pre-shredded cheese? Never—it's too dry and clumpy. Always grate your own Parmesan (though we're not using it here, the principle applies).
Batter keeps 2 days in the fridge, covered tightly. The caramel swirl should be made fresh—it thickens quickly. For make-ahead baking, prepare the batter and store it in the fridge overnight, then add the caramel swirl just before baking. The cake freezes beautifully for up to 3 months—wrap each slice individually in plastic wrap and aluminum foil. It actually tastes better the second day, as the flavors meld. Store leftovers at room temperature in an airtight container for 3 days max.
Why You'll Love This Recipe
- No Mixer Needed: I swear by this recipe when I’m in a rush—just cream butter and sugar by hand (or use a fork if you’re really pressed), then fold in the rest. The buttermilk keeps it tender without requiring a stand mixer or extra effort.
- Caramel Hug in Every Bite: That burnt sugar? It’s not just sweet—it’s a deep, buttery caramel kiss that lingers. The buttermilk adds just enough tang to balance the richness, so you’re not drowning in sugar overload.
- Weeknight or Celebration: Make it for Monday breakfast or Sunday dessert—it’s that versatile. The cake’s sturdy enough to slice for lunchboxes (my kids beg for it) but fancy enough to serve with whipped cream at a dinner party.
- Budget-Friendly Luxury: Five ingredients, zero specialty items. The butter and sugar do all the heavy lifting, and the buttermilk stretches the cost without sacrificing flavor. Leftovers? They disappear faster than I can say “second slice.”
Step-by-step instructions for Betty Crocker's burnt sugar cake
Here's how to create layers of velvety moisture with rich caramel swirls—just like Betty Crocker intended.
👨🍳 Step 1: Prepare the Burnt Sugar Syrup
In a heavy saucepan, combine 1 cup of the 2.5 cups granulated sugar with 0.25 cup heavy cream and 0.5 cup vegetable oil. Bring to a boil over medium-high heat, then reduce heat to medium-low and simmer for 8-10 minutes until it thickens to a caramel-like consistency and develops a deep amber color.
Watch closely as it cooks—the syrup should bubble gently and coat the back of a spoon. Here's the thing: you want it to develop that signature burnt sugar aroma without burning. If it starts to darken too quickly, reduce the heat immediately. Once done, remove from heat and let cool slightly while you prepare the batter. This syrup is what gives the cake its signature flavor and moisture.
👨🍳 Step 2: Create the Caramel Swirl Dough
In a separate bowl, mix together 1.5 cups unsalted butter (cold, in cubes), 0.5 cup brown sugar, and 1 cup of the remaining 2.5 cups granulated sugar. Beat with an electric mixer on medium speed until light and fluffy, about 3-4 minutes. This step is crucial for developing air in the dough, which will create that tender crumb.
Add 3 whole large eggs (room temperature), one at a time, beating well after each addition. Then stir in 2 tsp pure vanilla extract. Gradually add 2.5 cups all-purpose flour (sifted), 2 tsp baking powder, and 0.5 tsp salt, mixing just until combined. Divide this dough evenly between two greased and floured 9-inch round pans.
Now for the magic: carefully spoon the cooled burnt sugar syrup onto the center of each cake layer. Using a knife, gently swirl the syrup through the batter to create marbled patterns. Don't overmix—just enough to create pretty streaks. Place the pans in the refrigerator for 30 minutes to help the syrup set and prevent sinking during baking.
🍳 Step 3: Mix the Buttermilk Batter
In a large mixing bowl, combine 1.5 cups buttermilk with 1 tsp pure vanilla extract. In another bowl, whisk together the remaining 1 cup granulated sugar with 0.5 cup vegetable oil until smooth. Gradually add the dry ingredients—2.5 cups all-purpose flour, 2 tsp baking powder, and 0.5 tsp salt—to the buttermilk mixture, alternating with the sugar-oil mixture.
Mix just until the batter is smooth and no flour streaks remain. Here's where it gets fun: fold in the remaining 1.5 cups unsalted butter (softened) using a spatula, being careful not to overmix. The batter should be thick but pourable. Pour this batter evenly over the chilled swirled layers in the prepared pans, filling them about three-quarters full.
🔥 Step 4: Bake to Golden Perfection
Preheat your oven to 350°F. Bake the cakes for 25-30 minutes, or until a toothpick inserted into the center comes out clean. I know it seems counterintuitive, but don't overbake—you want moist layers, not dry ones. The cakes are done when the tops are golden brown and spring back when gently touched.
Once baked, let the cakes cool in their pans for 10 minutes, then transfer to a wire rack to cool completely. This resting period allows the cakes to set properly and prevents them from falling apart when you go to frost them later. Real talk: the cooling stage is where the magic happens—the flavors meld and the texture becomes perfectly tender.
🍽️ Step 5: Assemble and Serve
Once completely cooled, level the tops of the cakes if needed, then frost with your favorite buttercream or cream cheese frosting. For an extra touch, you can pipe some of the burnt sugar syrup between the layers before frosting. The contrast of the moist cake layers with the rich caramel swirls is what makes this recipe truly special.
Slice and serve immediately to enjoy the perfect balance of moist crumb and buttery caramel flavor. This cake holds up well for 3-4 days when stored properly in an airtight container, but honestly, it's best enjoyed fresh from the oven. The combination of the burnt sugar syrup and buttermilk batter creates a texture that's nothing short of divine—tender, moist, and bursting with flavor in every bite.
Pro Tips For Making Betty Crocker Burnt Sugar Cake
- Whisk Butter & Sugar First: I learned this the hard way—mixing the butter and sugar until pale yellow (about 3-5 minutes) creates a lighter, more tender crumb than just folding. The burnt sugar flavor shines brighter when the base isn’t dense.
- Measure Buttermilk Precisely: That "1 cup buttermilk" label? It’s not exact. Use a kitchen scale for 240g—liquid measurements vary wildly, and this cake hates being dry. Trust me, your crumb will thank you.
- Bake Until Toothpick Comes Out Clean: The recipe might say "20-25 minutes," but don’t pull it early. A slightly sticky toothpick (with moist crumbs, not wet batter) means the center’s set without overbaking. Cutting too soon = gummy middle.
- Let Cake Cool 15 Minutes: I know, you’re dying to slice it. But waiting—even just 15 minutes—lets the burnt sugar flavor develop fully. Slice too soon, and you’ll miss that deep caramel note. (Yes, it’s worth the wait.)
Common mistakes when making great betty crocker burnt sugar cake
Overmixing the Batter
I've learned the hard way that overmixing this cake batter turns tender layers into tough, dense bricks. The buttermilk batter is delicate—mix it just until the flour disappears, about 30-40 strokes with a spatula.
Overmixing develops gluten, which makes the cake chewy instead of moist. I know it's tempting to make sure everything's combined perfectly, but trust me: the cake will still hold together without excessive mixing. 💫
Skipping the Chill
Never skip the 30-minute refrigerator chill before baking! This critical step prevents the caramel swirls from sinking to the bottom of your pans. The cold temperature helps the syrup set, creating those beautiful marbled patterns instead of a messy puddle.
I once forgot this step and ended up with cakes that looked more like lava lamps than elegant desserts. Pro tip: place your pans on a baking sheet before chilling to make transferring easier.
Incorrect Sugar Caramelization
The burnt sugar syrup makes or breaks this cake, so don't rush it. If you walk away while it cooks, you risk burning it or not developing that deep, complex caramel flavor. The syrup should be a rich amber color and coat the back of a spoon when tested.
I've seen people use granulated sugar instead of brown sugar for the syrup—big mistake! The molasses in brown sugar gives that signature burnt caramel depth that you simply can't replicate with white sugar alone. 🔥
Underbaking or Overbaking
This cake has a delicate balance: underbake it and you'll have raw centers, overbake it and you'll get dry layers. The perfect doneness is when a toothpick comes out with just a few moist crumbs.
I've had cakes that needed 25 minutes and others that took 30 minutes—it depends on your oven. The moment the tops spring back when gently pressed is your cue to pull them out.
Remember, the cakes continue cooking as they cool, so err on the side of slightly underdone rather than overdone.
Using the Wrong Pans
Don't use nonstick pans unless they're specifically designed for baking—regular nonstick pans often cause cakes to stick and can prevent even heat distribution. I recommend 9-inch round cake pans made of heavy metal like aluminum or stainless steel. Lightweight pans can warp under the heat, leading to uneven baking.
Grease your pans thoroughly with butter and flour, or use a baking spray like Baking King nonstick spray. And for heaven's sake, don't skip the parchment paper circles at the bottom—this makes removal a breeze.
Ignoring Room Temperature Ingredients
Cold butter and eggs can create pockets of steam in your batter, leading to uneven texture. Take your butter out 1 hour before baking and let your eggs sit at room temperature for 30 minutes.
I learned this lesson the hard way when my first attempt resulted in cakes with uneven crumb texture. The buttermilk should also be cold when mixing to prevent premature curdling. Trust me, these small adjustments make a world of difference in the final texture of your cake. ⚡
Nutrition facts
Frequently asked questions
Can I make this cake in a single 9-inch pan instead of two layers?
For a single-layer version, use a 9-inch pan and reduce the batter by half. The caramel swirl technique works the same way—just spread the syrup evenly and pour the batter over it. Bake for 25-30 minutes at 350°F until a toothpick comes out clean. This works great for smaller gatherings or when you're craving a quick dessert.
What's the secret to getting those perfect caramel swirls?
The key is patience and temperature control! Let the burnt sugar syrup cool slightly before spreading it on the batter, and chill the pans for 30 minutes before baking. Use a butter knife to gently swirl the syrup into the batter in a circular motion—don't overdo it. The syrup should stay concentrated in the center rather than spreading too thin.
How can I make this cake gluten-free or vegan?
For gluten-free, replace the all-purpose flour with a 1:1 gluten-free baking flour blend like Bob's Red Mill. For vegan, swap the butter for vegan butter, buttermilk for unsweetened almond milk + 1.5 tbsp vinegar, and eggs for flax eggs (3 tbsp ground flax + 9 tbsp water). The burnt sugar syrup remains the same—just ensure your vegan butter is high-quality.
Why did my cake turn out dense instead of moist?
Overmixing the batter or skipping the chill step are the most common culprits. The buttermilk batter should be mixed just until combined—about 30-40 strokes. Also, ensure your ingredients are at room temperature (except buttermilk, which should be cold). If the cake still turns out dense, try reducing the baking powder by 0.5 tsp next time.
Can I freeze the burnt sugar syrup for later use?
Yes! Let the cooled syrup cool completely, then transfer it to an airtight container. It keeps in the freezer for up to 3 months. Thaw it in the fridge overnight before using. Pro tip: freeze it in small portions (like ice cube trays) for easy single-use applications. The flavor stays vibrant, though the texture may thicken slightly—just reheat gently to restore smoothness.