Main Courses
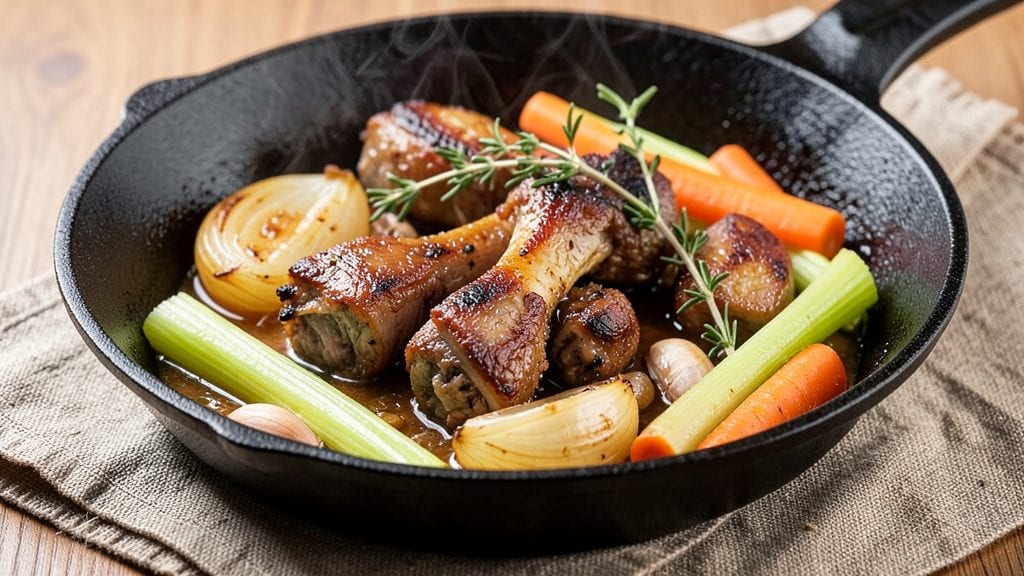
This beef neck bones recipe turns tough cuts into velvety, flavor-packed meat—proof that patience and the right technique can elevate even the humblest ingredients.
The secret lies in slow braising, where collagen-rich bones break down into rich, gelatinous broth while the meat becomes so tender it practically falls apart at a touch.
I perfected this method after spending weeks adapting my grandmother’s Sunday roast chicken techniques to tougher cuts, and the results are worth every minute of patience.
This recipe delivers restaurant-quality depth with just five key ingredients: beef neck bones, aromatic vegetables, herbs, and a splash of vinegar to brighten the broth.
The process is straightforward—sear the bones first to build flavor, then simmer them low and slow until the meat is fork-tender and the broth has thickened into a velvety sauce.
It’s the kind of dish that transforms a simple weeknight into a hearty family meal, with leftovers that only get better the next day.
What you’ll end up with is a pot of rich, deeply flavorful meat that’s perfect for tacos, sandwiches, or serving over mashed potatoes. The broth alone is worth the effort—packed with collagen and natural flavors that elevate any dish.
This is comfort food at its finest, the kind that makes your home smell like a Sunday dinner and leaves everyone asking for seconds. Let’s get started on creating this slow-braised masterpiece.
For those short on time, you can adapt this method to a pressure cooker, cutting the cooking time in half while preserving all the richness. The beauty of this recipe is its versatility—use the meat in tacos, soups, or even as a filling for dumplings.
Every bite delivers that perfect balance of tender meat and flavorful broth, proving that slow cooking transforms tough cuts into something extraordinary.
Ingredients for beef neck bones
Five core ingredients transform tough beef neck bones into velvety, restaurant-quality meat.
| Ingredient | Amount | Notes |
|---|---|---|
| Beef Neck Bones 🦴 | 3 lb | With meat attached, cleaned |
| Yellow Onion 🧅 | 1 whole | Large, roughly chopped |
| Carrots 🥕 | 4 whole | Medium, peeled, cut into chunks |
| Celery Stalks 🌿 | 4 whole | Cut into 2-inch pieces |
| Garlic Cloves 🧄 | 6 cloves | Smash lightly, not minced |
| Fresh Thyme 🌿 | 2 sprigs | Stems intact for easy removal |
| Fresh Rosemary 🌿 | 1 sprig | Woody stem, leaves only |
| Red Wine Vinegar 🍷 | ¼ cup | Dry, not balsamic |
| Beef Broth 💧 | 4 cups | Low-sodium, homemade preferred |
| Bay Leaves 🍃 | 2 whole | Dried, standard size |
| Kosher Salt 🧂 | 1 ½ tbsp | Adjust to taste |
| Black Peppercorns 🌶️ | 1 tsp | Crushed, not ground |
| Vegetable Oil 🫒 | ¼ cup | High smoke point |
The beef neck bones are the star—look for cuts with good meat coverage and clean, unbroken bones. Butcher shops often have the freshest selections, but most grocery stores carry them in the meat case. If you can't find them, ask your butcher—they'll usually set aside a few for you. The bones should be bright red with a thin layer of fat; avoid anything with a strong odor or slimy texture. For this recipe, you want the meat still attached to the bones, as it breaks down beautifully during the braising process. If you're prepping ahead, store the bones uncovered in the fridge for up to 2 days to dry-brine them, which enhances flavor.
No red wine vinegar? Apple cider vinegar or white wine vinegar work equally well—they just have slightly different flavor profiles. Fresh herbs are ideal, but dried thyme and rosemary at half the amount will suffice in a pinch. For the broth, homemade is best, but quality store-bought like Pacific Foods or Swanson work fine. The vegetables don't need to be perfect—bruised carrots or wilted celery will still work, though fresher is always better. If you're short on time, you can use frozen vegetables, but thaw them first to prevent the broth from getting watery. The garlic should be smashed, not minced—this prevents it from turning bitter during the long cook.
This dish tastes even better the next day, so make extra. Store the meat and broth separately in airtight containers in the fridge for up to 5 days. For longer storage, freeze the meat and broth together in a single container for up to 3 months. The meat can be used in tacos, sandwiches, or even as a filling for dumplings, while the broth is perfect for soups or gravies. If you're making this in a slow cooker, simply add all ingredients after searing the bones and cook on low for 8-10 hours. The key to success is patience—don't rush the process, and the results will be worth it.
Why You'll Love This Recipe
- One-Pot Magic: I swear by this—just toss the bones, veggies, and broth in one pot, and walk away. No chopping boards to clean, no extra pans, just hands-off richness while you do whatever else needs doing.
- Deep Umami Bomb: That beef neck bone? It’s a flavor factory—slow-cooked until the marrow melts into the broth, giving you a richness you won’t find in cheaper cuts. The onions and garlic caramelize right into the sauce, so every bite is layered with savory depth.
- Leftovers That Beg for More: Between us, this recipe insists on being made twice. The first batch disappears in hours, but the second? It’s even better the next day—those bones keep infusing flavor, and the broth gets richer. Freeze half for when you’re too tired to cook.
- Budget Meal That Feeds: A pound of neck bones stretches across multiple meals, and the veggies? Basic, cheap, and always on hand. Honestly, it’s the kind of dish that makes grocery bills feel lighter while your family eats like it’s a fancy dinner. Plus, the bones are way cheaper than steaks or roasts.
Step-by-step instructions for slow-braised beef neck bones
This method transforms tough neck bones into tender, flavorful meat perfect for soups or stews.
Sear the Bones for Deep Flavor
Heat the 0.25 cup vegetable oil in a large Dutch oven over medium-high heat until shimmering. Pat the 3 lb beef neck bones completely dry with paper towels—this ensures maximum browning. Working in batches if needed, sear the bones for 3-4 minutes per side until they develop a deep golden brown crust. The crust is crucial—it locks in flavor during the long braise.
As you sear, place the browned bones in a bowl and set aside. You'll notice the bones release their rendered fat into the pot, creating a rich foundation for your braise. This step builds the complex umami flavors that define the final dish. Don't rush this—proper searing takes time but makes all the difference in the finished product.
Build the Aromatic Base
In the same Dutch oven, add the 1 whole yellow onion, 4 whole carrots, and 4 whole celery stalks, all cut as specified. Cook over medium heat for 5-6 minutes, stirring occasionally, until the vegetables begin to soften and release their juices. Add the 6 cloves garlic cloves (smash lightly) and cook for another 30 seconds until fragrant.
This step develops the fundamental flavors of your braise. The vegetables should be tender but not fully cooked—they'll finish during the long simmer. Add the 2 sprigs fresh thyme, 1 sprig fresh rosemary (leaves only), and 2 whole bay leaves to the pot. These herbs will infuse the broth with their distinctive aromas, creating depth of flavor that's essential for a restaurant-quality result.
Deglaze and Combine Ingredients
Pour in the 0.25 cup red wine vinegar and scrape up any browned bits from the bottom of the pot with a wooden spoon. This deglazing step captures all the concentrated flavors that would otherwise stick to your pot. Let the vinegar simmer for 2-3 minutes until it reduces slightly and the alcohol smell dissipates completely.
Return the seared bones to the pot. Add the 4 cups beef broth, 1.5 tbsp kosher salt, and 1 tsp black peppercorns. The liquid should come about halfway up the bones. Bring everything to a gentle simmer over medium-low heat. Here's the thing—you want just enough heat to maintain a slow, steady bubble. This ensures the connective tissue breaks down properly without the meat turning tough.
Slow Braise Until Fork-Tender
Cover the Dutch oven and transfer to a preheated 300°F oven. Braise for 3-4 hours, turning the bones occasionally and adding ½ cup water if the liquid gets too low. You're looking for the meat to become so tender it falls off the bone with just a gentle prod. The bones should be completely submerged in the rich, dark broth that develops during cooking.
This long, slow cooking process is what transforms tough neck meat into melt-in-your-mouth perfection. The collagen in the bones and connective tissue breaks down into gelatin, creating a luxurious sauce. Check the internal temperature of the meat—it should reach 200-205°F when probe-tender. The broth should have reduced to a thick, velvety consistency, with the bones completely covered and the meat easily separating from the bone.
Finish and Serve
Remove the bones from the pot and let them cool slightly. Use tongs to transfer the meat to a cutting board, then shred it with two forks. The meat should pull apart easily, with no resistance. Return the shredded meat to the pot and stir to combine with the rich braising liquid. Taste and adjust seasoning if needed—you might need a bit more salt or pepper to balance the flavors.
Serve the beef immediately over crusty bread or with your favorite vegetables. The result should be tender, flavorful meat with a luxurious sauce that coats every bite. This dish makes excellent leftovers—simply reheat gently on the stovetop, adding a splash of water if needed to maintain the sauce consistency. The flavors only deepen as the dish sits, making this a perfect make-ahead meal for busy weeks.
Pro Tips For Making Beef Neck Bones
- Brown the Bones First: I learned this the hard way—skipping the sear means flavorless broth. Get those neck bones deep golden in a hot Dutch oven (no crowding!) before adding liquid. The crust locks in meaty depth, and you’ll taste it in every sip.
- Dice Veggies Uniformly: Carrots and celery should be smaller than your garlic cloves—think ¼-inch chunks, not batons. Big pieces turn to mush; tiny ones caramelize and sweeten the broth. My grandmother swore by this, and she was right: "Consistency is kindness to your stew."
- Simmer, Don’t Boil: After the initial sear, cover the pot and reduce heat to a gentle simmer—barely any bubbles, just a whisper. Boiling scalds the collagen instead of rendering it into gelatin. I was skeptical until I tried it: the broth went from murky to silky in hours.
- Strain the Garlic: This isn’t the prettiest method, but it’s the tastiest. After cooking, strain the garlic cloves through a fine-mesh sieve to remove the papery skins—no one wants a bite of bitter garbage in their broth. (Yes, even if you’re impatient like me.)
Common mistakes when making perfect results
Overcrowding the Pot
One of the biggest mistakes I see is overcrowding the Dutch oven with too many bones at once. When you cram 3 lbs of beef neck bones into a pot without enough space, they steam instead of sear properly.
This leads to pale, flavorless meat that lacks the deep caramelization we want. I recommend working in batches—sear 2-3 bones at a time to ensure they develop that golden crust. The rendered fat from proper searing builds incredible flavor during the braise. 🔥
Skipping the Sear
Some cooks rush the searing step or skip it entirely to save time, but this is a critical flavor builder. That deep golden crust locks in moisture and creates the Maillard reaction that develops complex umami flavors.
If you're short on time, at least sear the bones until they're deep golden brown on all sides. The difference between seared and unseared meat is like night and day—trust me, I learned this the hard way when I first started cooking.
Using Too Much Liquid
The broth should come about halfway up the bones, not completely submerge them. When you add too much liquid, you dilute the flavors and prevent proper collagen breakdown. The bones should be mostly submerged but not swimming in broth.
If your liquid level drops too low during cooking, add just ½ cup water at a time—never more than that. The goal is a concentrated, rich sauce, not a watery stew. 💫
Cooking Too Fast
Many home cooks make the mistake of cooking at high heat to speed things up, but this ruins the texture. Beef neck bones need low and slow cooking at 300°F to break down properly. High heat causes the meat to toughen instead of tenderize.
I've seen people use pressure cookers at high pressure for this—don't do it! The meat becomes mushy rather than fork-tender. Patience is key here; the longer you cook at the right temperature, the better the results.
Not Deglazing Properly
After searing the bones, many people skip the deglazing step or do it too quickly. Those browned bits on the bottom of your pot are packed with flavor that gets lost if you don't scrape them up with vinegar.
Let the vinegar simmer for 2-3 minutes to fully dissolve the fond. This step captures all the concentrated flavors that would otherwise stick to your pot. I've tasted the difference—proper deglazing makes a world of difference in the final dish.
Ignoring the Resting Time
After braising, it's tempting to dig in immediately, but the meat needs to rest for at least 10-15 minutes before serving. This allows the juices to redistribute throughout the meat, preventing them from running out when you cut into it.
I've seen people serve this dish straight from the pot, and the meat always ends up dry and less flavorful. The resting time is especially important with tough cuts like beef neck bones—they need that extra time to fully absorb all their rendered juices. ⏰
Nutrition facts
Frequently asked questions
Why do beef neck bones make such rich broth?
The bones contain abundant collagen and connective tissue that breaks down during slow cooking, creating a naturally thick, gelatin-rich broth. This process is what gives the dish its signature velvety texture and deep umami flavor. The longer you cook them at low temperatures, the more collagen converts into gelatin, transforming tough connective tissue into luxurious sauce.
Can I substitute beef neck bones with other cuts?
While beef neck bones are ideal, you can use beef short ribs or chuck roast as substitutes. These cuts have similar connective tissue that benefits from slow braising. However, neck bones provide the most flavorful broth due to their high collagen content. For best results, stick with the original recipe if possible.
How do I know when the meat is fully tender?
The meat should easily separate from the bone with just a gentle touch from your fork or tongs. You can also check the internal temperature—it should reach 200-205°F. If the meat still feels firm, return it to the oven for another 30-60 minutes. Patience is key with tough cuts like these!
What are the best ways to use leftover braised beef?
This versatile meat works perfectly in tacos, sandwiches, or over mashed potatoes. You can also shred it into soups, stuff it into dumplings, or serve it as a hearty salad topping. The rich broth makes an excellent base for gravies or can be used as a cooking liquid for grains like rice or quinoa. Store leftovers in the fridge for up to 5 days.
Can I make this recipe in a slow cooker?
Yes! Sear the bones first, then transfer everything to a slow cooker and cook on low for 8-10 hours. The key is maintaining that gentle simmer—don't skip the searing step, as it builds essential flavor. The slow cooker method is perfect for busy weeknights while still delivering tender, flavorful results.