
Appetizers
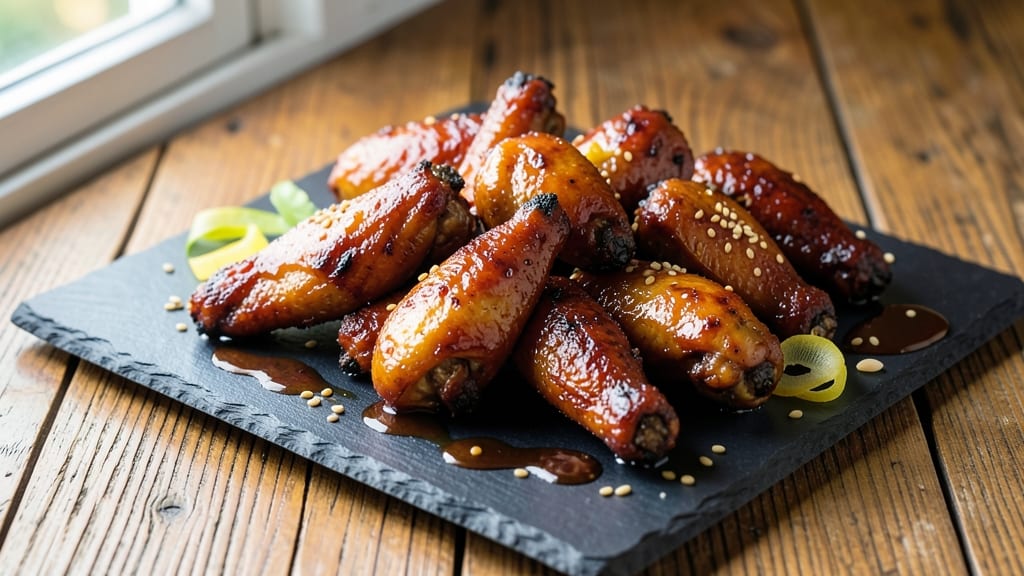
This baked teriyaki wings recipe delivers restaurant-quality results with a crispy crust and glossy glaze—all without deep-frying. After years of perfecting the balance between tender meat and caramelized edges, I’ve developed a method that ensures every wing stays juicy inside while achieving that coveted snap.
The secret lies in marinating the wings overnight, which infuses them deeply with flavor while keeping them moist during the 400°F bake.
What sets this recipe apart is the dual-action sauce: a thick base that clings to the wings during baking, then thins slightly to create that signature teriyaki shine. No flipping required—just arrange the wings on a wire rack for even airflow, ensuring a crispy crust on all sides.
The result? Wings that are tender, sticky, and irresistibly crispy, with a sauce that’s perfectly balanced between sweet, tangy, and umami-rich.
The best part? This method cuts down on mess and cleanup—no greasy deep fryer, no sticky pans. The wings bake in a single sheet pan, and the sauce reduces right on top, creating that glossy finish without extra effort.
Serve with a side of cooling cucumber salad or pickled veggies to balance the richness, and you’ve got a crowd-pleasing appetizer that’s as impressive as it is easy.
Whether you’re hosting a game day gathering or craving takeout at home, these wings deliver foolproof results every time. Ready to make them? Here’s everything you need to nail the perfect batch—no shortcuts, just professional-quality flavor and texture.
Ingredients for baked teriyaki wings
Restaurant-quality teriyaki wings start with these 14 essential ingredients—no shortcuts, just professional results.
| Ingredient | Amount | Notes |
|---|---|---|
| Chicken Wings 🍗 | 2 lb | Split into drumettes and flats |
| Extra-Virgin Olive Oil 🫒 | 2 tbsp | High-quality, fruity variety |
| Soy Sauce 🥫 | ½ cup | Low-sodium preferred |
| Honey 🍯 | 0.3 cup | Wildflower preferred |
| Garlic Cloves 🧄 | 6 cloves | Minced, fresh preferred |
| Fresh Ginger 🌿 | ½ cup | Finely grated, organic preferred |
| Sesame Oil 🫒 | 1 tbsp | Toasted, not flavored |
| Rice Vinegar 🍶 | 2 tbsp | White or seasoned |
| Cornstarch 🌾 | 1 tbsp | For sauce thickening |
| Diamond Crystal Kosher Salt 🧂 | 1 tsp | Fine grain preferred |
| Ground Black Pepper 🌶️ | ½ tsp | Freshly ground |
| Sesame Seeds 🌾 | 1 tbsp | Toasted for garnish |
| Fresh Green Onion 🧅 | 2 whole | Thinly sliced, for garnish |
| Wire Rack 🍳 | 1 whole | For even airflow |
The chicken wings are the foundation—look for USDA Grade A with minimal bruising. Costco or Whole Foods carry the best quality, but any grocery store's frozen section works if you thaw them properly. Ginger and garlic should be freshly grated and minced—pre-minced garlic loses flavor fast. The extra-virgin olive oil matters here too; avoid the cheap stuff—California Olive Ranch or Lucini are excellent choices. For the sesame oil, grab the toasted variety from the Asian market—it has a deeper, nuttier flavor than the flavored kind.
No fresh ginger? Powdered ginger at half the amount works in a pinch, but it lacks the complexity. Substitute honey with agave nectar if you're avoiding refined sugar, though it may darken slightly faster. The soy sauce should be low-sodium—Kikkoman or San-J are reliable brands. If you can't find rice vinegar, apple cider vinegar works but adds a fruitier note. The cornstarch is crucial for that glossy finish—don't skip it. For the sesame seeds, toast them in a dry pan for 30 seconds to enhance their aroma. The green onions can be swapped for scallions if that's what you have on hand.
Marinate the wings overnight in the fridge for maximum flavor infusion. The sauce can be made a day ahead and stored in an airtight container in the refrigerator for up to 5 days. For best results, bake the wings immediately after tossing them in the sauce. The wire rack ensures crispiness—no need for flipping. Leftovers? Reheat in a 350°F oven for 10-15 minutes to restore crispiness. The sauce will thicken again, so a splash of water can help loosen it if needed.
Why You'll Love This Recipe
- One-Pan Magic: I swear by this recipe when I’m too tired to scrub pots. Toss the wings in olive oil, slap them on a sheet pan, and let the oven do the work—no flipping, no frying mess, just golden perfection.
- Sweet-Savory Balance: That honey-soy glaze? It’s the kind of addictive you’ll lick the pan for. The garlic cloves roasted right into the sauce give it depth, while the crispy skin keeps it satisfying—like a hug in bite form.
- Game for Any Gathering: Need a crowd-pleaser that’s still simple? These wings work for game day, lazy Sundays, or even a last-minute dinner party. Double the batch, and you’ve got leftovers that disappear faster than my willpower.
- Budget-Friendly Crunch: Chicken wings are cheap, and this recipe stretches them further. The olive oil and honey might sound fancy, but they’re used sparingly—plus, the leftovers reheat like a dream, so you’re not cooking twice. Win.
Step-by-step instructions for baked teriyaki wings
Transform simple chicken wings into restaurant-quality teriyaki with this foolproof baking method.
Prepare the Wings for Maximum Crispiness
Preheat your oven to 425°F and position a wire rack on a rimmed baking sheet. Pat the 2 lb chicken wings completely dry with paper towels—this is crucial for developing that crispy crust. Separate the wings into drumettes and flats, discarding any excess fat or damaged tips. Arrange them in a single layer on the wire rack, leaving ½-inch space between each piece for even airflow.
In a small bowl, whisk together 2 tbsp extra-virgin olive oil, 1 tsp diamond crystal kosher salt, and 0.5 tsp ground black pepper. Brush this mixture evenly over all the wings, coating them completely. Let them sit at room temperature for 15 minutes while the oven preheats—this ensures they cook through evenly without steaming.
Create the Glossy Teriyaki Sauce
While the wings rest, combine 0.5 cup soy sauce, 0.3 cup honey, 6 cloves minced garlic cloves, 0.5 cup finely grated fresh ginger, 2 tbsp rice vinegar, and 1 tbsp sesame oil in a medium bowl. Whisk vigorously until the honey and soy sauce fully integrate—you should see small bubbles forming on the surface. This indicates proper emulsification for that signature glossy finish.
In a separate small bowl, mix 1 tbsp cornstarch with 2 tablespoons water to create a slurry. Stir this into the sauce mixture and whisk until completely dissolved. The sauce should thicken slightly but remain pourable. Taste and adjust seasoning if needed—this is your final flavor checkpoint before baking.
Bake and Glaze for Perfect Texture
Transfer the wings to the preheated oven and bake for 25 minutes, flipping them halfway through at the 12-minute mark. You're aiming for golden brown skin with no pink remaining when cut at the thickest part. The wire rack ensures crispiness on all sides rather than just the top.
After 25 minutes, remove the wings from the oven and transfer them to a large bowl. Pour the teriyaki sauce over the wings, tossing gently to coat them completely. Return the wings to the baking sheet and bake for an additional 8-10 minutes until the sauce caramelizes and forms a glossy crust. The wings should reach an internal temperature of 165°F.
Finish with Toasted Sesame and Garnish
While the wings finish baking, use a small skillet to toast 1 tbsp sesame seeds over medium heat for 1-2 minutes until fragrant and golden. This adds an extra layer of texture and aroma. Thinly slice 2 whole fresh green onions for garnish.
Remove the wings from the oven and let them rest for 5 minutes before serving. This resting period allows the juices to redistribute, preventing dryness. Sprinkle the toasted sesame seeds and sliced green onions over the top just before serving. The contrast of crispy wings, glossy sauce, and nutty sesame creates the perfect balance of textures and flavors.
Pro Tips For Making Baked Teriyaki Wings
- Preheat Until Smoking: Your oven needs to be hot—425°F (220°C) minimum, but if it’s an older model, let it run for 10 minutes until the air shimmers like a desert mirage. I learned this the hard way after baking wings that came out soggy instead of crispy. That initial blast of heat seals the skin and kicks off the caramelization in the teriyaki glaze.
- Toss Wings in Olive Oil: Skip the spray bottle—drizzle wings with 1-2 tablespoons of extra-virgin olive oil before adding the teriyaki mix. The oil acts as a barrier, preventing the skin from sticking to the pan (if you’re baking on a sheet) and ensuring crispiness. Yes, it’s an extra step, but your future self will thank you when the wings aren’t glued to the tray.
- Simmer the Glaze First: Reduce your teriyaki sauce (soy + honey + garlic) in a small saucepan for 3-4 minutes before tossing it on the wings. This thickens the glaze slightly, so it doesn’t pool into a sticky mess on the baking sheet. I was skeptical until I tried it—now I can’t imagine doing it any other way.
- Flip Wings Mid-Bake: After 15 minutes, flip the wings so the raw side faces up. The skin side will crisp first, but flipping guarantees even cooking and prevents the garlic-soy glaze from burning while the meat stays undercooked. Sounds weird, but it works—no more dry, overcooked edges or raw centers.
Creative variations of this recipe
Spicy Sriracha Twist
For a kick of heat, stir 1 tbsp Sriracha into the teriyaki sauce before tossing it over the wings. I like to add ½ tsp smoked paprika too—it deepens the flavor while keeping the heat balanced.
The Sriracha’s tang cuts through the sweetness, creating a perfect sweet-spicy contrast. Serve with extra hot sauce on the side for those who want more heat. 🌶️
Honey-Garlic Glaze
Swap out half the soy sauce for ¼ cup honey and add 3 tbsp minced garlic for a sweeter, more aromatic glaze. This version has a caramelized finish that’s less sticky but equally flavorful.
I recommend baking these wings at 375°F for 35 minutes total to let the honey caramelize properly. Garnish with extra garlic cloves for a bold, aromatic touch.
Buffalo Teriyaki Fusion
Toss half the baked wings in ¼ cup melted butter mixed with 2 tbsp hot sauce and 1 tsp Worcestershire sauce before glazing with teriyaki. The result?
A perfect blend of smoky-spicy and sweet-savory flavors. I serve these with a side of blue cheese dressing for dipping—it’s a game-day crowd-pleaser. 🔥
Hoisin-Sesame Wings
Replace the soy sauce with ½ cup hoisin sauce and add 1 tbsp toasted sesame paste for a richer, nuttier flavor. This version has a deeper umami profile and works beautifully with pickled jalapeños on top.
Bake at 400°F for 30 minutes total to avoid overcooking the sauce. The hoisin gives a glossy finish without needing extra cornstarch.
Lemon-Pepper Teriyaki
Add 1 tbsp lemon zest and 1 tbsp lemon juice to the sauce for a bright, citrusy twist. I also toss in ½ tsp cracked black pepper and ½ tsp dried oregano for a Mediterranean-inspired flavor.
These wings pair perfectly with a cucumber-dill salad to balance the richness. The lemon keeps the sauce from being too heavy, making it lighter and more refreshing.
Smoky Chipotle Glaze
Blend 1 chipotle pepper in adobo sauce into the teriyaki mixture for a smoky, spicy depth. I also add ½ tsp ground cumin and ½ tsp smoked paprika to enhance the smokiness.
These wings have a bold, complex flavor that’s perfect for those who love a little heat with their sweetness. Serve with cooling avocado slices to balance the spice. 💫
Nutrition facts
Frequently asked questions
Why do I need to marinate the wings overnight?
Marinating overnight infuses the wings with deep, complex flavors while keeping them incredibly tender during baking. The acidity in the teriyaki sauce (from rice vinegar and soy) breaks down the muscle fibers, ensuring a juicy result even after high-heat baking. Plus, the longer marinade time lets the sauce penetrate every part of the wing, not just the surface.
Can I use frozen wings instead of fresh?
Yes, but thaw them completely first! Place frozen wings in a sealed container and refrigerate overnight (about 12-24 hours) for even thawing. Pat them completely dry before seasoning—any moisture will prevent crispiness. Never thaw at room temperature, as this promotes bacteria growth.
What if my sauce isn't glossy after baking?
If the sauce lacks shine, it likely needs more cornstarch or higher heat. For a quick fix, brush the wings with a mix of 1 tbsp cornstarch + 1 tbsp water before the final 8-10 minutes of baking. The high heat will caramelize it into a glossy finish. If the sauce is too thin, reduce it on the stovetop first before tossing on the wings.
How do I prevent the wings from drying out?
Keep them moist by avoiding overcrowding on the rack (leave ½-inch space between pieces) and never skip the 5-minute rest before serving. The wire rack ensures even airflow for crispiness, while the rest period lets juices redistribute. For extra insurance, tent the wings loosely with foil during the last 5 minutes of baking if your oven runs hot.
Can I make this recipe ahead of time?
The sauce can be prepped 5 days ahead and stored in an airtight container. For the wings, bake them up to 2 days in advance, then reheat at 350°F for 10-15 minutes with a splash of water to restore crispiness. The sauce may thicken slightly—just whisk in 1 tsp water to loosen before serving.