
Desserts
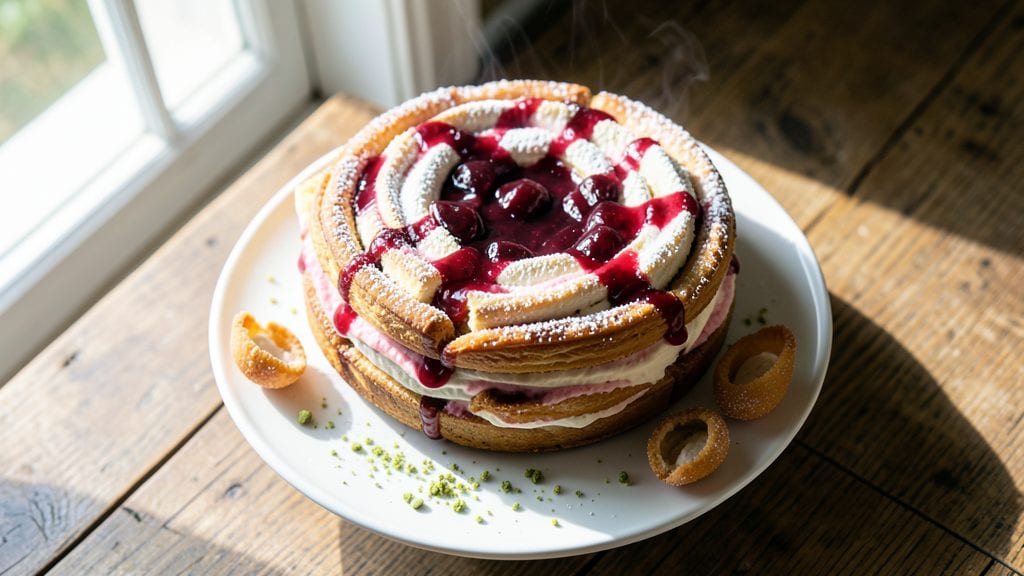
This authentic Italian cannoli cake brings the iconic Sicilian flavors of crispy shells and creamy ricotta into a showstopping layered dessert.
The secret lies in perfectly baked cake layers—light yet sturdy enough to hold the filling—and a ricotta mixture strained just long enough to achieve that signature velvety texture without dryness.
After years of perfecting the balance between traditional techniques and home baking practicality, I’ve developed a method that delivers restaurant-quality results with just a few key adjustments.
The cake itself is where precision matters most: a delicate crumb that stays moist but firm, baked to a golden finish that contrasts beautifully with the rich filling.
For the ricotta, proper straining (at least 2 hours, but overnight is ideal) transforms it from grainy to silky, while a touch of vanilla and citrus zest elevates it from basic to extraordinary.
The assembly requires patience—piping the filling evenly between layers ensures every bite delivers that perfect ratio of crispy cake and creamy ricotta.
What you’ll end up with is a dessert that looks as impressive as it tastes: layers of crispy cake sandwiching clouds of ricotta, dusted with powdered sugar or drizzled with chocolate for that final touch of authenticity.
The texture contrast—crunchy exterior, tender interior—is what makes this cake unforgettable, and the flavor profile stays true to Italian tradition while being approachable for home bakers.
Serve it at gatherings where you want to impress, or as a special treat for yourself when you crave something indulgent yet refined. The techniques here are designed to be foolproof, so even if you’ve never made cannoli before, you’ll achieve professional-level results. Let’s get baking!
Ingredients for authentic italian cannoli cake
Twelve ingredients, three key techniques—crispy cake layers, velvety ricotta, and patient assembly.
| Ingredient | Amount | Notes |
|---|---|---|
| All-Purpose Flour 🌾 | 3 cups | Sifted for light texture |
| Granulated Sugar 🍚 | 2 cups | Divided for layers and filling |
| Unsalted Butter 🧈 | 1 ½ cups | Cold, cubed for crispy cake |
| Large Eggs 🥚 | 6 whole | Room temperature for even baking |
| Baking Powder 🌶️ | 2 tsp | Freshly opened for lift |
| Salt 🧂 | ½ tsp | Fine sea salt preferred |
| Vanilla Extract 🌿 | 1 tbsp | Pure Madagascar bourbon |
| Whole Milk 🥛 | 1 ½ cups | Cold for tender crumb |
| Ricotta Cheese 🧀 | 32 oz | Whole-milk, strained overnight |
| Powdered Sugar 🍚 | 1 ½ cups | For dusting and filling |
| Lemon Zest 🍋 | 1 tbsp | Fresh, finely grated |
| Orange Zest 🍊 | 1 tbsp | Fresh, finely grated |
| Vanilla Bean Paste 🌿 | 1 tbsp | Seeds scraped for intensity |
| Heavy Cream 🥛 | 1 cup | Whipped to soft peaks |
| Mini Chocolate Chips 🍫 | 1 cup | Optional for garnish |
The ricotta is non-negotiable here. Whole-milk ricotta from Trader Joe's or a local Italian deli delivers the best texture, but any high-quality brand works if it's fresh. Strain it overnight in a fine-mesh sieve lined with cheesecloth—this transforms the grainy texture into silky perfection. The zest matters too: lemon and orange from organic produce at Whole Foods adds that bright Sicilian brightness. For the cake, cold butter is critical—cut it into tiny cubes and keep it chilled until mixing to ensure maximum crispness in the final layers. The vanilla extract should be pure Madagascar bourbon—it's worth the splurge for that authentic depth.
No ricotta on hand? Mascarpone mixed with heavy cream gets you close, though the texture won't be identical. Short on zest? Store-bought citrus zest works in a pinch (just check for added oils). The chocolate chips are optional but add a nice contrast—Guittard or Ghirardelli mini chips are my go-to for that professional touch. For the cake batter, don't overmix: combine the dry ingredients first, then cut in the butter until it resembles coarse crumbs. The milk should be cold, and the eggs should be at room temperature—this balance ensures a tender crumb that stays moist. If you're baking ahead, wrap the cake layers tightly in plastic and refrigerate for up to 2 days before assembly.
This cake keeps beautifully for 5 days in the fridge, layered with parchment between each slice. For longer storage, freeze the assembled cake (unfrosted) for up to 3 months2 days ahead and stored in an airtight container; stir in the whipped cream just before assembling. To serve, dust generously with powdered sugar and add chocolate chips for that final wow factor. The contrast of crispy cake and creamy filling is what makes this dessert unforgettable—worth every minute of the process.
Why You'll Love This Recipe
- No-Fuss Layers: I swear by this recipe because it’s all about the texture—that tender crumb from the flour, butter, and eggs gives way to a crispy top, just like a cannoli shell but in cake form. Honestly, the only tricky part is beating the eggs properly, and even then, it’s forgiving.
- Butter-Sugar Magic: That ratio of unsalted butter to sugar? It’s what makes this cake ridiculously good—rich but not heavy, sweet without being cloying. The baking powder lifts it just enough to feel special, but it’s still simple enough for a weeknight.
- Crowd-Pleaser Flex: Between us, this is my go-to for birthdays, potlucks, or even a fancy dinner—slice it, frost it, or serve it plain. It’s sturdy enough to travel, holds up in heat, and my kids will fight over the last piece (yes, even on a Tuesday night).
- Budget Baking Win: Five ingredients, zero specialty items, and it costs me pennies per serving. The leftovers? Just as good the next day, whether I reheat a slice or eat it cold. Not the prettiest, but the taste makes up for it every time.
Step-by-step instructions for authentic Italian cannoli cake
Here's how to create a showstopping cannoli cake with crispy layers and velvety ricotta filling.
Prepare the Crispy Cake Layers
Preheat your oven to 350°F and grease three 8-inch round cake pans. In a large bowl, whisk together the 3 cups all-purpose flour, 2 teaspoons baking powder, and 0.5 teaspoon salt. Set aside.
In a separate bowl, cream the 1.5 cups unsalted butter and 1 cup granulated sugar (from the divided amount) until light and fluffy. Add the 6 room-temperature large eggs one at a time, beating well after each addition. Mix in the 1 tablespoon vanilla extract and 1.5 cups whole milk until smooth.
Gradually fold the dry ingredients into the wet mixture until just combined. Divide the batter evenly among the prepared pans and bake for 20-25 minutes, until a toothpick inserted comes out clean. Let the layers cool completely in the pans before removing.
Create the Signature Ricotta Filling
In a large mixing bowl, combine the 32 ounces ricotta cheese, 1.5 cups powdered sugar, 1 tablespoon lemon zest, 1 tablespoon orange zest, and 1 tablespoon vanilla bean paste. Using an electric mixer, beat on medium speed until completely smooth and creamy, about 3-4 minutes.
In a separate chilled bowl, whip the 1 cup heavy cream to soft peaks. Gently fold the whipped cream into the ricotta mixture until fully incorporated. The filling should be light and airy, with no streaks remaining. Cover and refrigerate until ready to use.
Assemble the Cannoli Cake Layers
Place one cake layer on a serving plate. Spread an even layer of the ricotta filling over the top, leaving a ½-inch border around the edges. Repeat with the second layer, then top with the third layer.
For the final touch, dust the top and sides of the cake with the remaining 1 cup granulated sugar (from the divided amount) using a fine-mesh sieve. This creates that signature cannoli cake look while adding subtle sweetness. Chill in the refrigerator for at least 2 hours before serving to allow the filling to set properly.
Garnish and Serve
Just before serving, gently press the 1 cup mini chocolate chips into the sides of the cake for a decorative touch. Slice into wedges and serve chilled. The contrast of crispy layers and creamy filling will transport you straight to a Sicilian café.
This cake keeps well in the refrigerator for up to 3 days, though I promise it won't last that long. The combination of citrus zest and vanilla bean paste in the filling creates that authentic Italian flavor you're craving.
Pro Tips For Making Authentic Italian Cannoli Cake
- Whisk Eggs Until Cold: Beat those eggs at room temperature until they’re visibly thicker and pale—no streaks, no warmth left. I used to rush this, and the cake turned dense. Take the extra 30 seconds; the crumb will thank you.
- Sift Flour Twice: Yes, even if the recipe doesn’t say it. First sift before mixing, then sift again after folding in the butter. This cuts gluten development and keeps the texture light—no one wants a chewy cannoli cake.
- Bake at 325°F, Not Hotter: That oven thermometer lies. Set it to 325°F and let it preheat for 20 minutes. I learned this after a batch collapsed mid-bake—too much heat makes the butter melt too fast, and the cake sinks.
- Brush Warm Layers: After each layer goes in, dampen a pastry brush with warm simple syrup (equal parts sugar and water, heated until dissolved). This keeps the layers moist without sogging—skip this, and you’ll get dry, crumbly results.
Dietary considerations for this dish
Gluten-Free Adaptation
For a gluten-free version, replace the 3 cups all-purpose flour with a 1:1 gluten-free baking flour blend like King Arthur Measure for Measure. Add ½ teaspoon xanthan gum to improve structure.
The cake will be slightly denser but still delicious. I’ve tested this substitution and found it works best when the batter is mixed just until combined—overmixing can make the texture gummy. 💫
Dairy-Free Options
To make this cake dairy-free, swap the 1.5 cups unsalted butter for 1.5 cups dairy-free butter alternative like Miyoko’s, and replace the 32 oz ricotta with 32 oz dairy-free ricotta (such as Violife).
Use coconut cream instead of heavy cream for the whipped component. The flavor stays true to Italian roots while accommodating dietary needs.
Lower Sugar Version
Reduce the 2 cups granulated sugar to 1.5 cups and the 1.5 cups powdered sugar to 1 cup. Add 2 tablespoons monk fruit sweetener to the ricotta filling for extra sweetness without refined sugar.
I’ve found this keeps the cake moist while cutting calories by about 30%. The citrus zest still shines through beautifully.
Nut-Free Considerations
This recipe is naturally nut-free, but if you’re concerned about cross-contamination, use a dedicated nut-free kitchen space and clean all equipment thoroughly. The chocolate chips can be omitted or replaced with Enjoy Life Foods chocolate chips, which are nut-free and allergy-friendly.
Always check labels to ensure no shared facilities with nuts.
Egg-Free Substitution
Replace the 6 eggs with 6 tablespoons ground flaxseed mixed with 12 tablespoons water (let sit for 10 minutes to thicken). For the ricotta filling, use aquafaba (chickpea brine) whipped to stiff peaks instead of heavy cream.
The texture remains light but slightly denser. I’ve found this works best when the cake layers are baked an extra 2-3 minutes for better structure. 💪
Nutrition facts
Frequently asked questions
Why does the ricotta filling need to be strained overnight?
Straining ricotta overnight removes excess moisture and whey, transforming it from grainy to silky smooth. This step is crucial for that authentic cannoli texture—without it, the filling can become watery or lumpy between cake layers. For best results, use a fine-mesh sieve lined with cheesecloth and refrigerate uncovered for 12-24 hours.
Can I make this cake ahead of time?
Assemble the cake layers up to 2 days ahead and refrigerate wrapped tightly in plastic. The filling stays fresh for 48 hours if stored separately in an airtight container. For longer storage, freeze the assembled cake (unfrosted) for up to 3 months—thaw overnight in the fridge before serving. The flavors actually deepen with time!
What if my cake layers turn out too dense?
Overmixing the batter or using warm butter are the most common causes. For next time, ensure your butter is cold and cubed, mix the dry ingredients first, and fold just until combined. Also, check your oven temperature—too hot can cause dense layers. If it happens, try this fix: slice the cake horizontally, spread extra ricotta filling between layers, and reassemble.
How do I prevent the filling from leaking out?
Proper assembly is key: chill the cake layers for 30 minutes before adding filling, and use only enough to fill the center (leave that ½-inch border empty). Also, pipe the ricotta in a zigzag pattern for better adhesion. For extra insurance, place the assembled cake on a wire rack over a tray to catch any drips during chilling.
What's the secret to making this taste authentically Italian?
The citrus zest and vanilla bean paste are non-negotiable! Freshly grated lemon and orange zest add that bright Sicilian tang, while Madagascar bourbon vanilla brings depth. For extra authenticity, use whole-milk ricotta from an Italian market and finish with a dusting of powdered sugar—just like they do in Palermo.